


Learn how to use Python to develop an efficient network and port scanning tool for swiftly identifying active devices and open ports, enabling thorough security assessments and effective risk mitigation measures.
With the proliferation of cyber threats and attacks, safeguarding network infrastructure against unauthorised access, data breaches, and service disruptions is a critical concern for organisations and individuals alike. Network and port scanning are therefore indispensable tools in the arsenal of cybersecurity professionals.
Network scanning, the process of systematically probing a network to identify active devices and their attributes, serves as the foundation for understanding network topology and architecture. By comprehensively mapping out the network infrastructure, security administrators gain insights into the layout of devices, their interconnections, and potential vulnerabilities. This helps to implement robust security measures to fortify the network against intrusions and exploits.
Port scanning, a technique that complements network scanning, focuses on scrutinising the status and accessibility of communication ports on networked devices. Ports act as gateways for data transmission, facilitating the exchange of information between applications and services. Through port scanning, security professionals can ascertain the availability of open ports, which signify operational services, as well as closed or filtered ports, which may indicate security controls or inactive services. By meticulously analysing port configurations and identifying anomalies, organisations can bolster their defence mechanisms and thwart malicious activities aimed at exploiting vulnerable services.
The synergy between network and port scanning is instrumental in conducting comprehensive security assessments, vulnerability analyses, and penetration testing exercises. By leveraging these techniques, cybersecurity professionals can proactively detect and remediate weaknesses in network infrastructure, thereby mitigating the risk of cyberattacks and ensuring the integrity, confidentiality, and availability of critical assets and resources.
In essence, network and port scanning serve as indispensable components of proactive cybersecurity strategies, enabling organisations to fortify their defences, pre-emptively address vulnerabilities, and uphold the resilience of their digital ecosystems in the face of evolving threats and adversaries.
Despite the critical importance of network and port scanning in cybersecurity, existing tools often lack efficiency, accuracy, and user-friendliness. Current solutions may struggle to provide comprehensive insights into network topology and port configurations, hindering effective security assessments and vulnerability analyses. Addressing these limitations, let’s develop a sophisticated network and port scanning tool that overcomes existing challenges, enabling cybersecurity professionals to identify active devices and open ports swiftly and accurately, thereby enhancing network security and resilience against evolving cyber threats.
Getting started
Here are the steps that will help us to get started.
- Install scapy library.
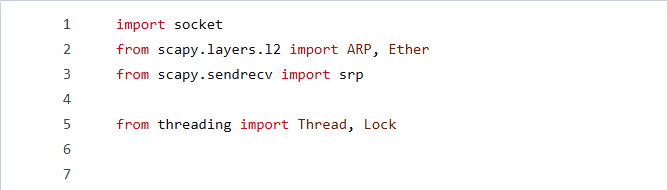
- Import the necessary modules — socket, scapy, thread, lock.
- Define function: scanHost(ip, startPort, endPort) – Scan TCP ports on a single host within a specified range.
- Define function: scanRange(ip, startPort, endPort) – Scan TCP ports on all hosts within a network.
- Define function: tcpScan(ip, startPort, endPort) – Scan TCP ports on a specific IP address.
- Define function: network_scan(target_ip) – Scan devices in a network using ARP.
- Use socket to create TCP connections to each port within the specified range.
- Print open ports if the connection is successful.
- Use scapy to create ARP packets and send them to discover devices in the network.
- Extract IP and MAC addresses from the responses.
- Print the discovered devices.
- Test the script with various inputs to ensure it behaves as expected.
- Optimise the script for efficiency and usability.
To begin with we would need Python version 3.x and any Python-compatible IDE (e.g., PyCharm, VSCode). A Python-based network and port scanner uses modules like scapy and socket to identify active hosts and open ports within a network.
- Next, load the following libraries:
- library(scapy): This is used for interacting with the packets on the network.
- library(socket): This establishes network connections over various network protocols such as TCP or UDP to send and receive data.
Defining function scanHost() and scanRange()
The code initialises a print lock `print_lock = Lock()` to synchronise the console output. This is utilised in critical sections to ensure orderly printing when multiple threads are involved, and prevents potential issues with concurrent printing during TCP port scanning.
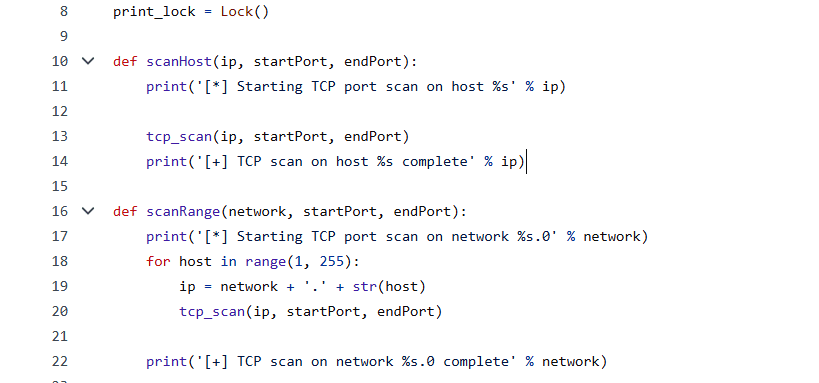
scanHost(ip, startPort, endPort): This function initiates a TCP port scan on a single host identified by the IP parameter. It iterates through the range of ports from startPort to endPort and calls the tcp_scan function to perform the scan. It prints messages indicating the start and completion of the scan for that host.
scanRange(network, startPort, endPort): This function conducts TCP port scanning on a range of hosts within a network. It iterates through host addresses in the network range (e.g., “192.168.1.1”, “192.168.1.2”, etc), calling tcp_scan for each host within the specified port range. It prints a message indicating the start of the scan on the network. Figure 2 depicts the enhanced functionality with scanHost() and scanRange().
Defining function tcp_scan()
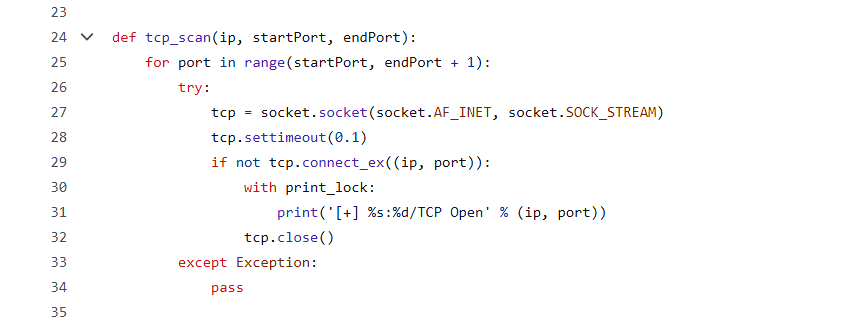
Loop through port range: It iterates through each port in the specified range.
Attempt connection: For each port, it attempts to establish a TCP connection with a timeout of 0.1 seconds.
Check connection status: If the connection attempt is successful (i.e., the port is open), it prints a message indicating an open TCP port.
Close socket: It closes the TCP socket after printing the message.
Exception handling: It includes exception handling to catch any errors during the connection attempt, passing over them without taking action. Figure 3 introduces the tcp_scan() function for comprehensive network analysis.
Defining function network_scan()
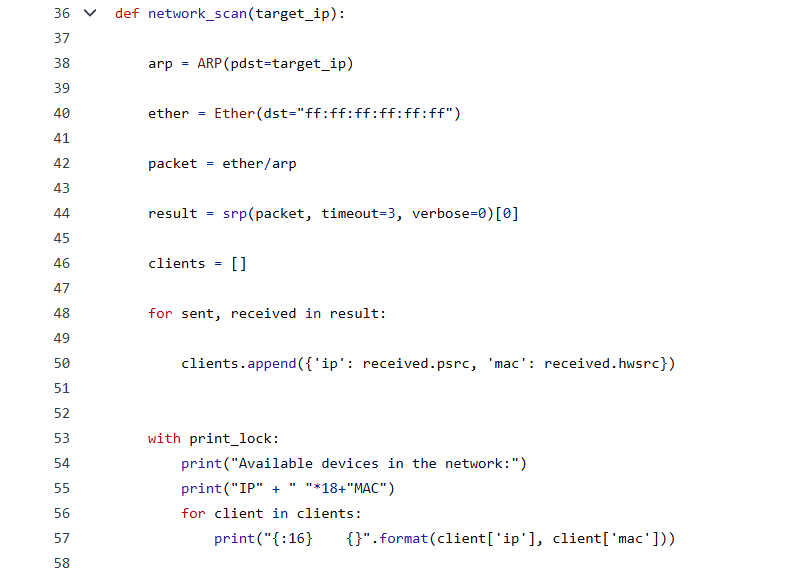
ARP packet creation: Creates an ARP packet with the target IP address (target_ip). Creates an Ethernet frame with the destination MAC address set to broadcast.
Sending and receiving packets: Sends the packet with a timeout of 3 seconds. Captures the response containing IP and MAC addresses.
Extracting information: Iterates over responses, extracting IP and MAC addresses into a list of dictionaries.
Printing results: Prints available devices in the network with their IP and MAC addresses in a formatted table. Figure 4 streamlines the network evaluation with network_scan() function.
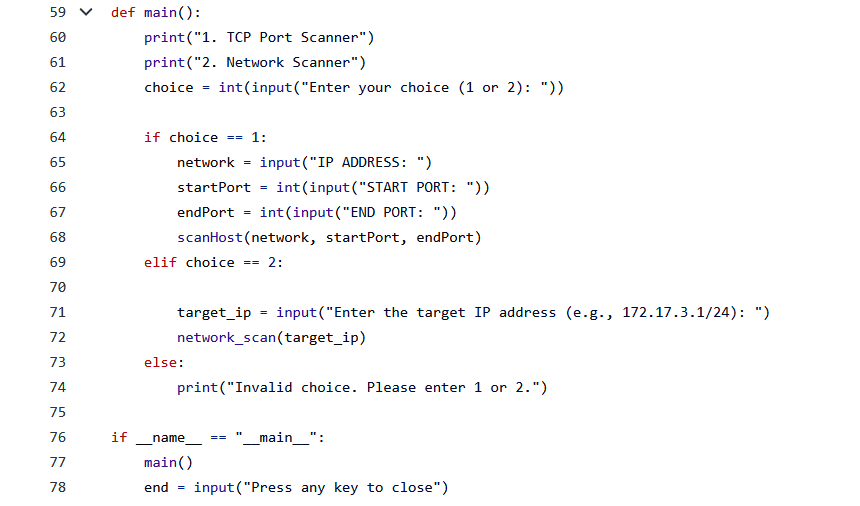
Defining the main() function
Display options: It prints the available options: ‘1. TCP Port Scanner’ and ‘2. Network Scanner’.
Get user input: It prompts the user to enter their choice (either 1 or 2) using the input() function, and converts the input to an integer.
Handle user choice: If the user chooses option 1 (TCP Port Scanner), it prompts for an IP address, start port, and end port; it then calls the scanHost() function to perform a TCP port scan on the specified host within the specified port range.
If the user chooses option 2 (Network Scanner), it prompts for a target IP address (e.g., ‘172.17.3.1/24’) and calls the network_scan() function to perform a network scan.
If the user enters an invalid choice, it prints a message indicating so.
Execution: If this script is executed directly (i.e., __name__ == “__main__”), it calls the main() function to start the program. After the user selects an option and the scanning is complete, it prompts the user to press any key to close the program. Figure 5 defines the function main() coded with a menu driven model.
Result and output
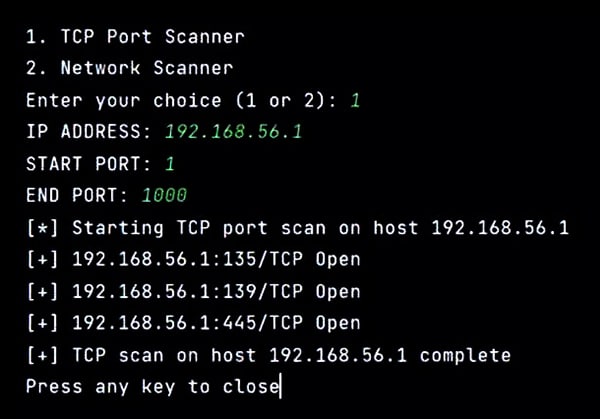
Figure 6 shows the output of the TCP Port Scanner with range 1 to 1000.
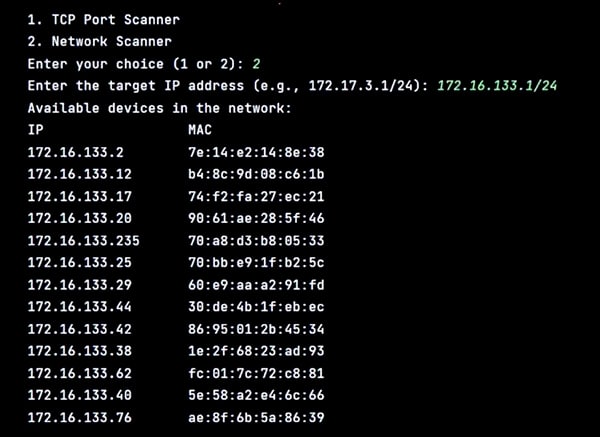
Figure 7 depicts the Network Scanner capturing the available devices in the network.
In conclusion, the creation of a network and port scanner using Python represents a significant advancement in the realm of network security and management. Such tools are indispensable for network administrators and security professionals, providing them with the means to thoroughly analyse the state of their networks. The use of Python allows rapid development and easy integration with existing systems and tools, making the scanners accessible to a wide range of users.
Furthermore, the incorporation of libraries such as `socket` and `scapy` enhances the functionality and effectiveness of the scanners. These libraries provide comprehensive capabilities for network communication, packet manipulation, and analysis, enabling thorough examination of network traffic and devices.
The open source nature of this project encourages collaboration and contribution from the cybersecurity community. By sharing code and insights, developers can collectively improve and expand the capabilities of these scanners, ultimately benefiting the entire community.


