


Git is a popular version-controlled tool. However, Git commands have always been confusing, and most users stumble over the terminologies. After diving deep into its internals in this tutorial, you will be able to use commands like git commit, git cherry-pick, etc, with a new perspective.
Git can maintain multiple versions of a file since it stores them all in its database. It creates a new database for each Git repository, which is present in the .git folder.
Let’s create a new repository as git_tutorial_dir. A repository isn’t a Git repository until we initialise it. To initialise a repository, the git init command is used. This command creates a Git database in the repository.
→ Downloads mkdir git_tutorial_dir
→ Downloads cd git_tutorial_dir
→ git_tutorial_dir ls
→ git_tutorial_dir ls -a
. ..
→ git_tutorial_dir git init
Initialized empty Git repository in /Downloads/git_tutorial_dir/.git/
→ git_tutorial_dir git:(main) ls -a
. .. .git
→ git_tutorial_dir git:(main)
To understand Git, let’s understand Git objects first.
Git objects
Every file or directory is stored as an object in Git. It stores these Git objects as a key value pair, where the key is the object ID and value is the object. Let’s understand each of these objects in detail.
Blobs: For each file in a repository, Git creates a blob object. Blob objects contain each line present in a file. The only difference between a blob object and a file is that unlike the latter, a blob does not store, create and update the time stamp.
The object ID of a blob object is a SHA-1 hash value. This hash value is unique among all the objects created in the repository. It is a checksum of the content stored in the file plus a header. The first two characters of the object ID are used as a directory and the remaining 38 characters are used as a file name. There can be at the most 256 directories present in the .git/objects folder. This is done to quickly do a binary search for any object whenever required.
git_tutorial_dir git:(main) ls
git_tutorial_dir git:(main) touch file1.txt
git_tutorial_dir git:(main) x echo “Adding first line to file1” > file1.txt
git_tutorial_dir git:(main) x cd .git/objects
objects git: (main) tree
|
|---info
|__pack
3 directories, 0 files
objects git:(main)
Here I have created a new file as file1.txt and added some content to it. But when I checked the Git objects folder nothing was present in it.
git_tutorial_dir git:(main) × git add file1.txt
git_tutorial_dir git:(main) x
git_tutorial_dir git:(main) x cd .git/objects
objects git: (main) tree
.
|_ec
|__ 7ff284664263109178b5ea42eadfef0fa8e8e2
|__info
|__pack
4 directories, 1 file
objects git: (main)
When I did git add, a new object was created. As described above, the first two characters are used as the directory and the rest as file names. To check for the content and type of object, there is a simple command – git cat-file.
objects git: (main) git cat-file -t ec7ff284664263109178b5ea42eadfef0fa8e8e2
blob
objects git:(main) git cat-file -s ec7ff284664263109178b5ea42eadfef0fa8e8e2
27
objects git: (main) git cat-file -p ec7ff284664263109178b5ea42eadfef0fa8e8e2
Adding first line to file1
objects git: (main)
Here we can see that a blob object has been created for file1.txt. The size of this object is 27 bytes, and the content is ‘Adding first line to file1’ which is the same as what we added in the file.
Trees: For each directory in a repository, Git maintains a tree. This tree contains blob objects for all the files present in that directory. Since a directory can have multiple sub-directories inside it, a tree can also have multiple trees representing each sub-directory. The object ID of the tree object is also a SHA-1 hash value. A root tree represents a Git repository only; therefore, a root tree contains all the content of the Git repository.
As shown in Figure 1, I have committed the changes added in the previous section. Due to this a new object for tree and commit are also created.
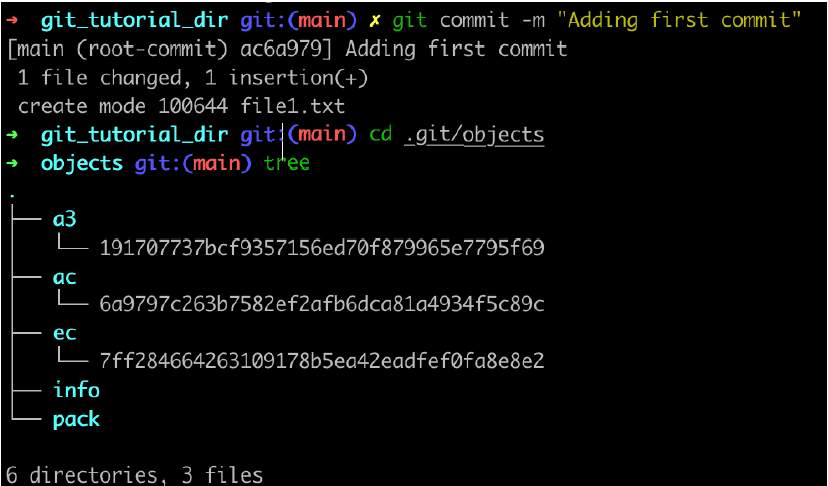
objects git:(main) git cat-file -t a3191707737bcf9357156ed70f879965e7795+69
tree
objects git:(main) git cat-file -p a3191707737bcf9357156ed70f879965e7795f69
100644 blob ec7ff284664263109178b5ea42eadfef0fa8e8e2 file1.txt
Here I have checked the content of the tree object. This tree is a root tree of the repository as of now. As shown, a tree contains a reference for the file1.txt blob object. If there are more directories in the repository, the tree will store the references to trees created for those sub-directories.
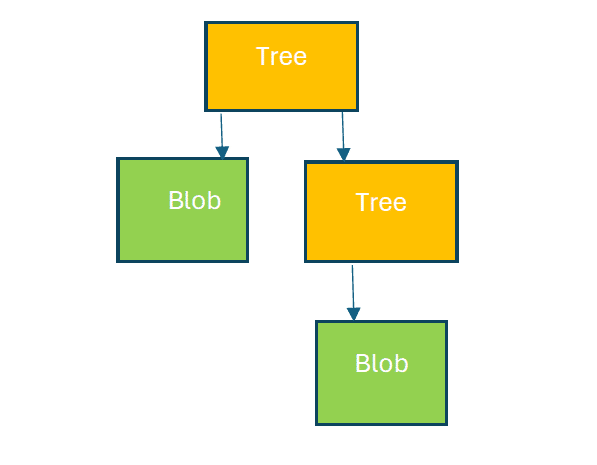
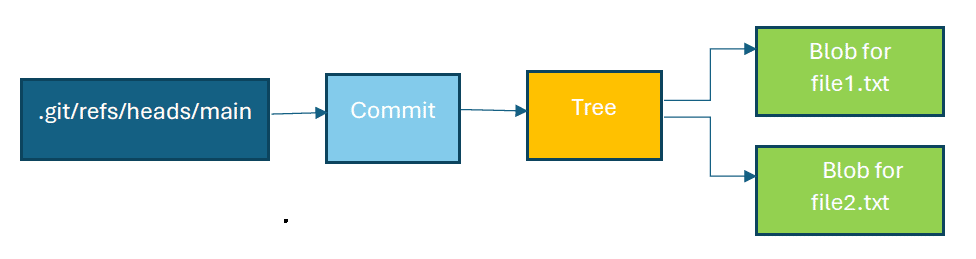
Figure 2 shows how tree and blob objects are related.
Commit: The third object created along with blob and tree objects is a commit. A commit is a snapshot of time. It stores the object ID of the root tree only. Along with that it contains details such as the committer name, time stamp of commit, parent commit, and more. Its object ID is also a SHA-1 hash value.
→ objects git: (main) git cat-file -t ac6a9797c263b7582ef2afb6dca81a4934f5c89c
commit
→ objects git: (main) git cat-file -p ac6a9797c263b7582ef2afb6dca81a4934f5c89c
tree a3191707737bcf9357156ed70f879965e7795f69
author Anchal Agarwal 1705342062 +0530
committer Anchal Agarwal 1705342062 +0530
Adding first commit
→ objects git: (main)
The code given above shows the content of a commit. It can be seen that it only contains SHA-1 of the current root working tree. To find any file or directory, it will start searching from root tree only.
You may wonder that since each commit contains a reference for the whole repository, does it create a new blob or tree object for each file and directory present in the repository?
To answer this question, I added a new file as file2.txt in the repository. The commit message I gave is ‘Adding second commit’. The current Git history looks like what’s given below:
commit bfbb79d72518aebdd5e7df7425bdcefc16e62552 (HEAD -> main)
Author: Anchal Agarwal
Date: Wed Jan 17 08:13:03 2024 +0530
Adding second commit
commit ac6a9797c263b7582ef2afb6dca81a4934f5c89c
Author: Anchal Agarwal
Date: Mon Jan 15 23:37:42 2024 +0530
Adding first commit
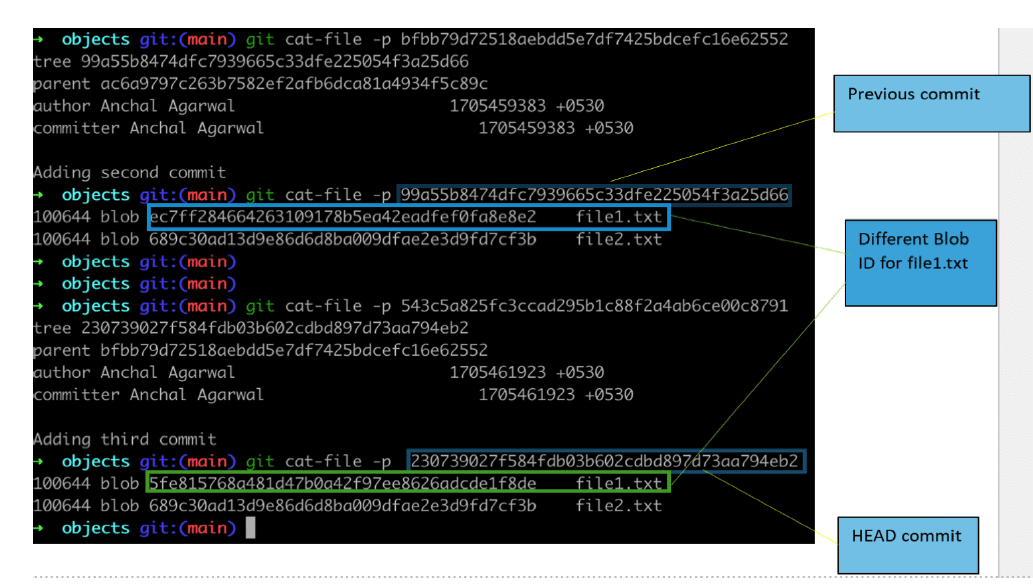
Figure 4 shows the content of the new commit and its root tree object ID. If we print the content of the tree, we can see a new blob object has been created for file2.txt.

Let’s create one more commit. This time I have edited file1.txt and committed the changes with the message ‘Adding third commit’. The new commit ID is 543c5a825fc3ccad295b1c88f2a4ab6ce00c8791. The head is also changed and now points to the new commit ID.
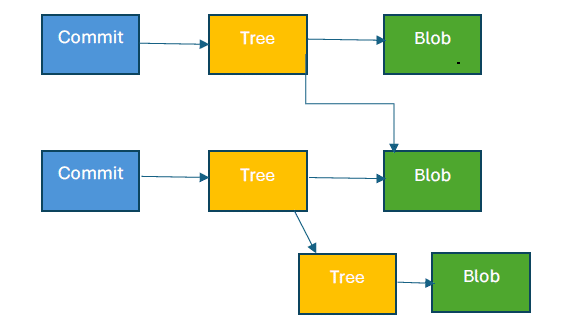
The tree created for the new commit will look like what’s shown in Figure 5.
Do observe the difference between both commit trees — only the blob object ID of file1.txt has changed and file2.txt refers to the same blob object. This is because nothing has been changed in file2.txt since the last commit. Therefore, we can conclude that a new blob or tree object is only created when the respective file or directory content changes. This strategy helps Git to store all the data.
Git branches
While working with Git, you may have also come across branches. We create a branch wherever we want to work on different tasks in the same repository. A branch in Git is just a file pointing to a commit object ID. Yes, that’s it. It stores nothing else.
The location where all branches are present is the .git/refs/heads/ folder. Creating a new branch is equal to adding a new file in this folder with a commit ID.
If you are following this tutorial from the beginning, then you should have only one branch as main. Also, if we check the heads folder, it only contains the main file right now.
Now add a new branch by creating a new file in this folder called branch2. Since I wanted this branch to point to the second commit ID, I have added a second commit ID in this file.
→ heads git:(main) echo “bfbb79d72518aebdd5e7df7425bdcefc16e62552” > branch2
→ heads git: (main) ls
branch2 main
-> heads git: (main) cat branch2
bfbb79d72518aebdd5e7df7425bdcefc16e62552
→ heads git:(main)
If we check the git log history, a new branch as branch2 has been created and points to the second commit.
If we enter git branch, we will be able to see two branches now.
If you see the git log, you will see a HEAD pointer to a branch. This HEAD pointer records the current branch of the repository. HEAD is a file present in the .git folder of a repository. In our case it is pointing to the main branch.
→ .git git: (main) cat HEAD
ref: refs/heads/main
→ .git git: (main)
The HEAD pointer changes whenever we do git checkout to another branch. You can change the HEAD pointer manually by changing the HEAD file.
Figure 7 shows changes made to update the HEAD file to point to branch2.
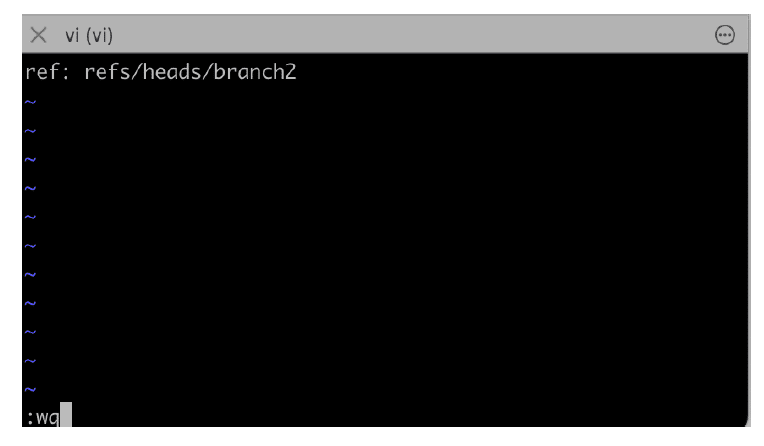
If you now check the git log, you will find the head points to branch2.
How git cherry-pick works
git cherry-pick is a very popular and strong command. If you are not aware of this command, you can read about it from the official documentation of Git.
Just to give a brief explanation, if we have branch A and branch B and want to apply changes done in a certain commit of branch A to branch B, we need to just copy the commit object ID from branch A and do git cherry-pick over branch B.
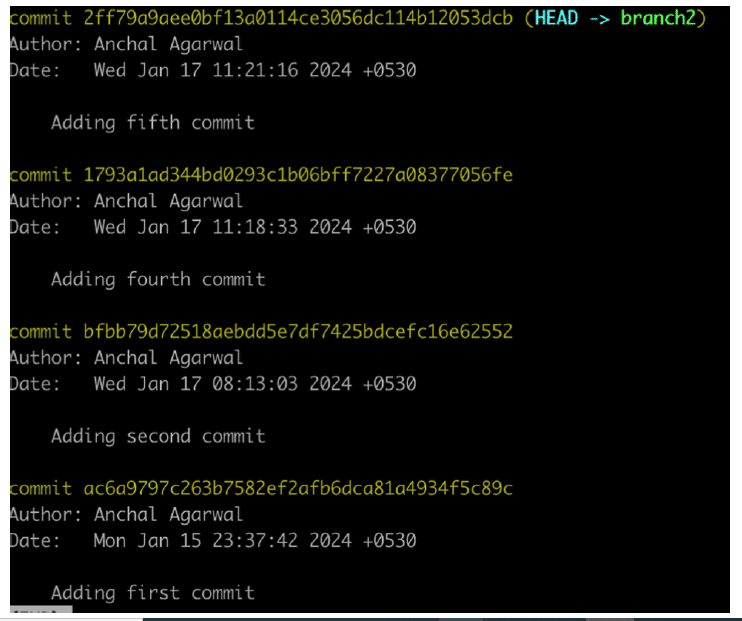
I am currently on ‘branch2’, I will create two more commits. In the fourth commit, I will create a new sub-directory and add a file to it. In the fifth commit, I will just edit the file2.txt we created earlier.
Figure 8 shows the output of the git log of branch2 after these changes.
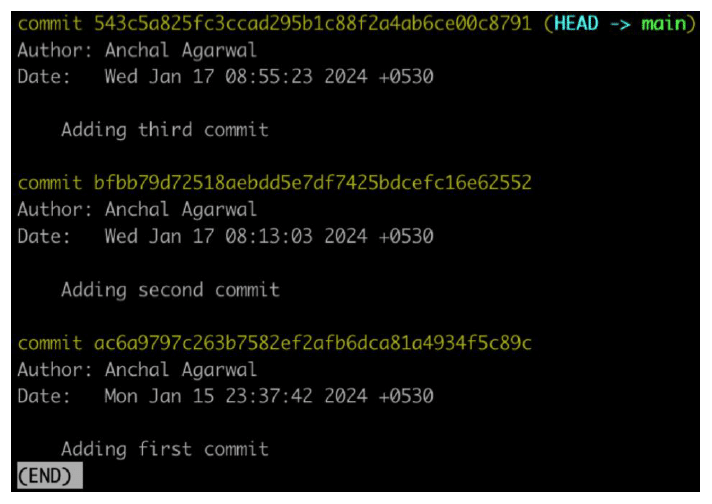
Now I only want the changes made in the fifth commit to be copied to the main branch. So I will copy its commit ID, checkout to main branch and give the git cherry-pick command.
Figure 9 shows the output of the git log of the main branch before the command is given.
This is what the output will look like after the git cherry-pick command is executed in the main branch:
→ git_tutorial_dir git:(branch2) git checkout main
Switched to branch ‘main’
→ git_tutorial_dir git:(main) cat file2.txt
I am creating a file2
→ git_tutorial_dir git:(main) git cherry-pick 2ff79a9aee0bf13a0114ce3056dc114b12053dcb
[main ba3fe0a] Adding fifth commit
Date: Wed Jan 17 11:21:16 2024 +0530
1 file changed, 1 insertion(+)
→ git_tutorial_dir git:(main) cat file2.txt
I am creating a file2

I am learning git
Here you can see that the content of file2.txt changed after the git cherry-pick command ran.
Let’s see our current directory after giving the git cherry-pick command:
→ git_tutorial_dir git:(main) ls
file1.txt file2.txt
→ git_tutorial_dir git:(main)
If you observe carefully, the sub-directory that I created in the fourth commit is not copied. This is because git cherry-pick compares the diff of commit to copy with the current head commit and only makes the changes that are not there. Here it saw that file2.txt has some lines which were not present in the third commit and copied these. Since the directory was not created in the fifth commit, it did not copy those changes.
Using Git logs for data recovery
Git records all our actions. Therefore, if by mistake we lose work done in a commit, we can always recover that. This happens generally when we delete a branch initially and want that back or when we accidentally hard reset a branch. Here is an example in which we first hard reset a branch and then recover a lost commit.
I am on the ‘main’ branch and currently it is at ‘ba3fe0a6fe2c’.
→ git_tutorial_dir git:(main) cat .git/refs/heads/main
ba3fe0a6fe2c3e0469a0c7ee2621b2ec1778fcb5
→ git_tutorial_dir git:(main)
Now I do a hard reset for this branch to some previous commit.
→ git_tutorial_dir git:(main) git reset --hard bfbb79d72518aebdd5e7df7425bdcefc16e62552
HEAD is now at bfbb79d Adding second commit
→ git_tutorial_dir git:(main) cat .git/refs/heads/main
bfbb79d72518aebdd5e7df7425bdcefc16e62552
→ git_tutorial_dir git:(main)
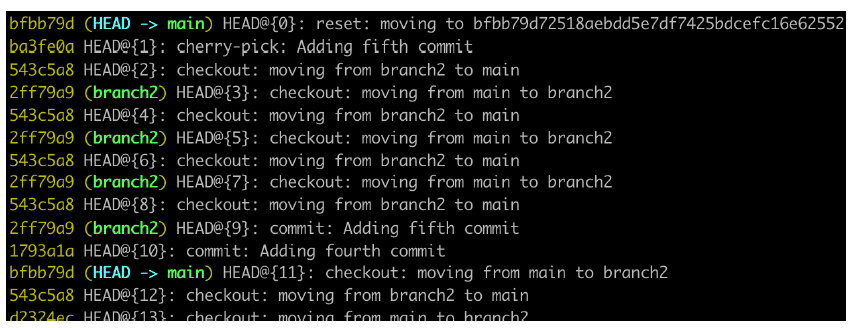
Effectively, I have now lost all top commits, and have no branch containing those commits. A quick way to find older commits is to use the git reflog command. Git records all our actions in the .git/logs directory. git reflog uses this log folder only to display the history of the repository.
Figure 10 shows the output of git reflog. We can clearly see that our head was previously at ba3fe0a and we have reset the main branch to bfbb79d72. So now we can create a separate branch with the original commit (ba3fe0a).
In case I have lost commit and don’t have any reflogs as well to rely on, we can always check for dangling commits (commits that are not part of any branch) using the git fsck command.
In this article we have covered Git objects and how they are used by Git to manage different versions of our repository. We also touched upon topics like how Git creates different branches and maintains the HEAD pointer, learnt about the internal workings of the git cherry-pick command and used Git logs to recover commits that get lost accidentally. Hope this article works as a good starting point for those who want to deepen their understanding of Git.


