An article for the programmers who would like to explore JavaScript Build Tools. This article is a transcript of a talk session by the author during Open Source India 2019 at NIMHANS Convention centre, Bengaluru.
As a programmer of any language you would be aware about how to build and package your code to put it into production. Suppose if you are using Java, you would package it as a war file. But what if you are using JavaScript. Here we are going to read about Build Tools that you would need for JavaScript.
In JavaScript, while building an application, you do code separation in different folders. For example an ecommerce website, you put cart related stuff in one cart folder and then put other files like CSS, HTML or JavaScript files in separate folders and as a result you will have a lot of folders. For maintainability purposes, it is good in the long run. But if you want to run that and put it in production without build tools/processing, then you will be serving all those files to the browsers at the run time for different folders leading to time delay. If a user is visiting a lot of pages, then all the files will take a long time to load in the browser.
So, what build tools does is to take all those folders and convert it into single files for CSS, JavaScript and images or makes chunks of code based on your load space requirement.

Figure 1: Build Process
That way we can load those chunks of code based on needs at a particular time. Build tools nowadays are sophisticated enough that we don’t need to do any manual intervention.
Conceptual understanding of each build process step
Below are the main steps that one needs for most of the web applications and build tools help us do this without manual intervention.
● Minification: It refers to reducing your lines of code. Let’s say for the sake of developer-friendly purposes, you have added comments for each section of the code. And for code readability purposes, you have included lots of tabs and spaces, which increases the file size. So, at build time all these will be removed. This will make the size small and we will be able to load it faster in a browser.
● Asset optimization: This is related to images or videos on your website. High-resolution images are often loaded on a desktop or a laptop. But while loading it in mobile, high resolution is not required. You can do with the minimal version of that image so that it loads faster. These optimisations can be run from build tools.
● Pre-processing (CSS): Nowadays, people don’t prefer to directly write CSS. SASS, LESS, Dev, view and modular way of writing CSS. Conversion from SASSs to CSS is done by build tools.
● Linting: It is to keep the sanity of your code before checking it into your repository.
● Duplication: Suppose you are taking a certain library and using it. They have their own dependencies which you are using in your application also. So if you use that library and the library production build also has a copy, these two will increase your final buildup file size. So here, duplication will remove the copy of the particular libraries and make a single copy.
● Tree shaking: It analyses your entire codebase and removes the codes, functions which are not useful.
● Transpilers: This is specific to any flavour of JavaScript. If you are using TypeScript or CoffeeScript, then transpilers will convert it into JavaScript.
● Compression: If you have a lot of resources to load and want to make it faster so that it is easy to load, then you can compress the files and uncompress on the browser side.
● Polyfills: It serves the purpose of solving browser incompatibility issues.
● Documentation: This will generate documentation for the developer or engineering team. It will not go into production.
Wide variety
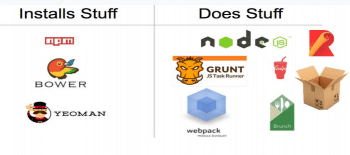
There are many popular build tools out there such as Node, Yarn, Yeoman, Gulp, Webpack, Parcel, Babel, NPM, Bower, Grunt, Browserify, Brunch, Rollup and Microbundle.
So how to use which one? To overcome this problem, it is important to keep in mind what each build tool does, whether it is involved in “installing stuff” or “doing stuff”. That stuff can be bundling, tree shaking, task running, starting a dev server etc.
Majorly, NPM, Bower, Yeoman and Yarn come under the “install” category.

Nowadays, you can do “doing stuff” within the “installing stuff”.
Some examples of “doing stuff” are:
● Replacing a string of text in a file.
● Creating folders and moving files into those folders.
● Running unit tests with a single command.
● Refreshing the browser when saving a file.
● Combining all JavaScript files into one and all CSS files into one.
● Minifying concatenated JavaScript and CSS files.
● Modifying the placement of <script>tags on an HTML page.
All build tools are powered by Node and NPM. They are like the basic building block. You can install and run anything on top of them.
Production-ready version of an app
A final build is a production ready code of your application

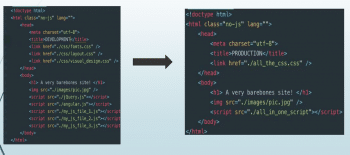
Figure 3 is an HTML example that loads in a browser. If you don’t use any build tools, then all files on the left need to be loaded. Based on file size and network speed, it takes a lot of time to render.
With the help of build tools, the file (on the left) is combined into a single, compressed file (on the right) and loaded. That way readability is improved and load time becomes faster.
Some additional points
However, the lines between “install” and “do” can be blurry. NPM is nowadays used for installation purposes. You can also write the script in JavaScript and run as part of the NPM command line. There is no right combination of tools.
All build tools have the same goal, which is to make our life easier and less headache while building. So, instead of waiting for production, one can test the performance in the development time.
You don’t need to learn entirely about the build tools. Whenever you require, only that much you can learn. You don’t need to be an expert in plug-ins, modules and learn how to write a config file. Most of the tools automatically do that.
Build tools took off when NPM and Node.js came into the picture. When Grunt and Bower came, that disappeared. Later, Gulp came which was better than Grunt and currently, Webpack is ruling all the frameworks. But still, Gulp and Grunt are useful.
Since 2017, Rollup and Parcel have been gradually taking the lead. They are similar to Webpack, but do automatic configurations.
Most common build tools
● Grunt: It is a JavaScript-based command line build tool that allows developers to automate all boring and repetitive processes. There are lots of plugins for all the build processes such as minification, compilation, unit testing, linting etc. Based on previous task results, you can configure them. Performance-wise, it’s good. It has a lot of community support.
● Gulp: It defines tasks as JavaScript functions instead of configuration objects and runs time-consuming tasks. It was made with code-over-configuration priority. Browserify is another build tool that merges all the HTML files with CSS files. On top of it, Gulp runs the tasks. It has a lot of plugins using which the code can be modified.
● Webpack: It is a build tool that is built on four main concepts: Entry, Output, Plugins and Loaders. Webpack has a flexible configuration. You just need to write a few lines of the config file and it works. Webpack introduced code-splitting and tree-shaking; features that were not present in the earlier released Gulp or Grunt. That way, Webpack made a huge difference, thus making it popular.
● Rollup.js: Rollup provides a much simpler configuration as compared to Webpack and has a host of pre-configured plugins that are easy to incorporate into your project. Rollup is different from all others in the sense that it doesn’t use AMD (Asynchronous Module Definition). It directly analyses your code and loads up. Rollup works with CommonJS along with ES6. You don’t require any extra plugins to achieve that (in contrast to Webpack).
● Parcel: It is blazing fast. This is the first build tool that uses parallelism by using service workers to do a parallel build-up of your application. Any file it comes across is cached and used for the next build. At first, Parcel will be slow but gradually becomes faster. If your system is multicore, then it uses service workers to faster build processes. Tree shaking was not supported earlier but it has recently been added. You don’t need to add any config.js file. Just go to your application folder and just run Parcel and the name of the file.
It automatically figures out your whole application code and assets. Caching and multi-parallelism bring speed. You don’t need config files to achieve all that.
These tools are applicable to any JavaScript and any front-end application. It is common for all applications whether they are enterprise type big applications or small applications like your projects.
What happens in popular frameworks
Nowadays we use Angular CLI to build and start the server. The Angular CLI abstracts a lot of things, from the way you create a new Angular project to generating production build. It setups all the necessary configurations for each tool used for bundling, linting, testing. It allows you to generate code, extracts your i18n strings, handles update and migration.
Angular CLI has 5 concepts in project setup
● Workspace: Your project folders.
● Schematics: Defines your Angular structure with respect to the availability of build configurations, when to run and so on.
● Architects: It is the library built by Angular.
● Builders
● angular.json
Schematics also has the task of joining builders and architects.
If you want some tasks to be run as part of your Angular CLI command, then you can define your schematic using angular.json to execute that and you can bind that to your Angular project which will run well.
In conclusion, there is no right tool to do a particular task. It depends on your application, project size and how frequently you are running a task. So if you are starting from scratch, then try Parcel.
This article is based on a talk session by the author during Open Source India 2019 at NIMHANS Convention centre, Bengaluru
Note: The talk session has been transcribed by Vinay Prabhakar Minj of EFY editorial team.


