Taiko is a free and open source browser automation tool built from the ground up to make browser automation reliable. It is a node library to automate Chromium based browsers like Google Chrome, Microsoft Edge and Opera, using JavaScript. Its simple API, smart selectors and implicit waits make tests highly readable and maintainable. Taiko uses Chrome DevTools to automate Chromium.
UI testing is critical to find out if the application under test is of the best possible quality, mimicking the actual user interactions. This means that the tests open a browser and interact with the application, in the same manner that an actual user would. Having said that, we need to be very cautious while writing such test suites, because they have a reputation of failing for reasons that may not be entirely related to functionality. This means you will often hear comments like those represented in Figure 1.
Teams end up with ‘flaky test suites’ and they lose confidence in the automated suites. This results in the team ignoring failed tests, in order to pass quality tests. This happens often, resulting in dangerous quality compromises for your application.
Surely, there is a better way to make testing more reliable.
Installing Taiko
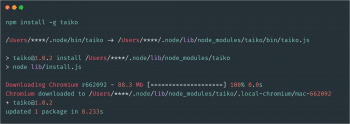
Installing Taiko is really simple. It is available in the npm registry.
When Taiko gets installed, it downloads the Chromium browser. This eliminates one of the biggest hassles of browser automation. There are no drivers, build tools or linking to a browser executable. You can start writing tests right after installation.
Taiko has a basic runner to run test scripts, and also integrates easily with other test runners like Gauge, Jest or Mocha.
Taiko controls Chromium browsers by sending commands over the Chrome DevTools protocol. The DevTools protocol is a low-level API to interact with Chromium via WebSockets. For example, here’s a script for reading the URL of the page currently displayed on Chromium.
const devtools = new WebSocket(
'ws://localhost:9222/devtools/page/69990451-aaab-4ef8-87b1-ea77b8101b2a'
);
devtools.onopen = function() {console.log('websocket is connected ...');
ws.send('{"id":1,"method":"Page.enable","params":{}}', err => {
if (err) {
console.log(err);
} else {
ws.send(
'{"id":2,"method":"Page.navigate","params":{"url":"https://taiko.gauge.org/"}}'
);
}
});
};

devtools.onmessage = ({ data }) => {
const {
result: {
result: { value }
}
} = JSON.parse(data);
console.log('WebSocket Message Received: ', value);
if (response.id == 3) {
const buffer = new Buffer(response.result.data, 'base64');
fs.writeFile('./screenshots/ws_screenshot.png', buffer, function(err) {
if (err) {
return console.log(err);
}
console.log('The ScreenShot is Captured');
ws.close();
});
}
};

devtools.send(
JSON.stringify({
id: 1,
method: 'Runtime.evaluate',
params: {
expression: `'The current URL is: ' + location.href`
}
})
);

devTools.send('{"id":3,"method":"Page.captureScreenshot","params":{}}', err => {
if (err) {
console.log(err);
}
});
Even though the plain DevTools protocol APIs are powerful, they are also verbose, and hard to write and maintain. Taiko provides a simpler user interaction based API to automate the browser. Let’s look at how Taiko simplifies the above code snippet.
const { openBrowser, goto, screenshot,currentUrl, closeBrowser } = require('taiko');
(async () => {
try {
await openBrowser();
await goto('https://taiko.gauge.org/');
await currentUrl();
await screenshot();
} catch (error) {
console.error(error);
} finally {
await closeBrowser();
}
})();
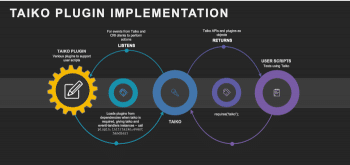
To see how Taiko fits in your test setup, let’s look at its high-level layers first (please refer to Figure 3).
Using Taiko’s superpowers to create reliable tests
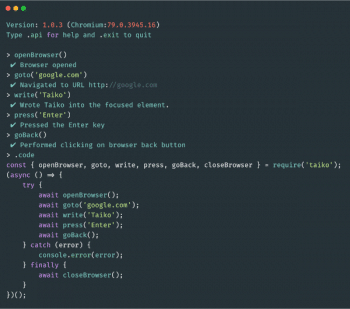
Interactive REPL (read-eval-print loop) creates clean code. Taiko has an interactive REPL to record tests and generate clean JavaScript code.
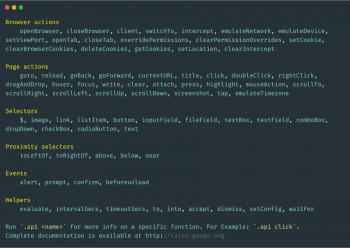
To launch the REPL, type taiko in your favourite command line. The REPL is now ready to accept Taiko’s API as commands for controlling the browser. To see the list of commands, just type ‘.api’.

Explicit waits become obsolete
Taiko’s API understands actions that trigger HTTP or HTTPS requests to a Web server, and loads the server response data back into the script or fetches dynamic content. This results in an implicit understanding of when a page is ready, and the user doesn’t have to add explicit waits in between each command and page navigation.
Proximity selectors keep your tests independent of the underlying code. Taiko’s smart selectors help test Web applications without depending on the internal app structure. Taiko works in a complete ‘black box’ way.
await click(link(“Block”, toLeftOf(“name”))
await write(textBox(“first name”, toLeftOf(“last name”, above(“user name”)))
await click(link(“Block”, toRightOf(“name”))
await click(link(“email”, below(“name”))
await click(link(“Block”, near(“name”, {offset:50}))
Other Taiko superpowers
Taiko directly interacts with the browser and can easily use all the latter’s features in tests. These include the Intercept API and mock response, network emulation, geolocation and service workers.
Offline support
Offline support is very critical for certain types of applications. Some features rely on the offline status—for example, if you want a red banner to show up when the application is accessed in offline mode to stop your user from purchasing a product.
This can be tested either by turning off the network or using Chrome DevTools and emulating the offline mode. The same can also be done in Taiko, with ease:
await emulateNetwork(“offline”)
A few other network modes that Taiko supports are GPRS, Regular2G, Good2G, Good3G, Regular3G, Regular4G, DSL, WiFi, Offline.

Geolocation
If you have an application with global users and have a map to show where the user is, you can use Taiko to test this setup with ease.
First, we need to set permission to use geolocation for the specific website:
await overridePermissions('http://maps.google.com',['geolocation']);
Now call the setLocation API with lat, long and accuracy:
await setLocation({ latitude: 27.1752868, longitude: 78.040009, accuracy:20 })
DOM query
Another important API that Taiko provides is the evaluate() function, which lets you execute an arbitrary JavaScript function in the browser so that you can use built-in functions like querySelector() to manipulate the page.
For example, on the Google home page, the search input field has the name ‘q’; so you can use the evaluate() function to target this input and set/change its value.
const { openBrowser, goto, evaluate, closeBrowser } = require('taiko');
(async () => {
try {
await openBrowser();
await goto('google.com');
await evaluate(() => {
document.querySelector('input[name="q"]').value = 'Gauge Taiko';
});
await evaluate(() => {
document.querySelector('input[value="Google Search"]').click();
});
} catch (error) {
console.error(error);
} finally {
await closeBrowser();}})();
Now that the page has the value set, you need to call evaluate() once more to scrape the search results. The function you pass to evaluate(), which is called the pageFunction parameter, can return a value. For example, the getUrls() function in the script shown below returns the contents of all the tags on the Google search results.
const { openBrowser, goto, evaluate, closeBrowser } = require('taiko');
(async () => {
try {
await openBrowser();
await goto('google.com');
// Type "JavaScript" into the search bar
await evaluate(() => {
document.querySelector('input[name="q"]').value = 'Gauge Taiko';
});

await evaluate(() => {
document.querySelector('input[value="Google Search"]').click();
});

// Get all the search result URLs
const links = await evaluate(function getUrls() {
return Array.from(document.querySelectorAll('a cite').values()).map(
el => el.innerHTML
);
});
console.log(links);
} catch (error) {
console.error(error);
} finally {
await closeBrowser();
}
})();
Create your own superpowers
Taiko’s features can be extended via plugins, which can allow users to take advantage of the ChromeDevtoolsProtocol with core Taiko concentrating on functionalities around UI automation tests.
One such feature in Chrome DevTools is the performance and the audit protocol for helping developers and testers monitor an application’s performance. This is a good example of a plugin that lets users perform diagnostic actions on the website.

How Taiko plugins work
- Plugin names should have the prefix ‘taiko-’; for example, taiko-taiko-diagnostics, taiko-screencast.
- Plugins should not have Taiko as a dependency; they should use the same instance as the users’ script.
- Plugins should implement the init() method, which will be called by Taiko on load passing and event handler instances.
- Taiko communicates with plugins via events.


For a full list of features and APIs, do check the documentation.
Taiko’s concise API with features like implicit waits and smart selectors make it an ideal choice for creating reliable UI tests. Its use of the Chrome DevTools protocol and its plugin architecture lets users add more superpowers, depending on what their applications need.
For a complete list of features and the full API, please go to taiko.dev.


