This article is a beginner’s tutorial on setting up a virtual machine and performing some basic operations on it.
Many people wish to switch from MS Windows to Linux, but are not sure which Linux distribution is best suited to their needs. So they decide to try out a few of the most popular and user friendly Linux distributions. But wait! Isn’t it a hectic and risky task to install multiple distributions on a single machine? You may lose all your data if you mess with partitions. Not necessarily. It’s risky, only if you are unfamiliar with virtualisation.
Virtualisation allows the running of multiple OSs on the same machine, simultaneously. There are many virtualisation solutions currently available, such as VMware Workstation, Microsoft Hyper-V and Citrix’s Xen, to name a few. However, today we will take a look at an open source virtualisation solution from Oracle called VirtualBox. It is completely free for personal and commercial use.
Benefits of virtualisation
To begin with, let us look at the benefits provided by virtualisation technology.
The capability to run multiple operating systems simultaneously: This feature greatly helps in testing software in multiple operating systems.
Better hardware utilisation: Most of the time, a number of servers in an organisational setup remain underutilised. Virtualisation helps in hardware consolidation which, in turn, improves hardware utilisation.
Easier software shipping: Virtualisation makes software shipping effortless. Without virtualisation one has to go through the complex software installation and configuration process. Virtualisation allows vendors to ship software as pre-configured appliances.
The terminology
Each technology has its own vocabulary and virtualisation is not an exception. Let’s get familiar with a few related important terms.
Host operating system (host OS): This is the OS of the physical computer on which VirtualBox is installed.
Guest operating system (guest OS): This is the OS that is running inside the virtual machine. VirtualBox supports a wide range of guests like Windows, Solaris, Linux, Apple, and so on
Virtual machine (VM): This is the special environment that VirtualBox creates for your guest OS while it is running. All its resources, like the CPU, memory, storage, network devices, etc, are virtual.
Guest additions. These are additional software bundles installed inside a guest to improve its performance and extend its functionality. For instance, these allow us to share folders between the host and guest, and have the drag-and-drop functionality.
Installation
VirtualBox is freely available for personal and commercial use. Visit https://www.virtualbox.org/wiki/Downloads and download it for the Windows platform. At the time of writing this article, the latest version of VirtualBox was 6.0.12.
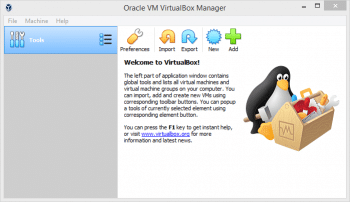
VirtualBox installation on Windows is pretty straightforward, just like any other software. After downloading the installer, just double-click on it and follow the on-screen instructions. If everything goes fine, you should see the window of the VirtualBox manager, as shown in Figure 1.
Basic operations
Now our lab environment is ready. Let us perform some primitive VirtualBox operations like creating a VM, saving it, powering it off, shutting it down and, finally, deleting it.
Creating a VM: A virtual machine is an emulation of a computer system. Just like any other physical system, it has memory, a CPU, a network, storage and other peripheral devices. To create the virtual machine, perform the following tasks in sequence:
a) Launch VirtualBox manager
b) Navigate to Machine->New menu
c) Select the name and operating system
d) Provide memory for the virtual machine
e) Select the ‘Create a virtual hard disk now’ option, as a brand new virtual machine is being created
f) Select VDI as the hard disk file type
g) Select ‘Dynamically allocated’ as the storage option
h) Select the file location and size
i) Click on the Create button
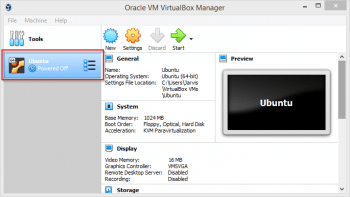
After performing these operations, a new VM will appear in VirtualBox manager as shown in Figure 2.
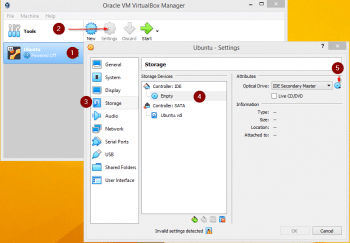
Installing the guest OS: To begin installing the OS, we need to attach an ISO image to the VM. Follow the steps given below to install a guest OS:
a) Select the newly created VM from the previous sequence
b) Click the Settings button on the toolbar
c) Select the storage option from the left pane
d) Select the optical disk drive from the storage devices
e) Provide the path of the ISO image and click the OK button. Figure 3 depicts the first five steps.
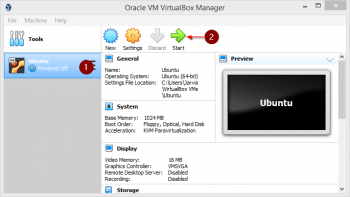
f) Select the VM from the left pane. Click the ‘Start’ button on the toolbar. Follow the on-screen instructions to complete OS installation
VM power actions: VirtualBox supports multiple power actions. Let us understand these in detail.
a) Power on: As the term suggests, this starts the VM. To start, right-click on the VM icon and select the Start option.
b) Power off: This is a non-graceful turn-off operation. It can cause data loss, so be careful. To power off the VM, right-click on the VM icon and select the Close->Power off option.
c) Shutdown: This is a graceful turn-off operation. In this case, the shutdown signal is sent to the guest. To shut down, right-click on the VM icon and select the Close->ACPI Shutdown option.
d) Reset: The Reset option will turn the VM off and on, respectively. It is different from Restart, which is a graceful turn-off operation. To reset the VM, right-click on it and select the Reset option.
e) Pause: In this state, the guest releases the CPU but not the memory. As a result, the contents of the memory are preserved when the VM is resumed. To pause the VM, right-click on it and select the Pause option.
f) Save: This action saves the current state of the VM and releases the CPU as well as the memory. The saved machine can be started again in the same state. To save the VM, right click on it and select the Close->Save State option.
Removing the VM: Let us explore the steps we need to take to remove a VM. The remove operation can be divided into two parts.
a) Unregistering the VM: This removes the VM from the library, i.e., the VM will get unregistered from VirtualBox and so will not be visible in the VirtualBox manager. To unregister a VM:
i) Right-click on VM, and select the Remove option.
ii) Click on the Remove Only option.
Note: To register the VM again, navigate to the Machine->Add option of the VirtualBox manager.
b) Deleting the VM: This action deletes the VM permanently. It will delete the VM configuration files and virtual hard disks. Once performed, this action cannot be undone. To delete the VM permanently, perform the following steps:
i) Right-click on VM and select the Remove option
ii) Click on the Delete all files option
Exporting the appliance: We can export a VM as an appliance in the Open Virtualization Format (OVF). This comes in a two-file format.
a) OVF file format: In this format, several VM related files are generated. For instance, there will be separate files for virtual hard disks, configurations and so on. OVF is a platform-independent, efficient, extensible, and open packaging and distribution format for VMs. As it is platform-independent, it allows the import of OVF virtual machines exported from VirtualBox into VMware Workstation Player and vice versa.
b) OVA file format: In this format, all VM related files are archived into a single file and the .ova extension is assigned to them. By leveraging this feature, we can create a Golden Image of a VM and deploy multiple instances of it.
To export a VM, perform the steps listed below:
a) Select a VM from the VirtualBox manager. Navigate to the File->Export Appliance option
b) Select the VMs to be exported, and click the Next button
c) Provide the directory location and OVF format version
d) Provide the appliance settings and click the Export button
Importing the appliance: We can create a VM by importing an OVF appliance. To import a VM, perform the following steps:
a) Open the VirtualBox manager and navigate to the File->Import Appliance option
b) Select Virtual appliance and click on the Next button
c) Verify the appliance settings and click on the Import button.
After this, the new VM will appear in the VirtualBox manager’s left pane.
In this article for beginners, we have discussed the benefits of virtualisation, and also looked at how some primitive operations can be performed on virtual machines.


