Bonita Studio is the graphics design interface of Bonita Open Solution. With Bonita Studio, one can draw business processes step by step on the whiteboard, using the design and context palettes. The interface has a toolbar, with icons representing shortcuts to features, and functions available for process design and configuration.
Let us first look into what BPMN (Business Process Model and Notation) is and why it matters. BPMN is a standard for business process collaboration and for IT development that is maintained by OMG (Object Management Group), and is also ratified as ISO 19510 compliant. The latest version of it is BPMN 2.0.2, which was published in January 2014. It is a shared common language (used not just for business and IT).
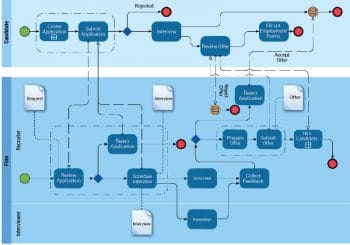
BPM (Business Process Management) is the discipline of managing processes in order to improve business performance outcomes. A business process model is a representation of an organisation’s processes. A model can be analysed and improved.
As mentioned earlier, the N in BPMN stands for ‘notation’ and consists of graphic symbols to represent the action, flow or behaviour of a process.
BPMN provides a notation that can be readily understandable by all users:
- The business analyst who models the process conceptually
- The technical developers responsible for implementing the technology for the process and
- Those who will manage and monitor the process.
BPMS (Business Process Management Suite)
BPMS is an application infrastructure to support BPM projects and programs from process discovery, definition and design, to implementation, monitoring and analysis and through ongoing optimisation. BPM suites are used for the automation of business processes, to optimise business operations and to improve customer experience. BPMS can be integrated with ERP and the core line of business systems, to measure process performance and user productivity.
Some of the BPM suites worth mentioning, which are available as free software (‘free’as in freedom) are featured below.
Bonita Studio CE
Bonita Studio CE is a complete free software solution for business process management and workflow, written in Java and licensed under the GNU General Public License v2. Bonita is available in both 32-bit and 64-bit versions for GNU/Linux, Windows; and in a 64-bit version for Mac platforms. It is the community edition that is libre and free for download. Users can graphically modify business processes using the BPMN standard, and connect the processes to other pieces of the information system to generate autonomous business applications accessible via Web portals, Web forms and mobile devices. Bonita Studio also allows the user to start with processes designed with other standards and technologies such as XPDL or jBPM. It is part of the Bonita application platform with several other components – Bonita BPM Engine, Bonita Portal, Bonita UI Designer and Bonita Continuous Delivery. The latest version of Bonita Studio CE is Bonita 7.8.1 and can be downloaded from https://www.bonitasoft.com/downloads.
Red Hat jBPM
This is a toolkit for building business applications to help automate business processes and decisions. It provides various capabilities that simplify and externalise business logic into reusable assets such as cases, processes, decision tables and more. It has been released under the Apache Software License. More details can be found at https://www.jbpm.org/.
 Modelio
Developed by Modeliosoft, its core is licensed under GPL, while the Modelio Module Runtime is under the Apache Public License. Modelio combines BPMN support and UML support in one tool, with dedicated diagrams to support business process modelling. The Java Designer module uses an RCP/Eclipse-style project file structure, and supports Java code generation and reverse, Javadoc generation and Java automation. Modelio provides an XMI import/export feature that enables you to exchange UML2 models between different tools. With the HTML Publisher module, users can publish their models in HTML format. Modelio provides integrated support of the Jython scripting language, for online requests, small scripts and macro definition. It supports a wide variety of standards including UML2, BPMN2, XMI, MDA, SysML, TOGAF, SoaML and UML Testing Profile. More details can be found at https://www.modelio.org.
Activiti
Activiti is a cross-platform, lightweight Java based workflow engine that can automate processes written in BPMN2.0. Licensed under Apache version 2.0, the software is developed by Alfresco and the Activiti community. Activiti can be downloaded from http://www.activiti.org/.
Getting Started
In this article, we try out Bonita Community Edition on the GNU/Linux platform.
To ensure freedom in software usage, I suggest using any of the fully free distros like Trisquel GNU/Linux, PureOS or Debian GNU/Linux (with only the main repo enabled). Before you download Bonita Studio, make sure that you know whether you are using a 32-bit or 64-bit system, and that you have the appropriate Java version installed. In the case of Linux, to find out whether you are using a 32-bit or 64-bit version, run the following command, which returns either 32 or 64:
getconf LONG_BIT |
In my GNU/Linux system, I downloaded the latest version of Bonita using the following command:
wget -c https://release.ow2.org/bonita/BonitaStudioCommunity-7.8.1-x86_64.run |
You need to change permissions of the downloaded file, which in my case is BonitaStudioCommunity-7.8.1-x86_64.run. To give execute permission for the software, use the following command:
sudo chmod +x BonitaStudioCommunity-7.8.1-x86_64.run |
To start the installation, run the following command from the terminal:
./BonitaStudioCommunity-7.8.1-x86_64.run |
Use sudo if the shell reports permission error. To start Bonita Studio, go to the directory where you installed it, and run the launcher for your operating system, as follows:
./BonitaStudioCommunity64-linux |
In case of any trouble when running Bonita Studio, you might want to take a look at log files. Studio log file can be displayed from Bonita Studio by following the sequence Help > Show Bonita Studio log. If Studio fails to start, you can open the log file manually. The file is named .log and is located in the <studio_folder>/workspace/.metadata folder.

To fix any OutOfMemory error, you need to increase the memory allocated to the JVM that runs Bonita Studio. Edit the *.ini file that corresponds to the executable you used to launch the Studio (e.g., BonitaStudioSubscription64.ini if you run BonitaStudioSubscription64.exe) and modify this line:Xmx512m to -Xmx1024m (or higher). Then restart Bonita Studio.
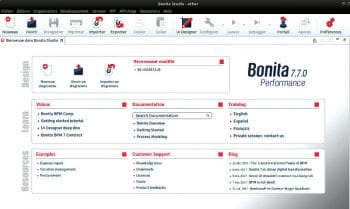
The Welcome page may be blank when you start up Bonita Studio.
To fix this, just install the missing packet libwebkitgtk by running the following command in Ubuntu or Ubuntu based systems like Trisquel; and in Debian or Debian based systems like PureOS:
sudo apt-get install libwebkitgtk-1.0-0 |
Then the Welcome page should look like what’s shown in Figure 2.
Before getting started with drawing graphical business process diagrams with Bonita, let us learn more about BPMN first.
Generally, BPMN is classified into the following four categories:
- Workflow (activities, start and end events, sequence flow, gateways)
- Organising (pools, swim-lanes or lanes)
- Readability (annotations, links)
- Special behaviour (messages, signals, timers, errors, loops, multi-instance)
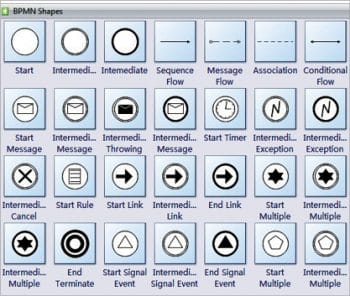
Though graphical representation of BPMN is monochrome, for readability, colours are given. In our examples, Start events are in green, Activities and intermediate events are in blue, Gateways are in yellow, and End events are in red.
Workflow includes activities, gateways, events, and the sequence flow that connects them.
Activities are tasks that are performed in the process – by humans, by automation or tasks that activate sub-processes.
Events are used to start or end a process. To manage specific actions during a workflow, an event gets triggered or is the result of some external process flow.
Sequence flows are used to show how workflow moves. A sample sequence flow representation is shown below.
Gateways are used to separate or join process flow.
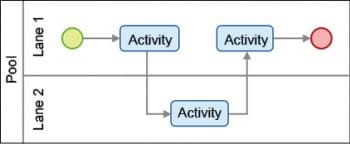
Organising uses pools and swimlanes. Pools contain a single, complete process and the workflow cannot leave a pool. Swimlanes are used to help organise the process based on who does what (actors). In a lap pool, swimlanes keep the swimmers from crashing into one another, but the workflow crosses swimlane boundaries as if they did not exist and are only for organisational clarity.
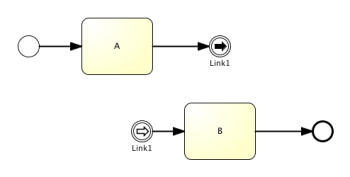
For readability of the model, annotations and links are used. Links allow you to cut a process that has become too long to read easily and simply continue the process on another line in the same pool.
Special behaviour BPMN symbols include a specific set of events and task markers. These symbols allow users to design executable workflows that can behave in complex ways. Messages and message flow are used to transfer data from one pool/process to another and to relate correlated processes.
Signals are used to broadcast information to other processes.
Timers are symbols used to launch periodic activities to ensure that an activity happens within a specified deadline.
Errors are used to define behaviour when the system encounters an error.
Loops and multi-instance: These are used to repeat tasks such as multiple launches of the same task (multi-instance) or to repeat the same task (loop).
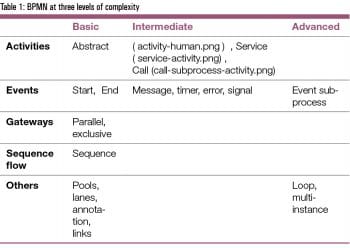
BPMN symbols can be defined at three levels of complexity – basic, intermediate and advanced. While basic is predominantly visual, intermediate and advanced BPMN becomes executable. BPMN symbols serve a dual purpose. Primarily, they visually represent a process flow and secondarily, they translate to executable code that allows a visual process model to be executed as an application.
To make the visual model executable, we apply the intermediate BPMN. In an executable process, the flow model becomes an actual process application. BPMN 2.0 is not just a notation — when implemented through a modelling tool, it provides programming instructions that a process engine uses to execute the process.
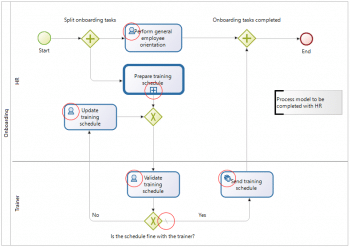
Now, let us look at our Generic Employee Orientation and Training Process extended with intermediate BPMN. Note that the activities have been defined and the default flow has been added.
Human activity is a step that must be done by a person, while service activity is an automated step. Call activity represents a sub-process, e.g.,‘Preparing training schedule’is a call activity linked to a sub-process which is a ‘child’ of the original parent process. At this point in the process, a token is passed to the sub-process and when it has completed, it is passed back to the parent process. Using this notation, you can model a top-level parent process that can be quite simple. It can call a series of sub-processes that are entirely independent workflows. This means they can be modelled independently and modified as needed without necessarily changing the parent process.
In intermediate BPMN, sequence flows include conditional and default flows. When connected to inclusive or exclusive gateways, sequence flows need to be defined as conditional or default, so that the ‘flow token’knows which path to follow. In conditional sequence flow, some specified condition(s) must be met so that the process can choose the next task from among two or more options. In our example, if the schedule is okay with the trainer, this condition is true and if not okay with the trainer, the condition is false.
The default sequence flow allows you to directly flow. If, for some reason, no conditions are met and the flow token always has a direction to take, default flow is marked with a \.
Sequence flow can’t cross a pool boundary, so to communicate between pools (processes), use messages or signals.
Now let us start building an application with Bonita Studio.
Generally, to create an application, the application pages, data model and processes are defined in parallel and evolve as you go deeper in the application details. The use case that we will be following is given below.
An employee opens the Travel Tool application to view pending and approved travel requests. He/she creates a new travel request. Then the request is sent to the employee’s manager. The manager reviews the request and either approves or refuses it.
See https://github.com/Bonitasoft-Community/getting-started-tutorial for the full artifacts.
- Design application pages
- Create the data model
- Create the process definition
- Create forms
- Run process
- Build the application
Designing application pages
The first step in creating an application is to design the application pages in the UI designer using dummy data, creating a prototype application as seen by users. The Bonita Studio UI designer is an environment for creating application pages and forms. To start the UI designer, click its icon in the Bonita Studio Cool bar (at the top of the screen). The UI designer opens in a browser.
Creating the data model
There are two stages to defining variables — first define the business data model, and then specify how the process handles objects of the model. The model is defined as a set of Java classes, and the process uses instances of these classes.
Creating the process definition
Creating the diagram: The first stage is to create the new diagram, which you do using Bonita Studio.
Create the diagram as follows:
1. Click New diagram on the Bonita Studio Welcome page. This creates an almost empty diagram for you to start updating.
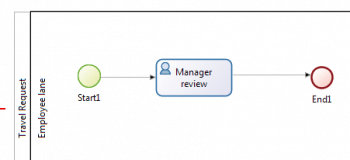
- The large rectangle with a name at the left is the pool.
- Inside the pool there is a lane, which is also a rectangle. You can see the border of the lane at the left side, beside the pool name. The other borders of the lane coincide with the pool border and so are not visible.
- The green circle in the lane is a start event.
- The blue box in the lane is a human task.
2. The first thing to do is to give the diagram a more descriptive name. Click on the diagram outside the pool, then go to the Details panel. This is the area on the bottom-right of the screen.
3. In the General tab, in the Diagram pane, click Edit next to the Name field.
4. Enter the new diagram’s name, Simple Travel Request, in the popup and click OK. You can see that in the tab at the top of the whiteboard, the diagram name has changed.
5. Now give the pool a more descriptive name. Select the pool by clicking in the space between the pool border and the lane border at the left of the diagram. Then go to the Details panel, then the General tab, followed by the Pool pane, and click Edit, which is next to the Name field. Enter the new pool name, Travel Request, in the popup. When you have renamed the diagram and the pool, the diagram will look like what’s shown in Figure 7.
6. This process starts when an employee fills in a travel request form. You do not need to create a task for this because it is this action that triggers the process to start. This is known as process instantiation. A form for process instantiation is defined at the pool level.
7. Define what happens after the user submits a request form — the manager reviews the travel request and approves or refuses it. You can use the example task that was added to the diagram automatically. Click on the task name and change it to Manager review.
8. Later on in this process, the subsequent task would be to send the travel request details to the admin team so that they can handle the booking. For now though, we are just interested in getting the first part of the process working; so add an end after the review task. You can do this by dragging the end icon (red circle) from the palette to the whiteboard, and then connecting to the Manager review task with a flow element.
When you have finished, your diagram should look like what’s shown in Figure 8.
Check out the website for the detailed steps for creating defining business variables, creating contracts, etc (https://documentation.bonitasoft.com/bonita/7.8/getting-started-tutorial).
Design methodology
The design methodology used by Bonita in creating a process-based application is described below.
Setting objectives: Objectives are a vital part of any project to implement or improve a business application or process.
Bonita will not help you to define the objectives for a project, but it will help you create metrics to check that your objectives are met.
Defining the application’s scope: Defining the application’s scope means defining the people who use it and their usage patterns, the information required, the level of security needed, and connections to external systems. For this, the following things are checked.
- Application or process: Is the process completely automatic or does it interact with other processes that have human users? If there is no human interaction, there is no need to create an application.
- People: Who owns the application? Who owns the processes in the application? Who uses the application and processes? Who are the key users? Who just needs to know the application exists? When and how is it used? Is it used frequently, on a schedule, in emergencies? Is it used by just one person or by many people at the same time?
- Information: What business information does the application need and what information does it deliver? What are the expected results of the processes, and of the application?
- Security: What are the kind of controls needed for people using the application? Is a simple login sufficient?
- Connections: What connections to external systems are needed? Does the application need to access information in a database, to send email, or to use some other business application? Do these external systems have APIs accessible by Java?
Drawing the process diagram: Using Bonita Studio, you can quickly sketch out the process flow, and create a diagram of the starting points, main steps, branches, decision points, and end points. Do this for each process in the application. At this stage, get the process owner and the key users to agree on the process flow, before going further.
When drawing a process diagram you might need to check the following.
- Though most business processes have a single start and a single end, it is also possible to have multiple starts and ends.
- If there are activities that happen in parallel, use symmetric gates to map out the beginning and the end of the parallel phases of the process.
Defining the process details: The process details are now defined and they include the following:
- Input and output data of each step, data model, sourcing, storage, and data types
- Details concerning transition and flow, like labels
- Connectors
- Actors
- Monitoring
- Exception handling
- Process maintainability
Designing the application: We can now create the pages and forms needed.
Testing: Test each process individually before testing the application as a whole. The process definition can be validated using Bonita Studio in the Details panel and the Validation status tab.
Bonita Studio includes an environment for locally testing the processes, before deployment.
It features an example of an organisation, called ACME, which you can use for testing a process or application. When local testing is complete, depending on the environment in which the application will run, you might also need to test the processes in a realistic system before putting the application into production. You could perhaps also put it into production for a limited number of users or cases.
Deployment: When testing is complete, the processes are ready to be deployed in the Bonita portal and the application is ready to be put into production. You need to configure each process for deployment before putting it into production.
Specifying the organisation: Before you can run a process in production, you need to define your organisation with entries for all process users, groups and roles. You also need to map the process actors to the real people who will carry out the process steps. You can manage your organisation in the Bonita portal for a production system. While you are in the testing phase, you can manage the organisation in Bonita Studio.
Monitoring and improvement: After deployment, you can monitor usage and collect key performance indicators, to assess how well the process is meeting the objectives you defined.


