Xamarin is a tool used for cross-platform mobile app development that allows developers to share a majority of the code across major platforms such as Android, iOS, Windows and macOS. This article is a tutorial on how you can use Xamarin to deliver a native Android app.
Xamarin has been built by the engineers who created Mono, the .NET Framework based open source development platform (Miguel de Icaza led the efforts to develop Mono). The Xamarin company was founded in May 2011, and Microsoft acquired it in 2016.
Xamarin uses a single language, i.e., C# to create apps for mobile platforms. It is natively compiled unlike other cross-platform solutions, which makes it a go-to option for building high-performance apps with a native look and feel. Additionally, Xamarin can hold all the native and the latest API access to utilise the underlying platform’s capabilities, such as multi-window on Android and ARKit on iOS.
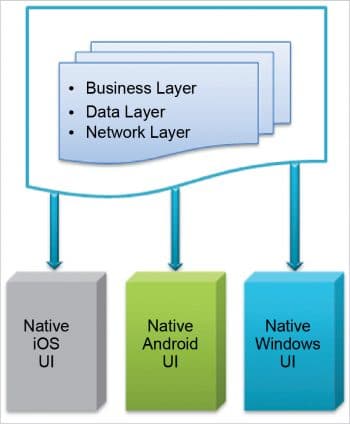
In Xamarin, platforms can share the code related to business logic, database layer and network communication to create platform-specific UI layers for a better user experience. Thus, Xamarin apps look the same as native apps on any device, as compared to generic hybrid apps.

Why use Xamarin
Earlier, mobile application development used to be limited, with fewer devices running on platforms with specific languages. But today, with the increased range of mobile devices and mobile company based OSs, building an application for each platform implies additional development and maintenance costs. Xamarin development is not a ‘one size fits all’ concept; it’s about increasing productivity while incurring minimal cost.
The top five benefits of Xamarin are:
- A single technology stack for all
- Performance that is the same as native app development
- Native user experience
- Open source
- Easy to maintain
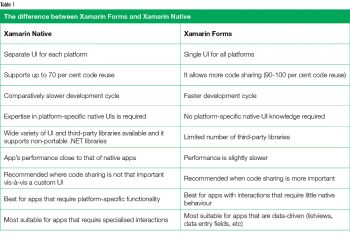
There are mainly two methods of building mobile applications using Xamarin:
- Xamarin Native
- Xamarin Forms
Xamarin Native uses Xamarin.Android and Xamarin.iOS to compile the source code. For iOS, it uses ahead-of-time compilation, while for Android, just-in-time compilation is done. In both the cases, the process takes care of memory allocation, garbage collection and platform interoperability issues, by default.
The following are the system requirements to install Xamarin on MacOS and Windows. The IDE is Visual Studio for Mac and for Windows.
The macOS requirements are as follows.
Operating system: macOS Sierra 10.12 or above.
Xamarin.Android: Android 6.0 / API level 23. While using the latest SDK, you can still target older Android versions.
The Windows requirements are as follows.
Operating system: Recommended Windows 10. The minimum OS version is Windows 7.
Xamarin.Android: Android 6.0 / API level 23. While using the latest SDK, you can still target older Android versions.
Note: You can use any version of Visual Studio 2017— community, professional, and enterprise.
To install Xamarin on Windows and Mac, download the latest version of Visual Studio for the given OS and follow the installation instructions. For additional information on Xamarin installation, visit https://docs.microsoft.com/en-us/xamarin/cross-platform/get-started/installation/index?tabs=windows.
Creating a sample Xamarin Android app
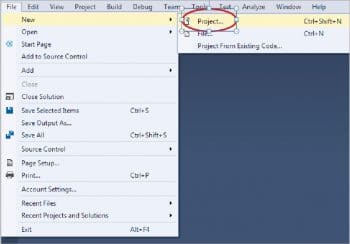
Open Visual Studio. Click on File-> New-> Project. This will bring up the New Project dialogue, as shown in Figure 4.
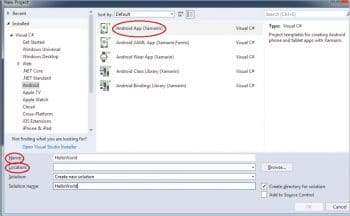
Next, select Visual Studio-> Android-> Android App (Xamarin). You will need to fill out the following entries.
- Application name: Please type in HelloWorld.
- Project location: Select Project Location.
Next, tick the ‘Create directory for solution’ check box, and click on the OK button. This will bring up the next step, as shown in Figure 5.
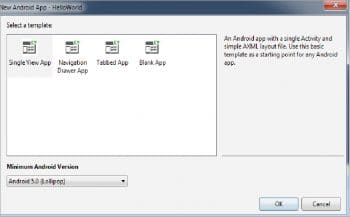
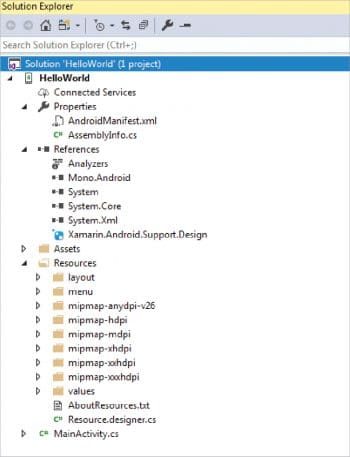
Go with the default option of creating a Single View App for now and choose the Minimum Android SDK Version for this application. Click on the OK button. This will generate your project. Look at the solution in Solution Explorer, as shown in Figure 6. Run the application.

 In Visual Studio, select the configuration, i.e., Debug/Release and the device/emulator on which you want to run the application.
Now click on the device name to run the application in the selected configuration. Your application is now running.
In this article, we have explored the basics of Xamarin development and looked at how to create a sample application. Developers should consider several key factors before creating mobile applications that deliver a high quality user experience. They should consider business needs and the goal of the application as the key factors while choosing the right development approach.


