With the popularity of cloud computing on the rise, there has been a steady increase in the use of container technology by enterprises. Docker is a popular container technology that we will explore in this article. The setting up of a proxy to run Docker containers may prove daunting to some, so this article walks the reader through the process and elucidates the pitfalls.
Nowadays, everyone in the community knows what a Docker container is and many of the more technically inclined appreciate this technology. Gone are the days of monolithic and ‘single point of failure’ kind of applications. We’re now in the era of microservices based applications, and Docker containers facilitate this with ease.
As of the end of 2018, container technology has been widely adopted as compared to VM (virtual machines in cloud), and this trend has been growing since early 2017.
It comes as no surprise that the most widely adopted container technologies are Docker (52 per cent) and Kubernetes (30 per cent); these two are leading the pack currently. Having said this, more than 70 per cent of the adopters (of Docker and Kubernetes) mentioned that they have deployed containers on VMs, so it’s not likely that VMs are going to disappear. They’re not, but going forward, IT executives do want to cut their VM licensing costs.

Containers are primarily being used for cloud-native applications (54 per cent). This is followed by lightweight stateless applications (39 per cent), cloud migrations (32 per cent) and modernising legacy applications (https://www.zdnet.com/article/container-adoption-speeds-up-to-the-detriment-of-vms/).
Proxies and the proxy server
A proxy server sits between a client application, such as a Web browser and a real server. It intercepts all requests to the real server to see if it can fulfil the requests itself. If not, it forwards the request to the real server.
In the Docker container environment too, proxy is very important and is used to handle connections originating from the local machine, which might otherwise not pass through the iptables rules that Docker configures to handle port forwarding or when Docker has been configured such that it does not manipulate iptables at all.
Setting up a proxy has become a major issue in many Docker container configurations nowadays because of the platform version differences, many applications getting containerised, and the availability of limited or scattered information/material, which is creating confusion.
As mentioned earlier, Docker container adoption and usage is growing every day and, often, people face many challenges while configuring proxies in a Docker container environment. Let us now look at how to address many of these challenges by providing the appropriate solutions and steps to be followed.
The Docker and Ubuntu versions used for this article are:
- Docker client 18.03.1-ce Community edition
- Docker server 18.03.1-ce Community edition
- Ubuntu 18.04.1 LTS Bionic release
On host proxy setup
This is a generic proxy setup for host/bare-metal servers to work on normal Internet connections.
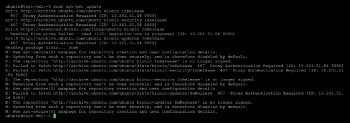
1) Problem: apt-get updates and install will not work behind a proxy. When $ sudo apt-get is executed, an error ‘407 Proxy Authentication is required’ is thrown up.
The example of the error is shown in Figure 1.
To solve this, ensure that the proxy has been set up properly. To make apt-get to work behind the proxy, we need to follow the two-step process mentioned below.
a. Create a /etc/apt/apt.conf file and add the following entries to the file:
$ vi /etc/apt/apt.conf

Acquire::http::Proxy “http://username:password@proxy:port/”;

Acquire::https::Proxy “https://username:password@proxy:port/”;
b. Create a /etc/apt/apt.conf.d/proxy.conf file and add the following entries in the file:
$ vi /etc/apt/apt.conf.d/proxy.conf

Acquire::http::Proxy “http://username:password@proxy:port/”;

Acquire::https::Proxy “https://username:password@proxy:port/”;
2) Problem: Sometimes one keeps on facing errors even after setting apt config, as mentioned earlier. The installation or update will fail and might not work again behind the proxy or sometimes, the pull operation of the Docker image will have issues.
The following step will resolve this issue.
Ensure that the proper DNS is set up by entering the name servers in the file /etc/resolv.conf:
$ vi /etc/resolv.conf

nameserver xx.xx.xx.xx

nameserver xx.xx.xx.xx

nameserver 127.0.0.53

search company.com
Note: This <IP address> is based on the host IP and gateway used, and will differ based on the configuration.

Pre-configured proxy on container images (migration/normal set-up scenarios)
When the container image is built and carried to a different environment, it should work fine (like DNS, routing, etc).
1) Problem: In some cases, apt-get or internet will not work during the building of container images.
This problem can be solved in the following way. The environment variable should be set up properly by using the following procedure.
a. Verify that the http_proxy, https_proxy, HTTP_PROXY and HTTPS_PROXY variables are set up by using the following echo command:
ubuntu@test-vm1:/etc/apt$ echo $http_proxy

http://username:password@proxy:port/
Ensure that the output is as shown above. If the output is empty, then proceed to set up the environment variable as shown in Step 2 below.
b.
# export http_proxy=http://username:password@proxy:port

# export https_proxy=https:// username:password@proxy:port
Then verify again with the echo command to ensure that the environment variable is updated properly.
c. Repeat the above steps for all environment variables like https_proxy, HTTP_PROXY and HTTPS_PROXY.
2) Problem: Sometimes the proxy will not persist across environments and configurations.
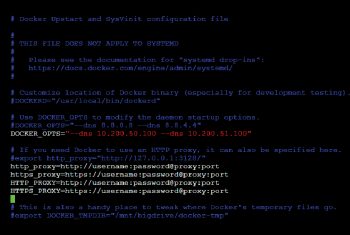
If the config.json file is updated with the following proxy parameters, this problem will be overcome. Figure 2 shows how to edit this file and set up the parameters.
- Update the ~/.docker/config.json file.
- Further to the above step, please update the daemon file /etc/default/docker with all environment variables.
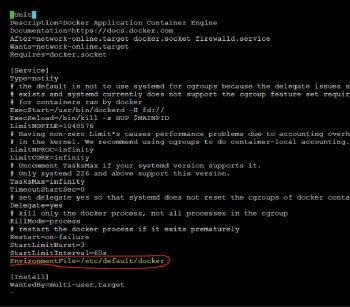
- Now add the reference of the /etc/default/docker file as a variable in the file /lib/systemd/system/docker.service as shown in Figure 3.
- Restart the Docker services, as follows:
# ubuntu@test-vm1:~$ sudo systemctl daemon-reload

# ubuntu@test-vm1:~$ sudo systemctl restart docker

# ubuntu@test-vm1:~$ sudo systemctl show --property Environment docker
How to override proxy configuration (during runtime)
This method helps in building Docker container images and further helps to override the host proxy to avoid future problems related to the proxy setup.
This procedure helps to override the proxy settings made while building the Dockerfile without modifying the contents in /etc/default/docker configuration. The Docker build provides an argument called build-arg, which can be utilised in this case. These values will persist in the respective image builds. If the same image is used, the proxy setup will be by default available as it was set up.

Note: End users who would like to connect directly to the Internet without a proxy, may not need this setup.
The following set of commands and configurations are used to set up this proxy:
$ sudo docker build --build-arg \ http_proxy=”http://username:password@proxy:port/” --build-arg \ https_proxy=”https:// username:password@proxy:port /” --network=host.
b. We can use the –build-arg argument without the values as well. These values can be populated from the environment variables like http_proxy, as shown below:
$ export http_proxy=http://proxyaddress:port

$ docker build --build-arg http_proxy .
We hope that this article will help those who face proxy issues while configuring Docker containers. We have tried to address most of the proxy configuration issues with this step-by-step approach, giving the required configuration details, commands and relevant screenshots. This article may not be of use if a direct Internet connection is used without a proxy.


