Android devices have captured the smart products market and are to be found everywhere. Windows developers who wish to develop Android apps can use open source developer tools that work on the Windows platform. This article introduces some of the best among these.
This article briefly discusses tools that Android developers can use on the Windows operating system. There are six different categories of tools that facilitate Android app development using the Windows OS:
- Source code management
- Build tools
- Application debugging tools
- IDE
- Continuous integration
- Continuous code inspection
Source code management
A source control management system (SCM) provides version control for code that has been developed by the team, for the test scripts created by the testing team, for the configuration files created by the DevOps team, and so on. SCM provides collaboration, coordination and services between the different stakeholders involved in application life cycle management.
GitHub
GitHub is a hosted version control service that uses Git (visit https://github.com).
Reasons for using GitHub: Git repositories are used for version control. The Git server helps to manage multiple repositories (when multiple people work on the same repository) to keep track of changes in code. GitHub also provides a facility for social code by providing the Web interface for the Git repository and management tools for collaboration.
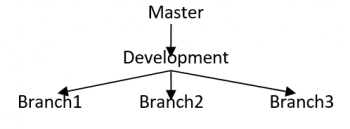
Workflow of GitHub: Git uses the same centralised pattern as a subversion (SVN) workflow, but it is a more powerful development presenter than the latter. In Git, every developer has a local copy of the entire project, where each developer can work independent of all other changes made to the project. Commits can be added to the local branch and the main development/master branch can be ignored until it is convenient.
Initialising the central repository: The third stage in Figure 1 is the developer local branch.
Try to use the Git terminal, although the Git GUI application is available. I know the Git GUI application might be easier, but the terminal has proved to be more convenient in my experience as a developer. In the Git terminal, the command line serves to communicate with the user and gives a proper error message even when the command fails; and it also points out the proper solution.
|
Stable release |
N/A – Hosted service |
|
Owner |
Microsoft |
|
Website |
https://github.com/ |
|
Written in |
Ruby |
|
On-premise or hosted |
Git repository hosting service |
|
Main features |
Private and public repositories. GitHub supports source code, wikis, notifications, integration with automation tools, issue tracking, and so on. |
Listed below are some GitHub commands:
git status
git add <files with proper path>
git commit –m “give proper message”
git push origin <your local branch>
git checkout development
git merge <local branch name>
git add <files with proper path>
git commit –m “give proper message”
git push origin main repository
Build tools
Build tools automate and orchestrate the process of compiling source code, running tests, downloading dependencies (JAR files), creating a package and deploying packages. Earlier, the process was manual and now, build tools have made the automation process easy. Build tools are an integral part of the DevOps practices such as continuous integration. Ant, Maven and Gradle are build tools for Java; NAnt is used for the .NET framework and MsBuild is used for C#.
Gradle
Gradle is an open source build automation system that builds upon the concept of Apache Ant and Apache Maven, and introduces a Groovy based domain-specific language instead of the XML form used by Apache Maven for declaring the project configuration.
How to install Gradle in your Windows system: There are two ways to set up Gradle in Windows.
To install it manually:
- Go to the Gradle official website: https://gradle.org/.
- Download the latest version of the Gradle distribution file.
- Unzip it in your program file folder or your specific path.
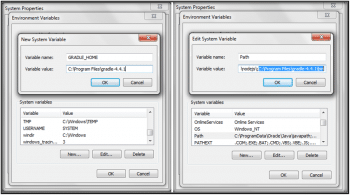
- Now set the Gradle path in your system’s environment variable.
- Go to System Variable and add a new path.
- Click Okay.
- Now add the path C:\Program Files\gradle-4.4.1\bin.
- Click on Okay. Go to the command prompt and check the Gradle version by using the gradle -v command.
Installing Gradle on Android Studio:
- Go to Android Studio.
- Open your exiting project in Android Studio.
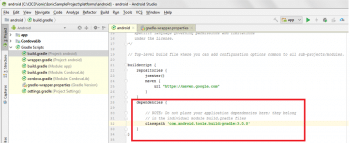
- Go to the build.gradle file for your project in the project module.
- Inside Dependencies, look for the classpath of Gradle.
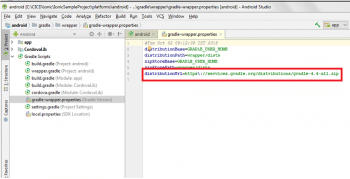
- Go to the gradle-wapper.properties file.
- Give the distribution URL for online Gradle installation, specifying the particular version.
|
Stable release |
04/10/02 |
|
Licence |
Apache License |
|
Website |
https://gradle.org/ |
|
Written in |
Java, Groovy, Kotlin |
|
On-premise or hosted |
Package available. |
|
Main features |
Groovy-based domain-specific language (DSL). Works well with multi-project builds. Supports Android, Java, and so on. |
The application debugging tool
Let’s discuss Android Debug Bridge in this section.
Android Debug Bridge
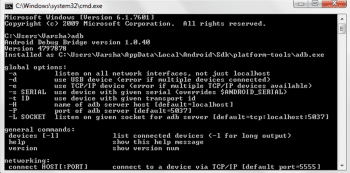
This is also called ADB. It is a software interface for the Android development system. ADB is part of the Android SDK (Android Software Development Kit) and is placed in the sub-directory called platform-tools.
Setting up ADB on Windows: When you are planning to test and debug your .apk file in real devices, then some setting up is required on your phone or system.
For the phone setup:
- Go to your phone Settings application.
- Tap the About Phone option.
- Tap the Build number option seven times to enable the Developer Mode. You will see the toast message on your phone once the Developer Mode is on.
- Then go back to the main Settings screen and select the Developer Mode option.
- Next, enable the USB Debugging mode option.
For installing the SDK manager on Windows:
- Install the SDK manager from Android Studio or else download the SDK platform tools for Windows from the Android-Developer website.
- Set the proper path where your SDK bundle is available in your system.
- Now set these paths for the Detect ADB path in your environment variable, as follows:
C:\Users\Varsha\AppData\Local\Android\Sdk\build-tools;

C:\Users\Varsha\AppData\Local\Android\Sdk\platform-tools;

C:\Users\Varsha\AppData\Local\Android\Sdk\tools;

C:\Users\Varsha\AppData\Local\Android\Sdk\platforms
4. Now go to command prompt and check ADB.
5. Connect the device via USB and test whether ADB devices are working or not by using the following command:
adb devices
6. Now you can install the .apk file in your real device through this command. Before running the command, go to the proper path where your .apk file is present, then run the following command:
adb install “your apk file name”
This command will install the .apk file in your device.
|
Stable release |
Android-28 |
|
Download link |
From the Android-Developer website |
|
Operating systems |
Windows, MacOS, Linux |
|
Main features |
Executes the command on the phone directly. Debugging of code. |
IDE
Android Studio
Android Studio is an open source and Linux based operating system that is used for mobile device development. Android Studio works based on IntelliJ IDEA. This is used for developing native and hybrid applications.
Requirements for setting up Android Studio:
- Java JDK5 or latest version
- Java Runtime Environment (latest version)
- Android Studio
Installation in Windows:
- Go to the Android Studio official website and download the latest version.
- Install Android Studio in your Windows system.
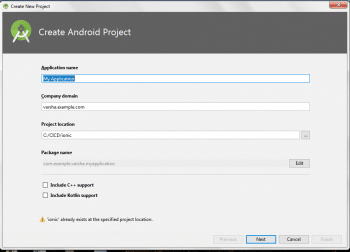
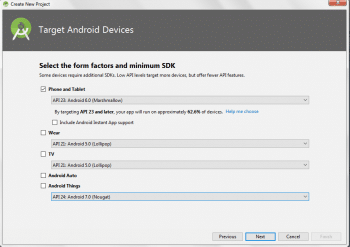
- Once Android Studio is open, start a new project.
- Write your project’s name and click the Next button.
- Set the Android target and click Next.
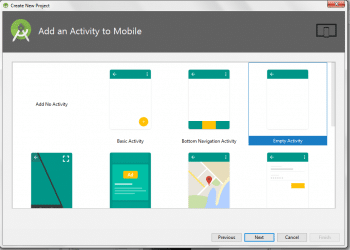
- Select Empty Project.
- Set the activity name.
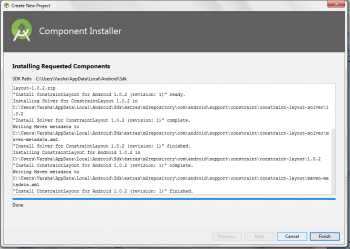
- After that, click Next to start the installation.
- Once the project has been created, to test the application, we need a virtual device. So before writing the code, launch AVD Manager in Android Studio. Once your AVD Manager has been created successfully, it means your system is prepared for Android development.
- Now write the code and test it in an emulator device.
|
Stable release |
3.2 |
|
Licence |
Freeware + SourceCode |
|
Website |
developer.android.com/studio/index.html |
|
Written in |
Java and Kotlin |
|
Operating systems |
Windows, MacOS, Linux |
|
Main features |
Gradle – for build support Lint tool – to check performance, usability and version compatibility ProGuard – for integration and app-compatibilities Support build in – Google Cloud Platform, enabling integration with Firebase cloud messaging and Google App Engine For device testing – Android Virtual Device (emulator) |
IntelliJ IDEA
IntelliJ IDEA is specially used for developing Java based applications. Developed and maintained by JetBrains, it is available in the community and ‘Ultimate’ editions. It has innumerable features for rapid app development and to improve code quality/analysis, including the in-build version control tool, compiler, debugger, various frameworks, support for code compilation, code navigation, code refactoring, the terminal, database tools, application server which boots the development process, etc.
IntelliJ IDEA also supports the development of native and hybrid applications.
Windows installation:
- 1. Go to the official website www.jetbrains.com/idea/ and download IntelliJ IDEA in a Windows machine.
- Perform the following steps depending on your OS (Windows, in this case):
- Run the ideacIC.exe or the ideaIU.exe file, which is downloaded.
- Follow the instructions in the installation wizard.
- If it is using the first instance, then do not use the Import settings option.
- Disable the unnecessary plugins.
- Download and install particular plugins from the IntelliJ IDEA plugin repository as required by the project.
3. After completing the proper setup, create your project in IntelliJ IDEA.
Android development in IntelliJ IDEA: For Android development, add the Android support plugins bundle in IntelliJ IDEA from the IntelliJ plugin repository.
The Android development plugin bundles: From the bundles, various tools are available for particular tasks:
- For creating an Android project build: Gradle based build system.
- Facility for working with the layout, manifest, resource and other XML files: Smart XML editor.
- Specific code inspections for Android use: Android-specific code inspections including those integrated with Android Lint inspections.
- To build the design for your application without changing the XML files manually: Graphics editor.
- For the database: Access to the SQLite database.
These are the basic plugin bundles for developing the Android Project.
|
Stable release |
2018.2.4 Build: 182.4505.22 |
|
Licence |
Community edition: Apache 2.0 License |
|
Website |
www.jetbrains.com/idea/ |
|
Written in |
Java |
|
OSs supported |
Windows, MacOS, Linux |
|
Main features |
Supported communications languages: Java, Groovy, Peri, Rust, Scala, XML/XSL, Kotlin, Python, Lua, Haskell, etc Technology and framework: Android, Ant, Gradle, Junit, Maven, TestNG, NodeJS, JSP, Spring, etc Version controller: CVS, Git, GitHub, SVN (Subversion), Mercurial, Team Foundation Server (TFS) Database support: Oracle, Microsoft SQL Server, MySQL and PostgreSQL |
Eclipse
Eclipse is one of the most popular IDEs among developers. Download and install it from https://www.eclipse.org/downloads/.
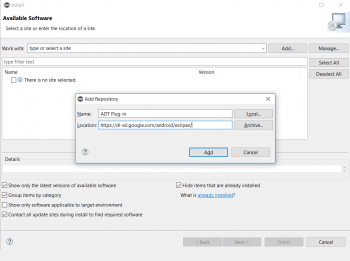
To set the Android Development Tool plug-in for Eclipse, open Eclipse and then choose Help > Software Updates > Install New Software. Add Repository and provide values as given.
Click on Add.
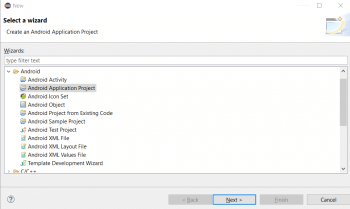
Check the available development tools and click on Next. Click on File > New > Others > Select Android and start working.
|
Stable release |
4.9 (2018-09 R) |
|
Licence |
Eclipse Public |
|
Website |
https://www.eclipse.org/ |
|
Written in |
Java and C |
|
Supported on |
Windows, Linux, MacOS and Solaris |
|
Main features |
Git flow support. It provides a set of modelling tools. |
Continuous integration
Continuous integration (CI) is one of the popular practices of DevOps. Developers commit code daily in the code repository such as Git or SVN, which triggers a process that includes static code analysis, compilation, unit test execution and package creation. In case of Android development, it creates an APK file.
If the process is followed correctly and if it becomes a part of the work culture, continuous integration helps to identify issues early on so that they can be solved easily. Fast detection of failures results in instant and constant feedback and hence the quality of the APK files improves even before these are made available to users.
There are many CI tools in the market. Jenkins is one of the most popular open source tools to implement CI for Android projects.
Jenkins
Jenkins is no longer a CI server since Jenkins 2.0, and it is now identified as an automation server. Jenkins supports Gradle based Android projects.
|
Stable release |
2.121.3 |
|
Licence |
MIT |
|
Website |
https://jenkins.io |
|
Written in |
Java |
|
On-premise or hosted |
The open source version is available in different flavours for different operating systems to install on premise. CloudBees provides the enterprise version of Jenkins. |
|
Main features |
Easy installation. Role based access. Distributed architecture – Master agent. More than 400 plugins are available to integrate with different open source and commercial tools. Flexible UI. |
Supports DevOps practices such as continuous integration and continuous delivery.
Download Jenkins for Windows from https://jenkins.io/download and install it. Go to the Jenkins dashboard at http://localhost:80808 and click on Manage Jenkins.
- Go to Manage Plugins and then to Available Tab and install the Gradle plugin.
- Verify the Gradle plugin installation in the Installed tab.
- Go to Manage Jenkins > Configure System > Global properties > Add Environment Variable ANDROID_HOME and provide the SDK path in the value.
- Go to Manage Jenkins > Configure System > Global Tool Configuration > Configure Gradle installations.
- Create the Freestyle Project from the Jenkins dashboard.
- Go to the Source Code Management section and configure the code repository details.
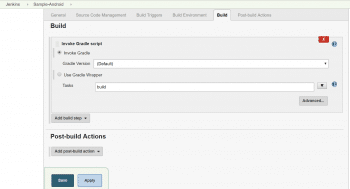
- Go to the Build section.
- Click on the Add build step and select Invoke Gradle Script.
- Click on Save and then on Build now to create an APK file for Android Project.
Continuous code inspection
Across organisations, different practices are followed for maintaining code quality and standards. The main reason to ensure a good quality of code is to make it maintainable and easy to understand. Manual verification of code is very difficult and may not give fruitful results. Different tools are used for code analysis for Android projects in Windows.
Android Lint
Android Studio comes with Android Lint. It verifies the quality of code and gives a list of errors and warnings.
- Create a Freestyle Project from the Jenkins Dashboard.
- Go to the Source Code Management section and configure code repository details.
- Go to the Build section.
- Click on the Add build step and select Invoke Gradle Script.
- Input Lint task.
- Click on Save and then on Build now.


