Processing is a flexible software sketchbook and a language for learning how to code within the visual arts domain. This article introduces Processing to the reader, and gives a tutorial on how to create a simple block jumper game using this tool.
Processing can easily be the first step for someone who has no prior experience working with graphics design software. Experts in the industry, too, can quickly convert their thoughts into code using this tool.
The many advantages of Processing are:
- It is completely open source and free to use.
- It has OpenGL integration that allows your projects the scope to expand.
- Its interactive outputs make working on projects quite simple, and it also has a wide range of outputs.
- It has over 100 different libraries that can be used in your projects.
- It is platform-independent.
Getting started
To get started with Processing, we must first download the software from the official website https://processing.org/download, and download the setup file for your preferred operating system.
Processing is available for Windows, Mac and Linux, and we will learn how to install it on each of these operating systems.
Device-specific installation instructions
On Windows, download a .zip file and extract it to a preferred location on the hard disk. Once extracted, run processing.exe.
On Mac, download a .zip file, and extract it to a preferred location on the hard disk. Once extracted, run processing.app.
On Linux, download the .tar.gz file. To extract it, open a terminal and type the following command:
tar xvfz {file_name}.tgz
This creates a folder named processing-xxxx [xxxx is the version]. Open a terminal, change the directory to the extracted folder [processing-xxxx] and run Processing, as follows:
$> cd processing-xxxx $> ./processing
Setting up the workspace
The default language to use with Processing is Java; however, in this guide we will use Python, as it is more user friendly.
To change the programming language, use the drop-down menu at the top right corner to select the mode, and choose ‘Add Mode’. In the pop-up window, navigate to the ‘Modes’ tab and select ‘Python Mode for Processing 3’. If you wish to use another programming language like js, you can also select your preferred mode. Once selected, click on ‘Install’ at the bottom right corner.
Creating a simple block jumper game
In this tutorial, we are going to create a simple block jumper game using Processing.
Basic setup
To begin, first decide on the general layout of the screen. In this case, we will directly draw on the screen. Another consideration is the dimensions of the screen. For a block jumper game, a rectangular screen is suitable.
The look of the player character is to be decided on next. For simplicity, a simple circle created using the ellipse () will suffice. A filled rectangle will do the job of giving the game some resemblance to the ground.
def setup():

global x, y, diameter

size(800, 300)

diameter = 30

x = 50

y = (200-(diameter/2))

def draw():

background(255)

fill(50)

rect(0, 200, 800, 300)

fill(255)

ellipse(x, y, diameter, diameter)
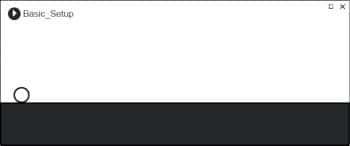
The above code block implements the concept and when run, you will see a screen as shown in Figure 1.


Making obstacles
We can now shift our thoughts to creating obstacles and movement. For this we will use a class called obstacle, as this will allow us to create multiple objects and use their methods easily.
import random

class obstacle:

def __init__(self, x, y, w, h):

self.x = x

self.y = y

self.w = w

self.h = h

def draw_ob(self):

fill(60)

rect(self.x, self.y, self.w, self.h)

def move(self):

global speed

self.x -= speed

if self.x <= 0 :

self.x=780

self.h = random.randrange(20, 50)

self.y = 200 - self.h
The above class makes it possible to create multiple obstacles. It also contains the methods to draw and move the obstacles. draw_ob() draws the obstacles, which are rectangles with co-ordinates that are defined previously. move() works by reducing the x coordinates of the obstacle, and by adding the speed variable that is initialised in setup() till it reaches the left-most edge of the screen, where it resets its x coordinates back to the right-most edge of the screen.
With the class defined, one can now move on to creating the objects and then calling the draw_ob() and the move() functions. To achieve the former, we just use a simple loop to create four obstacles in the setup() as shown below:
obs = []

x_val = 780

y_val = 180

ht = 20

wdt = 20

for i in range(4):

ob = obstacle(x_val, y_val, wdt, ht)

x_val += 200

ht = random.randrange(20, 50)

y_val = 200 - ht

obs.append(ob)
As shown in the above code segment, we create object ob while varying the coordinates and the height of the obstacles, and then append them to the list obs, creating a list of four objects. To draw the objects and then update the coordinates to achieve movement, we need to iterate over the newly created list obs and call the methods draw_ob() and move() for each of the objects in the draw(), as shown in the code segment below:
for ob in obs:

ob.draw_ob()

ob.move()
Note: You will need to declare the variable obs as global whenever you use it.
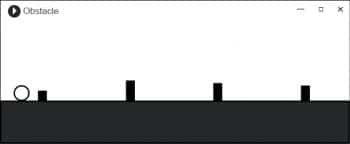
If you have followed the steps correctly, when executed, you will get an output as seen in Figure 2.
Note: If you are not able to get the desired output, do not worry because the entire code of the game is given at the end of the tutorial. Refer to it if you face any problems.
Collisions and how to avoid them
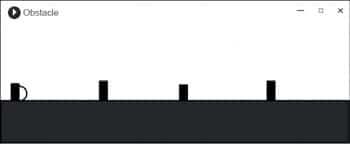
While executing the code given earlier, there is no control over the player circle, and thus the player can collide with the obstacles as shown in Figure 3.
To fix this issue, we need to introduce some conditions to check for collision between the player and the obstacles. We must also include the functionality for the player to move the player sprite using an input from the keyboard, so as to avoid obstacles.
The conditions to check for collisions must be put into the obstacle class to make it easier to use with the list of objects obs.
def collision(self, x, y):

global diameter

if( self.y < (y+(diameter/2)) ) and

self.x < ( x+(diameter/2)) and (x-(diameter/2)) < (self.x+self.w)):

return True

else:

return False
Now that collision with the obstacles is possible, there must be a condition to ensure that the game ends when an obstacle is hit. A Boolean variable game_over and an if-else block will do the trick. Initially the game_over variable is declared as false so that the game runs, and it gets updated by means of the collision() that we call for every loop of the draw().
if game_over == False:

for ob in obs:

ob.draw_ob()

ob.move()

game_over = ob.collision(x, y)

if game_over == True:

break

else:

background(0)

textSize(32);

textAlign(CENTER)

fill(200);

text(“GAME OVER”, 402, 152, -30)

fill(255)

text(“GAME OVER”, 400, 150)
If the game_over variable remains false, then the game continues, but if a collision occurs then the collision() returns true, which in turn makes the program control go into the else part of the if-else block.
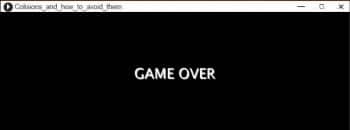
Here, the text of ‘Game Over’ is displayed in a slightly staggered manner by the use of the text(). textSize() and textAlign() set the size and the alignment, respectively, of the text that comes after it.
Thus, when the player sprite collides with an obstacle, the game will end and the screen shown in Figure 4 will be displayed.
Let’s move on to the next part, which is to avoid the obstacles. We will use an inbuilt function keyPressed(). This function gets evoked every time you press a key on your keyboard, and it is here, within a condition, that we will check if the upper key is pressed or not.
def keyPressed():

global lim, y

if key == CODED:

if keyCode == UP and lim < 1:

y -= 180

lim += 1

if y<=15:

y=15
In this inbuilt function, we can check for specific coded keys such as the UP arrow easily. Adding an extra lim variable, initialised in the setup with the value 0, will make sure that the player cannot press the UP arrow more than once while in the air. It is here that we also check if the player sprite is moving beyond the maximum limit of the window.
if(y<185):

y += speed + 0.5

if(y>=185):

lim = 0
Adding these if statements ensures that the player sprite will come down after pressing UP; also, if it reaches the ground, then we need to set back the lim to 0 so as to allow the player sprite to jump again. If you’ve got this part correct, then your game will look something like what’s shown in Figure 5.
Adding the score to the game
Now that our game is finally coming together, we can think of some way to add a score for the player. In this tutorial, we achieve that by creating another class that will contain the necessary arguments.
class stats:

def __init__(self, score=0):

self.score = score

def update_score(self):

global highscore

self.score += .005

if highscore < self.score:

highscore = self.score
Now that we have a class, let’s look at the method present in the class update_score(), which updates the score based on a predefined value (here, 0.005); and it is here that we also check for the high score (look at the final code for the exact call of the function).
In addition to this class, we will also have to initialise a few variables in setup(), as shown in the following code segment:
highscore = 0

stat = stats(highscore)
And in our main game’s if condition, adding the following code segment will allow us to display the score and the high score at the top right corner. The next code segment goes into the else part of the main game’s if condition, and this will allow us to display the player’s score in the ‘Game Over’ screen.
textSize(14)

textAlign(CENTER)

fill(0)

text(“Score”, 720, 25, -30)

text(int(stat.score), 770, 25, -30)

text(“HIGH SCORE”, 700, 50, -30)

text(int(highscore), 770, 50, -30)

textSize(14)

text(“YOUR SCORE”, 370, 200)

text(int(stat.score), 460, 200)
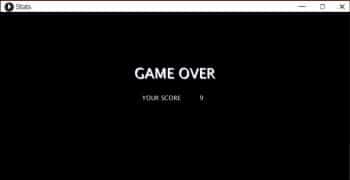
Now your game screen will look like what’s shown in Figure 6, and when the game is over, your screen will look like what’s shown in Figure 7.
We can now increase the difficulty level of the game by increasing the speed variable based on the score. An example is shown in the code segment that follows:
def speed_inc(score):

global speed

score *= .00001

speed += score
Finishing touches
Some of the finishing touches that we can add to our game to make it a smoother experience for the player are the replay and play/pause functionalities. Both of these can easily be implemented by using the keyPressed() and using text() for giving prompts to the user.
The implementation of the functions in the keyPressed() is shown in the following code segment:
if key == ‘ ‘:

game_over = False

stat.score = 0

speed = 1.5

if key == ‘p’ or key == ‘P’:

noLoop()

if key == ‘r’ or key == ‘R’:

loop()
The replay function works by resetting the game_over variable to false, resulting in the main game loop running again, thus resetting the score and speeding back to the initial condition. For pausing the game, we use the inbuilt function noLoop() which stops the looping nature of draw(), resulting in the game being paused. To resume, we use the inbuilt function loop(), which makes the draw() loop again, continuing the animation.


You can find the full code of the game at https://www.opensourceforu.com/article_source_code/oct18/procssing-codes.zip.
<Snip code from Print edition>

Full Code for the Game

import random

class obstacle:

def __init__(self , x, y, w, h):

self.x = x

self.y = y

self.w = w

self.h = h

def draw_ob(self):

fill(60)

rect(self.x, self.y, self.w, self.h)

def move(self):

global speed

self.x -= speed

if self.x <= 0 :

self.x=780

self.h = random.randrange(20, 50)

self.y = 200 - self.h

def collision(self, x, y):

global diameter

if( self.y < (y+(diameter/2)) ) and ( self.x < ( x+(diameter/2)) and (x-(diameter/2)) < (self.x+self.w)):

return True

else:

return False

class stats:

def __init__(self, score=0):

self.score = score

def update_score(self):

global highscore

self.score += .005

if highscore < self.score:

highscore = self.score

def speed_inc(score):

global speed

score *= .00001

speed += score

def setup():

global x, y, diameter, lim, game_over, highscore, obs, stat, speed

size(800, 300)

x = 50

y = 185

diameter = 30

lim = 0

game_over = False

highscore = 0

obs = []

x_val = 780

y_val = 180

ht = 20

wdt = 20

for i in range(4):

ob = obstacle(x_val, y_val, wdt, ht)

x_val += 200

ht = random.randrange(20, 50)

y_val = 200 - ht

obs.append(ob)

stat = stats(highscore)

speed = 1.5

def draw():

global x, y, diameter, lim, game_over, speed

background(255)

if game_over == False:

fill(51)

rect(0, 200, 800, 300)

fill(255)

ellipse(x, y, diameter, diameter)

if(y<185):

y += speed + 0.5

if(y>=185):

lim = 0

for ob in obs:

ob.draw_ob()

ob.move()

game_over = ob.collision(x, y)

if game_over == True:

break

else:

stat.update_score()

speed_inc(stat.score)

textSize(12);

textAlign(LEFT)

fill(0)

text(“PRESS P TO PAUSE”, 300, 25, -30)

text(“PRESS R TO RESUME”, 300, 50, -30)

textSize(14);

textAlign(CENTER)

fill(0)

text(“Score”, 720, 25, -30)

text(int(stat.score), 770, 25, -30)

text(“HIGH SCORE”, 700, 50, -30)

text(int(highscore), 770, 50, -30)

else:

background(0)

textSize(32);

textAlign(CENTER)

fill(200);

text(“GAME OVER”, 402, 152, -30)

fill(255)

text(“GAME OVER”, 400, 150)

textSize(14)

text(“YOUR SCORE”, 370, 200)

text(int(stat.score), 460, 200)

text(“Press Space To Replay”, 400, 250)

x_val = 780

for ob in obs:

ob.x = x_val

x_val += 200

def keyPressed():

global lim

global y

global game_over, stat, speed

if key == CODED:

if keyCode == UP and lim < 1:

y -= 180

lim += 1

if key == ‘ ‘:

game_over = False

stat.score = 0

speed = 1.5

if key == ‘p’ or key == ‘P’:

noLoop()

if key == ‘r’ or key == ‘R’:

loop()

if y<=15:

y=15
Acknowledgements
The author is grateful to Sibi Chakkaravarthy Sethuraman and Soubhagya Barpanda, Department of Computer Science and Engineering, VIT-AP and to Hari Seetha, head, Department of Computer Science and Engineering at VIT-AP.


