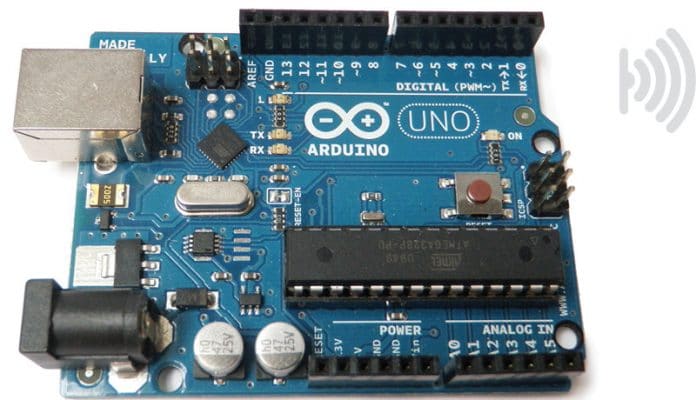
The Arduino board is a classic example of open source hardware that can be programmed and customised for use with various operating systems. It is commonly used to transmit IoT data to the cloud for analysis, storage and processing.
Open source software is very widely adopted throughout the world but open source hardware (OSH) is still undergoing research. Sometimes called free and open source hardware (FOSH), OSH refers to the firmware, chips, motherboard and sensors that are available for programming and customising, without any issues of proprietary licences and distribution. Open source hardware (comprising chips, sensors and boards, which can be programmed on demand to suit various needs) is commonly used in electronics and communications engineering.
Types of open source hardware
Different types of open source hardware associated with the development and programming of electronic boards are available for specific and on-demand applications, and can be deployed for integrated circuits on motherboards. Open source hardware can be used in the following fields.
- Computers: In desktop or laptop computing devices, much research is going on for the customisation of motherboards with real-time sensor devices so that live signals can be fetched in computers. These live signals may be related to satellite data, global positioning systems (GPS), temperature, humidity, environmental factors, ultrasonic signals, and so on.
- Electronics: This is the key domain in which electronic boards are customised using programming languages and scripts.
- Mechatronics: This is the merger of mechanical and electronics engineering.
Arduino
Arduino (https://www.arduino.cc) is an OSH and electronics platform for real-time applications.
It is available in many variants, and can be selected depending upon the type of application for which it is required. There are different boards available that can be programmed for specific applications.
Arduino boards are available for:
- Beginners
- Enhanced features
- Internet of Things (IoT)
- Education
- Wearable devices
Arduino UNO is one of the widely used microcontroller boards for beginners. This board can be easily programmed using the Arduino IDE, available at https://www.arduino.cc/en/Main/Software. The Arduino IDE software is available for multiple platforms including Windows, Mac OSX and Linux. C and C++ are the base programming languages used to program and customise the behaviour of the Arduino microcontroller board. The Arduino IDE can be downloaded without any cost, along with the live updates of the software.
Preparing Arduino for Internet of Things (IoT) applications
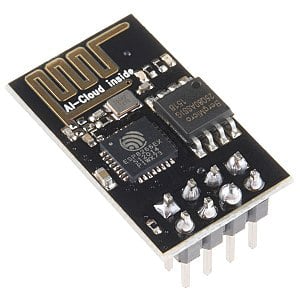
Arduino can be connected with live platforms of Internet of Things (IoT) by using Wi-Fi or similar network based chips. ESP8266 is a very popular device for communication with the Internet that can be easily interfaced with Arduino microcontroller boards. The ESP8266 Wi-Fi chip is very low cost and can be directly connected with the Arduino board to establish communication with the real cloud.
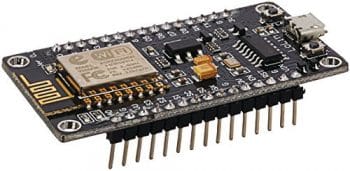
NodeMCU, an open source IoT based hardware platform with inbuilt Wi-Fi: To communicate and transfer data to the cloud in real-time, there is another chip called NodeMCU (http://www.nodemcu.com) that can directly communicate with live servers. NodeMCU integrates the firmware with inbuilt Wi-Fi connectivity so that direct interaction with the network can be done without physical jumper wires. It is an Arduino-like board that is used for interfacing with the cloud in real-time so that the live signals or data can be logged or stored for predictive analysis.
Storing sensor data in IoT platforms
There are a number of IoT platforms that can be used for the storage of real-time streaming sensor data from Arduino and similar boards. Once the circuit is created using Arduino, the signals can be transmitted and stored directly onto IoT platforms. These open source IoT platforms can be used for storage, processing, prediction and visualisation of the data recorded from the sensors on the Arduino board.
A few prominent IoT platforms that can be used for device management and the visualisation of data are:
- ThingSpeak: thingspeak.com
- Carriots: carriots.com
- KAA: kaaproject.org
- Things Board: thingsboard.io
- MainFlux: mainflux.com
- Thinger: thinger.io
- DeviceHive: devicehive.com
Transferring data to ThingSpeak
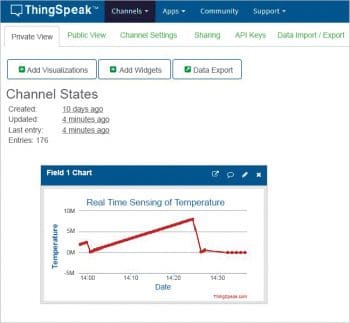
ThingSpeak (https://www.thingspeak.com) is a widely used open IoT platform for the collection, storage and visualisation of real-time sensor data fetched from Arduino, Raspberry Pi, BeagleBone Black and similar boards. Live streaming data on the cloud can be preserved using channels in ThingSpeak.
To work with ThingSpeak, a free account can be created. After successfully signing up on ThingSpeak, a channel is created on the dashboard and a ‘Write Key’ is generated, which is to be used in the Arduino code.
The key features of ThingSpeak include the following:
- Configuration of devices for sending data to a cloud based environment
- Aggregation of sensor data from different devices and motherboards connected with sensors
- Visualisation of real-time sensor data including historical records
- Pre-processing and evaluation of sensor data for predictive analysis and knowledge discovery
The source code that can be customised and executed on Arduino IDE so that real-time data can be fetched on board and then transmitted to ThingSpeak is given below. For simplicity, the execution of the code is done for NodeMCU hardware, which has inbuilt Wi-Fi for sending the data to the IoT platform.
#include <ESP8266WiFi.h>

const char* mynetwork = “<Wi-Fi Network Name>”;

const char* mypassword = “<Wi-Fi Network Mypassword>”;

const char* thingspeakhost = “api.thingspeak.com”;

char tsaddress[] = “api.thingspeak.com”;

String ThingSpeakAPI = “<ThingSpeak Write Key>”;

const int UpdateInterval = 30 * 1000;

long ConnectionTime = 0;

boolean connectedlast = false;

int fcounter = 0;

float value = 100;

WiFiClient client;

void setup()

{

Serial.begin(9600);

startEthernet();

}

void loop()

{

String RecordedAnalogInput0 = String(value++, DEC);

if (client.available())

{

char c = client.read();

}

if (!client.connected() && connectedlast)

{

client.stop();

}

if(!client.connected() && (millis() - ConnectionTime > UpdateInterval))

{

updateThingSpeak(“field1=”+RecordedAnalogInput0);

}

if (fcounter > 3) {startEthernet();}

connectedlast = client.connected();

}

void updateThingSpeak(String tsData)

{

if (client.connect(tsaddress, 80))

{

client.print(“POST /update HTTP/1.1\n”);

client.print(“Thingspeakhost: api.thingspeak.com\n”);

client.print(“Connection: close\n”);

client.print(“X-THINGSPEAKAPIKEY: “+ThingSpeakAPI+”\n”);

client.print(“Content-Type: application/x-www-form-urlencoded\n”);

client.print(“Content-Length: “);

client.print(tsData.length());

client.print(“\n\n”);

client.print(tsData);

ConnectionTime = millis();

if (client.connected())

{

Serial.println(“Connecting to ThingSpeak...”);

Serial.println();

fcounter = 0;

}

else

{

fcounter++;

Serial.println(“Connection to ThingSpeak failed (“+String(fcounter, DEC)+”)”);

Serial.println();

}

}

else

{

fcounter++;

Serial.println(“Connection to ThingSpeak Failed (“+String(fcounter, DEC)+”)”);

Serial.println();

ConnectionTime = millis();

}

}

void startEthernet()

{

fcounter = 0;

client.stop();

Serial.println(“Connecting”);

WiFi.begin(mynetwork, mypassword);

while (WiFi.status() != WL_CONNECTED) {

delay(500); }

}

Transferring data to Carriots
Carriots (https://www.carriots.com) by Altair is another open IoT platform for logging and processing of sensor data on the cloud based environment. The use cases of Carriots include implementation in smart retail, smart cities, smart energy, smart oil, smart agriculture, smart buildings, smart banking and others.
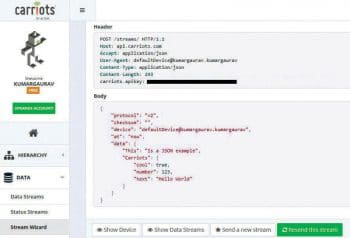
The Carriots platform can be accessed after free registration at carriots.com. After logging into Carriots, a secured control panel is provided that has options for creating and mapping devices and streams. There are options to integrate the streaming with e-mail and SMS for live notifications.
The following is the source code for the Arduino IDE which transmits data to Carriots:
#include “ESP8266WiFi.h”

const char* WiFiNetworkName = “<WiFi Network Name>”;

const char* NetworkPassword = “<WiFi NetworkPassword>”;

const char* ServerName = “api.carriots.com”;

const String CARRIOTSAPI = “<API Key of Carriots>”;

const String DEVICE = “defaultDevice@kumargaurav.kumargaurav”;

WiFiClient client;

int readval = 0;

void setup() {

Serial.begin(9600);

delay(1000);

Serial.println();

Serial.print(“Connecting to Network”);

Serial.println(WiFiNetworkName);

WiFi.begin(WiFiNetworkName, NetworkPassword);

while (WiFi.status()!= WL_CONNECTED) {

delay(1000);

}

Serial.println(“Connected”);

}

void sendStream()

{

if (client.connect(ServerName, 80)) {

Serial.println(F(“connected”));

String json = “{\”protocol\”:\”v2\”,\”device\”:\”” + DEVICE + “\”,\”at\”:\”now\”,\”data\”:{\”RecordedData\”:\”” + val + “\”}}”;

client.println(“POST /streams HTTP/1.1”);

client.println(“Host: api.carriots.com”);

client.println(“Accept: application/json”);

client.println(“User-Agent: Arduino-Carriots”);

client.println(“Content-Type: application/json”);

client.print(“carriots.CarriotsAPI: “);

client.println(CARRIOTSAPI);

client.print(“Content-Length: “);

int thisLength = json.length();

client.println(thisLength);

client.println(“Connection: close”);

client.println();

client.println(json);

}

else { Serial.println(F(“Not Connected”)); }

}

void loop() {

readval = analogRead(A0);

Serial.println(val);

Serial.println(F(“Transmit Data”));

sendStream();

delay(1000);

}
After executing the code in the Arduino IDE, the real-time data is transmitted to the Carriots server for recording. There are multiple file formats in which data can be stored for further evaluation.

The tech world is trying to connect every ‘thing’ using network based devices. This type of communication in which all objects are connected with each other is referred to as the Internet of Things (IoT). To work in this domain, there is a need for real sensor based devices with customisable hardware and chips. By using these, a well connected and programmed environment can be created in which secure and effective communication can take place. There is a lot of open source hardware available, including Arduino and Raspberry Pi, which can be programmed for multiple real-life applications for low cost IoT implementations.


