This article explores NativeScript, an open source framework for building truly native mobile apps.
There are a number of options available in the market today for cross-platform mobile app development. In this article we explore NativeScript, which is an easy and user-friendly mobile app development platform. You can learn it very quickly if you know HTML, CSS and JavaScript. NativeScript mainly focuses on the front-end and uses Angular, Modern JavaScript and TypeScript.
Architecture
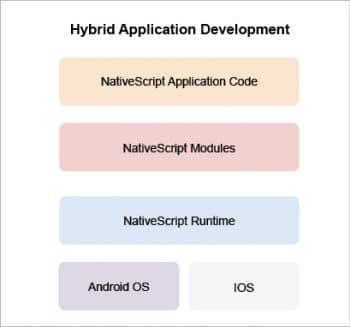
The NativeScript hybrid mobile app development architecture is divided into multiple layers. The mobile world is divided into two main platforms—Android and iOS. Each of these platforms has its own JavaScript machine. For iOS, it’s JavaScript Core; this is a JavaScript VM that runs JavaScript code for iOS. Likewise, for Android, we have the V8, an environment that runs JavaScript code for Android.
The NativeScript runtime provides the native capability for both the platforms. By using NativeScript modules or packages, we can provide the various capabilities that will be available to the JavaScript app. Beyond that, we can build the app’s code using Angular JS. We use JavaScript wrappers for native app development. The actual rendering of the UI is done using native UI elements. That’s why it behaves similar to or as fast as vanilla Android or iOS applications.

Installation and a demo
NativeScript is built on Node.js; so if you don’t have the latter, you need to install it. Installation is very simple. Go to the official website of Node.js, and get the installation file. Double click on it and install it. The link for the official website is https://nodejs.org/.
To check whether Node.js is already installed or not, you can use the following command:
node -v
If you get an error message like ‘No command found’ or ‘Command is not recognised’, it means you have not installed Node.js. After installing it, the next step is to install NativeScript, for which you can use the following command:
npm install -g nativescript
To verify whether NativeScript has been successfully installed, we can run the following command:
tns
Here, ‘tns’ stands for Telerik NativeScript since Telerik has developed this framework. If you see a lot of options as an output, it means you have successfully installed NativeScript.
After installing NativeScript, the next step is to install the requirements for iOS and Android. To build native iOS and Android apps, set up the development environment. Here, tns provides a quick start script which will help us to install everything.
Setting up the development environment in Windows: Press the Start button, type cmd, and then right-click and run as an administrator, going on to click the Enter button. Next, run the following script at the CLI prompt. Make sure that you run it as an administrator; else, it will fail or give some error.
@powershell -NoProfile -ExecutionPolicy Bypass -Command “iex ((new-object net.webclient).DownloadString(‘https://www.nativescript.org/setup/win’))”
The script will take some time to install everything. Once it is done, you can close the CLI and open it again to refresh it.
After installation, we will have the following:
Node.js (LTS) 8.x or later

Google Chrome

JDK 8

Android SDK

Google Repository

Android SDK build-tools

Android Studio
The script will work for the Android environment in Windows, and if you want to develop iOS apps in Windows, then NativeScript Sidekick has to be installed. The link for this is https://www.nativescript.org/nativescript-sidekick.
Due to time and space constraints, we are skipping this stage.
Setting up the development environment in Mac systems: If you are using the Mac OS, then you can run the following quick start script:
ruby -e “$(curl -fsSL https://www.nativescript.org/setup/mac)”
The script needs administrative access to run many commands, so while executing it, you will often be asked for the password. Once done, all iOS app development prerequisites will be installed.
The next step is to verify the setup. We can use the following command to do so:
tns doctor
If no issue is detected, it means everything is perfect and we can start our first ‘Hello world’ kind of application.
Building apps
To create an app, run the following command:
tns create HelloOpenSource4u --template nativescript-template-tutorial
Here, the tns create command will build an app with the name ‘HelloOpenSource4u’ and it will use a default template provided by NativeScript named ‘nativescript-template-tutorial’. There are other templates also available and you can create your own too. The link for that is https://github.com/NativeScript/NativeScript/wiki/Using-the-%60tns-create%60-command.
The Create command will take some time, as it fetches all the dependencies and creates a folder with a given app name. Once it is done, go to the folder. In our case, it’s ‘HelloOpenSource4u’.
Here is the command to run it:
cd HelloOpenSource4u

Running the app
To start the application, we need to use the tns run command inside the folder, as follows:
tns run android
It will take a few seconds, as NativeScript CLI will build and deploy a native Android application. When the command finishes, the native emulator will open and the app will be seen.
To run the application for iOS, run the command given below:
tns run ios
Figure 2 shows what happens after the app is run.
The advantages of using NativeScript are:
- It’s a hybrid mobile app development platform in which Android and native iOS apps without Web views can be created. It supports cross-platform development.
- It is based on JavaScript, mainly using TypeScript, Angular and Modern JavaScript.
- It offers access to native APIs via JavaScript, so we can even reuse packages from NPM, Gradle and many more.
So give it a try when you develop your next mobile app.


