Scikit-learn was initially developed by David Cournapeau as a Google Summer of Code project in 2007. The project now has more than 30 active contributors with paid support from Inria, Google, Tinyclues and the Python Software Foundation. Scikit-learn provides algorithms for supervised and unsupervised learning, using a Python interface.
Machine learning is one of the branches of computer science in which algorithms (running inside computers) learn from the data available to them. With this learning mechanism, various predictive models can be arrived at.
The machine learning systems (or algorithms) can be broadly classified into many categories, based on various factors and methods. The most popular of these are:
- Supervised learning
- Unsupervised learning
- Semi-supervised learning
- Reinforcement learning
- Online/batch learning
Supervised learning: In supervised learning, the data we input to these algorithms also includes the expected solution, which is called labels.
The supervised learning algorithm consists of sets of variables called dependent and independent variables. Dependent variables are derived from the target or outcome and independent variables are predictors.
Supervised learning occurs when the machine is taught or trained using data that is well labelled (which means that some data is already tagged with the correct answer or classification). Once this is done, the machine is provided with a new set of data or examples, so that this algorithm analyses the training data (set of training examples or data sets) and produces the desired outcome from labelled data.
The most popular and talked about supervised learning algorithm is the ‘Spam or Ham’ classification which is used for spam email classification. Another popular algorithm relates to fruit classification — if the shape of an object is round with a depression at its top and the colour is red, then it will probably be labelled as ‘apple’. And if the shape of an object is a long, curved cylinder that is green-yellow in colour, then it will probably be labelled as ‘banana’.
Some of the most important and heavily used supervised learning algorithms are:
- k-Nearest neighbours
- Linear regression
- Logistic regression
- Support vector machines (SVMs)
- Decision trees and random forests
- Neural nets (also called NNs)
Unsupervised learning: Here, the training data is unlabelled. It is similar to a system trying to learn without a teacher. In unsupervised learning, the training of the machine or system is done using the information that is neither classified nor labelled. Because of this, the algorithm itself will act on information without any guidance. Here, the machine with this unsorted information tries to recognise similarities, patterns and differences, without any training.
Some of the most important and extensively used unsupervised algorithms are listed below.
Clustering: These classify customers or buyers based on their purchasing patterns:
- K-Means
- Hierarchical cluster analysis (HCA)
- Expectation maximisation
Visualisation and dimensionality reduction:
- Principal component analysis
- Kernel PCA
- Locally-linear embedding (LLE)
- T-distributed Stochastic neighbour embedding (t-SNE)
Association rule learning: These set rules based on certain recognisable patterns of behaviour, like the customer who buys product X may also buy product Y.
- Apriori
- Eclat
Semi-supervised learning: Some algorithms can deal with partially labelled data and much unlabelled data; or sometimes, with a little bit of labelled data. These kinds of algorithms are called semi-supervised learning algorithms.
A photo hosting service like Google Photos is a good example of semi-supervised learning.
Reinforcement learning: RL or reinforcement learning is an area of ML inspired mainly by behavioural psychology. It is totally different from supervised learning. In this algorithm, an agent learns how to behave in an environment by performing actions and seeing the results.
Examples include Google’s DeepMind and AlphaGo.
Batch and online learning: Online and batch processing are slightly different, although both perform well for parabolic performance surfaces.
One major difference between them is that the batch algorithm keeps the system weights constant while computing the error associated with each sample in the input. Since the online version is constantly updating its weights, its error calculation (and thus gradient estimation) uses different weights for each input sample. This means that the two algorithms visit different sets of points during adaptation. However, they both converge to the same minimum.
Scikit-learn
In this article, we will primarily explore the Scikit library for machine learning purposes. Scikit is open source and released under the BSD licence. Most parts of the Scikit library are written in Python and some of its core algorithms are written in Cython (for efficiency and performance).
Scikit-learn’s main purpose is to build models; so this library is not well suited for other activities like reading, manipulation of data or the summarisation of data.
The benefits of Scikit-learn are:
- It is one of the most consistent interfaces available today to build ML models. It provides the user with many tuning parameters.
- Many of the good functionalities are in-built in this library.
- It also has good documentation that is easy to understand, and has active community support.
- It covers most of the well-known machine learning models
- However, it does have some drawbacks:
- Many geeks mention that in the beginning, Scikit-learn is somewhat harder to learn, compared to R.
- There is less emphasis on model interpretability.
Scikit-learn is a machine learning library for Python. It features several regression, classification and clustering algorithms including SVMs, gradient boosting, k-means, random forests, etc. I have given a brief overview of these algorithms earlier, keeping this in mind. This library is also designed to work with other Python based libraries like that of NumPy and SciPy.
A combination of these three libraries is well suited for many machine learning models.
Installation
The installation process of Scikit is easy, and it is assumed that the latest version of the NumPy (1.8.2 or above) and SciPy (0.13.3 or above) library packages are already preinstalled and supported in your systems. Once these prior dependent packages are installed, the installation of the Scikit library can proceed.
Note: It is assumed that Python 3.3 or a later version is used for these models.
Depending on the framework or Python environment in use, Scikit can be installed with the following set of commands. For Pip installation, give the following command:
ubuntu@ubuntu:~$ pip install scikit-learn
If the Anaconda package is in use, then use the following command (this step varies from the Conda prompt based on Windows, Mac or Linux platforms). Use the IPython terminal (now called Jupyter):
# conda install scikit-learn
Once the installation is done, the Scikit library can be used to build and predict models in Jupyter or other frameworks of choice. I have used Jupyter for all the code examples.
Building a model
Follow the steps shown below to build a model.
Step 1: For simplicity and ease of demonstration, the iris data set from kaggle.com is used here. Kaggle is one of the most popular websites and hosts a lot of data for machine learning model-building (https://www.kaggle.com/jchen2186/machine-learning-with-iris-dataset).
This data is a classification of the iris flower along with all its varieties, which are classified based on the length and width of their petals and sepals.
- There are 150 observations with four features each (sepal length, sepal width, petal length and petal width).
- There are no null values, so we don’t have to worry about that.
- There are 50 observations for each species (setosa, versicolor, virginica, etc).
- The response variable is the iris species.
- This is a typical classification problem, as the response is categorical in nature.
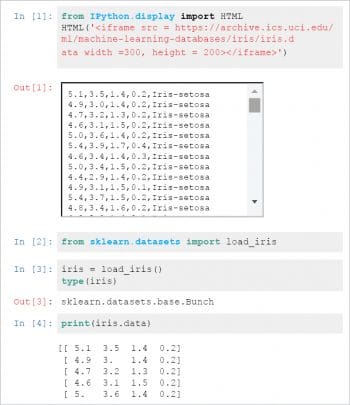
- Import the iris data set from the archive https://archive.ics.uci.edu/ml/machine-learning-databases/iris/iris.data
- Load the ‘sklearn’ library.
- Load the data set to ‘sklearn’ library.
- Please refer to Figure 1.
Step 2: Once the available data is collected, the algorithm to be chosen has to be decided. In classifying the iris flower, the KNN K-Nearest Neighbour algorithm will be used.
The following are the requirements to work with the ‘scikit-learn’ library:
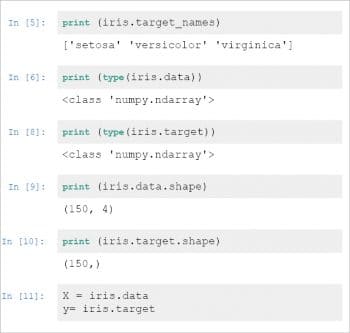
- Feature and response are separate objects
- Feature and response should be numeric
- Feature and response should be NumPy arrays
- Feature and response should have specific shapes
Variable ‘x’ is a two-dimensional array and variable ‘y’ is single dimensional. Please refer to Figure 2.
Step 3: As described earlier, the KNN algorithm has been selected and this involves the following steps:
- Pick a value for ‘k’.
- Search for the k-observation in the mentioned training data.
- Use the most popular response value from the k-nearest neighbour.
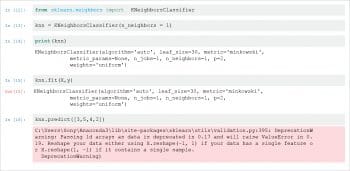
Please refer to Figure 3.
The following are the important steps and measures that are to be taken, while coding this:
- Import the ‘estimator’.
- Have the object ready and instantiate it (this is also called ‘hyper parameter’ ).
- Fit the model (with feature and response).
- Finally, predict the response from the observation.
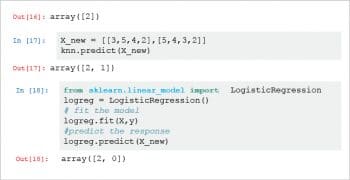
Please see Figure 4.
Note: The output of Line-16, which is ‘array([2])’ is the encoding for the ‘viriginica’ for the unknown Iris. In the Jpuyter notebook, the code in Line-30 “DeprecationWarning” can be ignored. In the Jupyter notebook, Ouput Line-17 ‘array([2,1]) is the classification for ‘Iris_setosa’.
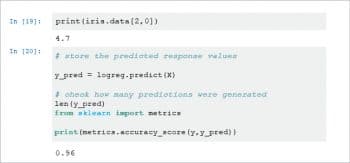
Once this is done, check for the accuracy of the model. In this case, the model has provided an accuracy of 0.96, which is 96 per cent, and is considered good. Please see Figure 5.
As stated earlier, Scikit-learn, along with the combination of SciPy and NumPy, is one of the best options available today for machine learning predictions.


I’ve been programming for some 40 years in C, C#, various dialects of BASIC, and Pascal. I found the combination of Python, numpy, pandas, and Scikit-Learn to be a real challenge. The syntax and the handling of arrays and matrices is particularly foreign and non-intuitive, IMAO. Eventually it comes somewhat clear, clear enough to build models that work.
Fortunately, there are loads of wonderful folks out there sharing their code, explanations, and help. A blessing on all of you. You have REALLY helped me over the hump(s) in this particular environment.
One other bone to pick is lack of easy real-time interface with the user. I’m thinking of building a C# interface that then launches the Scikit-Learn model module(s) which will read the ephemeral data from a text/csv file generated by the C# app. This would allow on-the-fly choice of input data from pick lists for instance.
WARNING! don’t fall into statistical traps!! You need to do all sorts of tests on your results to make sure you are not fooling yourself. Cross validation and other tests on the predicted versus the real tend to point out fallacies in your model. I know, ha ha, I did it to myself with a time series predictor.
Having rambled on about it, I do think that Scikit-Learn is a marvelous way to start in ML. It has all sorts of models to use and even bolt together with ‘pipeline’. You can build your own models in Python. Etc. Have fun! and good hunting for that Mackey-Glass solution! *grin*