Firmadyne is a Linux based system for emulating and analysing firmware. It is used for penetration testing of firmware and can even run exploits. It automatically runs Linux based firmware designed for embedded devices.
During IoT security testing, devices and related software need to be tested on the basis of various parameters. One of the requirements is firmware assessment, which can be carried out with hardware and software emulation. In hardware emulation, the tester has physical access to the device, the firmware is flashed on to it and the tester interacts with it through an interface. The hardware device can be a router, gateway device, etc. In software emulation, the tester may not have access to the device, but the firmware can be emulated through virtualisation, and dynamic testing of the firmware can be carried out.
The advantage of software emulation is that it is cost-effective. There is no need to purchase the device every time the firmware needs to be tested. If the firmware image can be accessed, then it can be mounted by using software emulation techniques and the testing can be done.
Firmadyne is a tool that can be used for dynamic analysis of Linux based embedded firmware. It is built on top of Qemu, an open source machine emulator and virtualiser. It consists of other components such as Binwalk, the PostgreSQL database and binaries, all of which will be discussed in this article.
Setting up Firmadyne
Clone Firmadyne from git clone https://github.com/firmadyne/firmadyne.
The prerequisites for Firmadyne can be installed with the following commands:
apt-get install busybox-static fakeroot git kpartx netcat-openbsd nmap python-psycopg2 python3-psycopg2 snmp uml-utilities util-linux vlan
During firmware analysis, the first step is to extract the firmware. Generally, firmware is in the .img, .bin or .chk format and needs to be extracted from the image file. This can be done using a tool named Binwalk.
To install Binwalk, use the following command:
apt-get install binwalk
Firmadyne uses PostgreSQL as the database to store the information and the metadata related to the firmware. The schema for this database can be found at ./firmadyne/database/schema in the firmadyne folder.

Setting up the database: For installing PostgreSQL, user creation, creating the database and dumping the schema, use the following commands:
apt-get install postgresql

postgres createuser -P firmadyne, firmadyne

postgres createdb -O firmadyne firmware

postgres pssql -d firmware < ./firmadyne/database/schema
Installing binaries: Go to the firmadyne folder and execute the download.sh file, which downloads all the pre-built binaries:
cd firmadyne; ./download.sh
Installing Qemu for virtualisation: To install Qemu, give the following command:
sudo apt-get install qemu-system-arm qemu-system-mips qemu-system-x86 qemu-utils
Once setup is completed, the firmware is mounted for dynamic analysis. For this demonstration, I have downloaded the DLink DIR-822_REVB_FIRMWARE_2.03b01.BIN file from the DLink vendor’s official website.
After downloading the firmware, let us try to extract the file system of the firmware using the Python script extractor.py, as shown in the code below. Once the extraction process begins, a tag is assigned to the firmware. As shown in the code below, Database ID 8 is assigned to the firmware, which is being extracted. The extraction of the firmware results in a .gz file being created in the images/ folder. This .gz file carries a number related to its database image ID.
root@kali:~/firmadyne# ./sources/extractor/extractor.py -b Dlink -sql 127.0.0.1 -np -nk “DIR-822_REVB_FIRMWARE_2.03b01.BIN” images/

>> Database Image ID: 8

/root/firmadyne/DIR-822_REVB_FIRMWARE_2.03b01.BIN

>> MD5: b666a447ebabdec1db7672048b8e6d0a

>> Tag: 8

>> Temp: /tmp/tmp2FSvWv

>> Status: Kernel: True, Rootfs: False, Do_Kernel: False, Do_Rootfs: True

>> Recursing into archive ...

>>>> Squashfs filesystem, little endian, version 4.0, compression:lzma, size: 5025153 bytes, 2282 inodes, blocksize: 131072 bytes, created: 2016-03-02 07:07:37

>>>> Found Linux filesystem in /tmp/tmp2FSvWv/_DIR-822_REVB_FIRMWARE_2.03b01.BIN.extracted/squashfs-root!

>> Skipping: completed!

>> Cleaning up /tmp/tmp2FSvWv...
Once extraction is completed, the architecture of the firmware is identified and the output is stored in the image table of the database with the help of the getArch.sh file, as shown in the code below.
root@kali:~/firmadyne# ./scripts/getArch.sh ./images/8.tar.gz

./bin/busybox: mipseb

Password for user firmadyne:
In the next step, the contents of the file system for the firmware are loaded. As mentioned earlier, the contents from 8.tar.gz, which is located under the images folder, are loaded. Use the following command:
./scripts/tar2db.py -i 8 -f ./images/8.tar.gz
Next, a QEMU disk image is created, as shown in the code below.
root@kali:~/firmadyne# ./scripts/tar2db.py -i 8 -f ./images/8.tar.gz

root@kali:~/firmadyne# ./scripts/makeImage.sh 8

Querying database for architecture... Password for user firmadyne:

mipseb

----Running----

----Copying Filesystem Tarball----

----Creating QEMU Image----

Formatting ‘/root/firmadyne/scratch//8//image.raw’, fmt=raw size=1073741824

----Creating Partition Table----

Welcome to fdisk (util-linux 2.31.1).

Changes will remain in memory only, until you decide to write them.

Be careful before using the write command.

Device does not contain a recognized partition table.

Created a new DOS disklabel with disk identifier 0x99029eac.

Command (m for help): Created a new DOS disklabel with disk identifier 0x2f73ce76.

Command (m for help): Partition type

p primary (0 primary, 0 extended, 4 free)

e extended (container for logical partitions)

Select (default p): Partition number (1-4, default 1): First sector (2048-2097151, default 2048): Last sector, +sectors or +size{K,M,G,T,P} (2048-2097151, default 2097151):

Created a new partition 1 of type ‘Linux’ and of size 1023 MiB.

Command (m for help): The partition table has been altered.

Syncing disks.

----Mounting QEMU Image----

add map loop0p1 (254:0): 0 2095104 linear 7:0 2048

----Creating Filesystem----

mke2fs 1.43.9 (8-Feb-2018)

Discarding device blocks: done

Creating filesystem with 261888 4k blocks and 65536 inodes

Filesystem UUID: 5a3d258b-879e-4b5f-889f-bd4a1bebed90

Superblock backups stored on blocks:

32768, 98304, 163840, 229376

Allocating group tables: done

Writing inode tables: done

Writing superblocks and filesystem accounting information: done

----Making QEMU Image Mountpoint----

----Mounting QEMU Image Partition 1----

----Extracting Filesystem Tarball----

----Creating FIRMADYNE Directories----

----Patching Filesystem (chroot)----

Creating /etc/TZ!

Creating /etc/hosts!

Creating /etc/passwd!

Removing /etc/scripts/sys_resetbutton!

----Setting up FIRMADYNE----

----Unmounting QEMU Image----
Having created an image that can be emulated, the network interface can be kick-started and the firmware can be emulated, as shown in the code below.
root@kali:~/firmadyne# ./scripts/inferNetwork.sh 8

Querying database for architecture... Password for user firmadyne:

mipseb

Running firmware 8: terminating after 60 secs...

qemu-system-mips: -net nic,vlan=0: ‘vlan’ is deprecated. Please use ‘netdev’ instead.

Bad SWSTYLE=0x04

qemu-system-mips: terminating on signal 2 from pid 2074 (timeout)

Inferring network...

Interfaces: [(‘br0’, ‘192.168.0.1’), (‘br1’, ‘192.168.7.1’)]

Done!
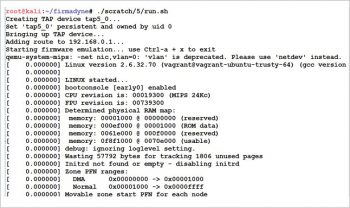
Now, in this case, the interface eth0 of the DLink firmware is up with the IP 192.168.0.1 and 192.168.7.1. Once the interface is up, the firmware can be emulated with the run.sh script, as shown in Figure 1.

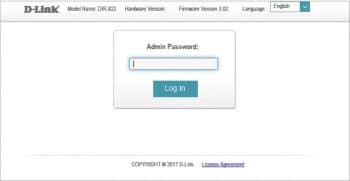
Since the DLink firmware used in this demonstration consists of a Web portal, it can be accessed over http://192.168.0.1 from any Web browser, as shown in Figure 2.
Next, after mounting the firmware, tests can be carried out for various application level security bugs. Tools like Nmap can be used to further probe for open ports. This enables an understanding of other possible entry points into the application. In a similar way, dynamic assessment can be carried out for different types of firmware.
Firmadyne comes with three basic automated tools — accessible Web page, analyse snmpwalk and vulnerability check. Accessible Web page script goes through the file system of the firmware image and gathers the information depending on the authentication required. Analyse snmpwalk gathers information about the SNMP (simple network management protocol) community strings. The vulnerability check module tests for the presence of vulnerabilities using exploits from Metasploit. Using interceptor tools like burpsuite, we can find the Web based vulnerabilities after emulating the firmware. This can be done without having access to expensive hardware
So with the help of Firmadyne we can automate firmware analysis to an extent. However, tester intervention is always required to verify the bugs. Also, emulating the images becomes easy with Firmadyne.


