This article introduces the reader to the Moodle plugins, CodeRunner and Virtual Programming Lab (VPL).
A learning management system is a tool used to create and manage educational and training programs. Moodle is a very popular learning management system; in fact, it is so popular that people may not even know of an alternative to it, off hand. Moodle is free and open source software licensed under the GNU General Purpose License. It has been developed using PHP and it can be used to create additional study material for academic subjects as well as to enable blended learning. The term ‘subject’ might be a bit misleading. In many parts of the world, like in Europe or the USA, the term used to refer to the same unit of study is ‘course’, which, in the Indian context means a collection of subjects. For example, in our country, a degree course in physics might have a subject called astrophysics.
Blended learning is an educational strategy in which traditional classroom methods are combined with online digital media to make the learning process more effective. An example of blended learning is a flipped classroom where the instructional materials are provided outside the classroom as online resources and discussions, while traditional homework is done inside the classroom. The arrival of Moodle has made the creation of course material that follows the blended learning model very easy.
In this article, we will focus on a lesser-known feature of Moodle called plugins. Since there are a large number of plugins available for use with Moodle, let’s discuss just two that are extremely useful to academicians who work as programming language instructors. These are CodeRunner and Virtual Programming Lab (VPL). Both allow the instructor to evaluate programming assignments very easily. CodeRunner is relatively simple and is available as a question type. VPL is a more complicated plugin, which offers features like interactive program editing, reviewing, plagiarism checking, etc.

Installing Moodle
The first step is to have a Web server solution stack package installed in your system. We are using XAMPP in our systems, so let us look at how it can be used to configure and run Moodle—but remember that you can use any other Web server of your choice to get the same effects. XAMPP is free and open source software consisting of the Apache HTTP server, MariaDB database, and interpreters for PHP and Perl. The installation of XAMPP is straightforward and after completing it, execute the command sudo /opt/lampp/lampp start on a terminal to start the XAMPP server. Now open a Web browser and type http://localhost on the address bar to check if XAMPP is working properly. If the XAMPP page loads correctly, proceed with the installation of Moodle. You can download the installation file from the official website of Moodle at https://download.moodle.org/. The latest version of Moodle 3.5 in different compression and archiving file formats is available for download at this location.
After downloading the installation file called moodle-3.5.tgz, extract and copy it into the directory /opt/lampp/htdocs with admin privileges. Next, create a database for Moodle in phpMyAdmin, which is available with XAMPP. Open a Web browser and type http://localhost/phpmyadmin on the address bar to access phpMyAdmin. On the browser, click the option New to create a new database. Select the option Create database and name it ‘moodle’. Using a Web browser, go to http://localhost/moodle. Open the Moodle configuration pages. While going through the Moodle installation process, name the database moodle—the name of the database we have created in phpMyAdmin. Setting MariaDB as the default database is beneficial if you are using XAMPP.
During the installation, you will be asked to provide certain paths and other options, yet on the whole, you will be able to complete the installation without much difficulty —just make sure that you have admin privileges. Following these steps will only enable you to install Moodle in your local system. To make your Moodle installation available publicly, you need to purchase a domain name and server space from a Web hosting company and configure the cPanel — a Web-based hosting control panel offered by many hosting providers to website owners, allowing them to manage their websites from a Web based interface. You can then upload and extract the Moodle folder in the cPanel to make it available publicly.
The other option is to obtain just a domain name and configure Moodle in Google or Amazon cloud services and link that server’s IP address to your own domain name. Before discussing CodeRunner and Virtual Programming Lab (VPL), let’s create a course in Moodle. Courses are the spaces that allow Moodle users to create and provide learning materials to their students. Moodle directly provides options to create new courses and the operation is simple. In this article, we have created just a single course called Programming to make our discussion easy to follow.
It is not possible to include a large number of images in a single article so we have prepared a separate document titled Configuration.pdf which is available for download at opensourceforu.com/article_source_code/July18moodle.zip. The document consists of a detailed set of screenshots involving the configuration of Moodle as well as the configuration and use of the two plugins, CodeRunner and VPL. Please download and go through this document if you get confused with any of the steps involved in the configuration of Moodle, CodeRunner or VPL.
Installing CodeRunner
Now it is time to install the first plugin called CodeRunner, which is going to help programming language instructors a lot. Unlike other normal plugins in Moodle, CodeRunner and VPL involve a two-step installation process. First, we have to install the actual plugin and then install sandbox servers to run programs to be tested by CodeRunner and VPL. Sandbox servers are needed to prevent system crashes when students experiment with code, either due to the unintentional use of bad code or malicious code. Either way, it is not at all safe to allow third party programs to be executed by your own local compiler. Sandbox servers allow the third party programs to use only a restricted set of resources of the host machine and thus protect the system from any harm.
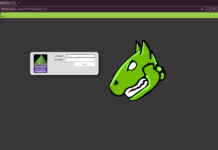
Moodle allows the course managers to set questions, the answers for which can be one among several question types. Some of the more commonly used question types of Moodle include multiple choices, short answers, numerical, descriptions, essays, matching, etc. CodeRunner offers question types that allow programming course content managers to set programming questions in which the student’s answer is code in some programming language. This code can then be automatically graded by running and testing it against test cases provided by the course manager. CodeRunner can be used to conduct programming tests in languages like C, C++, Java, Python, JavaScript, PHP, MATLAB, etc. To install the CodeRunner plugin, you have to log in to your Moodle server as the administrator. The plugin can be installed directly from the Moodle plugins directory. To do this, select the menu item Dashboard>Site administration>Plugins>Install plugins. We have installed the plugin CodeRunner from a zip file provided by the Moodle plugins directory. Figure 1 shows the CodeRunner plugin installation.
Setting up a sandbox server for CodeRunner
The sandbox server for CodeRunner is called Jobe server. There are two options available while deploying the Jobe server or any other sandbox server. You can use the address of the default Jobe server provided online or you can set up your own Jobe server on your local system. In this article, we have used the default Jobe server available online at jobe2.cosc.canterbury.ac.nz provided by the University of Canterbury, New Zealand to test CodeRunner programs, and installed a local sandbox server to test VPL so that the reader will be able to use sandbox servers online as well as locally. There is another reason why we do this. If you install more than one sandbox server in your local system, there will be a conflict because both the servers will use the same port address. Then you will have to manually change the port address for one of the servers. The advantage of using an online sandbox server is its ease of deployment whereas the disadvantage is that it is slow. If a large number of users take the test at the same time, the online sandbox server might deny service.
So, what we suggest is, experiment with both CodeRunner and VPL sandbox servers online, fix the plugin you like and set up the sandbox server of your choice locally so that faster execution is possible when a large number of students are taking the test. You can provide the address of the online Jobe server by taking the CodeRunner settings. The document Configure.pdf provides screenshots showing how to use the Jobe server installed in the local system as well as an online Jobe server.
Using CodeRunner
There are two different aspects to using plugins like CodeRunner. A programming language trainer will use CodeRunner to set an online programming test, whereas a student enrolled in that course will appear for this test to evaluate his or her level of knowledge. So, the two aspects of CodeRunner are setting up the test and taking the test.
We have already created a course titled Programming in Moodle. You should log in as an admin user, course designer or teacher, depending on the privileges provided by the admin user to create a CodeRunner test in Moodle. Here, in this example, we are logging in as the admin user to simplify things. The course called Programming will have a topic called Topic1, by default. Now, you need to create a quiz on Topic1 and add questions to it.
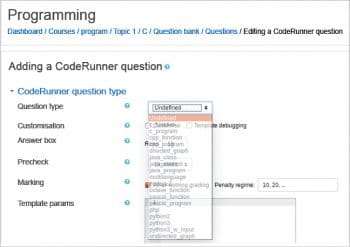
The questions can be first added to a question bank and then to the quiz. In our case, the name of the quiz is C to which we are adding a question type of CodeRunner. The question type option of CodeRunner allows a user to set the programming language in which the student is supposed to write the answer program. For this example, we have used c_function as the CodeRunner question type and thereby forced the student to write the answer as a C function. The other possible choices for CodeRunner question types include c_program, cpp_ function, cpp_program, java_ class, java_method, java_program, php, python2, python3, etc. Figure 2 shows the drop-down menu showing the question types of CodeRunner.
After setting this up, you need to provide details like the question name, question text, etc, so that the students get a clear idea regarding the answer they have to provide. Our question for this example is very simple — write a C programming language function to find the square of a number entered through the keyboard. The next task is to provide test cases for automatic evaluation of the program provided by a student. For example, if the input is -11, the answer should be 121 and if the input is 5, the answer should be 25. It is better to give a large number of test cases to make sure that the program provided by the student is in fact correct. You should provide test cases involving corner cases to achieve this.
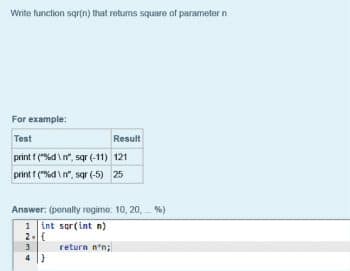
Now, you need to fix details regarding the grading and feedback for the test. Options like deferred feedback, adaptive mode, etc, can be used to modify the behaviour of the test. In our example, we have created only one question in the quiz called C to make things simpler, but remember there are no restrictions regarding the number of questions in a quiz. Now that we have created a test, student or guest users can attend this test depending on the privileges given to them. A user with proper authorisation can log in and attend this test. Figure 3 shows the environment provided by CodeRunner to write and execute answer programs. You will observe that some of the test cases are provided as examples to show the expected output.
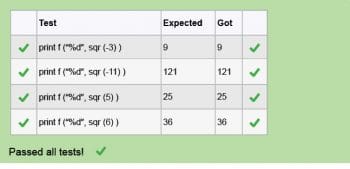
Once the student users are fine with the program, they can test it with CodeRunner. There are options provided by CodeRunner to reduce the grade for a question with each unsuccessful attempt. Figure 4 shows the output obtained after automatic evaluation of the program with test cases by CodeRunner. From the figure, it is clear that we have provided four test cases and the program has passed all four of those test cases. This is how CodeRunner can be used to set up automated programming tests. Remember, this article only provides a light introduction to CodeRunner, but for more details and advanced features, you can refer to the Moodle plugins directory.
Installing Virtual Programming Lab (VPL)
Now that we are familiar with the use of CodeRunner, it is time to introduce Virtual Programming Lab (VPL), which is much more powerful than CodeRunner. However, if both plugins can evaluate programming assignments by running the code provided by a student, what is the benefit of the additional features provided by VPL? Let us go through two academic scenarios to understand the need for the stronger features provided by VPL.
First, let us consider a student enrolled in an online course covering a new programming language, say, Rust. He has probably paid a fee and is willing to spend a lot of time to learn a new programming language. Usually, such online courses have programming assignments to test the knowledge level of the student. The student can write a program and test it to understand whether he has learned that topic or not. But is he going to copy the answer from some other source, say, the Internet? Most probably not. His aim is to learn a new programming language and plagiarising the program will not help him in any manner. In this scenario, the features of CodeRunner are sufficient and VPL might be overkill.
Now consider the second scenario in which you have to conduct an online exam, the marks for which will be considered for the final grade of a student. The academic community strongly disapproves of the practice of plagiarism but, in this scenario, some students might be tempted to get solutions online. In this case, the plugin should have additional features to check whether students have copied their programs from some other source. In this case, CodeRunner is not the best solution whereas VPL provides an option to check for plagiarism. VPL offers many such features that we should discuss. VPL is an activity module that can be used to create and conduct programming assignments in online programming courses.
As mentioned earlier, the installation of VPL is a two-step process. First, we have to install the plugin and then a sandbox server. The execution server that provides a sandbox for VPL is called a jail server, which is installed in your local machine. First log in to your Moodle server as the administrator, and you can install the plugin directly from the Moodle plugins directory. To do this, select the menu item Dashboard>Site administration>Plugins>Install plugins. The VPL plugin is also installed from a zip file provided by the Moodle plugins directory. The installation file for the jail server can be downloaded from http://vpl.dis.ulpgc.es/index.php/home/download. The latest version available for download is VPL Jail Execution System 2.2.2 and the name of this installation file is vpl-jail-system-2.2.2.tar.gz. Extract this file in your system and open a terminal inside the directory vpl-jail-system-2.2.2. In this directory, there is an installation shell script named install-vpl-sh. The installation can be completed by running this shell script, by executing the command ./install-vpl-sh on the terminal.
The detailed installation screenshots are given in the document Configure.pdf. If jail server is operating properly, it must respond with a page showing the text OK, if the URL http://server_name[:port ]/OK is typed in the address bar of a Web browser.
Using Virtual Programming Lab
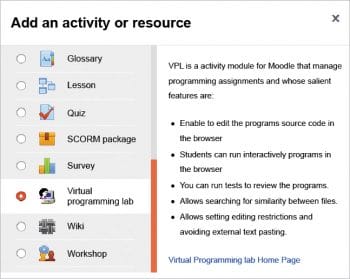
Let’s use VPL to set up an online programming test. Here again, we have to see how a teacher can set up a test using VPL and how a student can attend that test. To set up a test, you should log in as either an admin user, course designer or teacher, depending on the privileges provided by the admin user. In this example, we are again logging in as the admin user to simplify things. The course Programming created in Moodle has a topic called Topic1. The option Add an activity or resource allows us to add new VPL activity to Topic1. Figure 5 shows how VPL can be added as an activity.
Now, details regarding the program to be answered have to be provided — the program’s name, its description, etc. Just like for CodeRunner, for VPL too, we need to set up a test with a single question, which in this case is,“Find the square of a number entered through the keyboard.”
The other advantage of VPL over CodeRunner is that in the case of the latter, the solution program should be written in a specific programming language preset by the teacher. VPL does not have this restriction. Depending on the extension of the program, the required compiler will be selected by the jail server to do the compilation. For example, a file with an extension .py will be treated as a Python program and another file with an extension .c will be treated as a C program automatically by the jail server. The programming languages supported by VPL include Ada, C, C++, Fortran, Java, Pascal, Prolog, SQL, Scheme, etc.
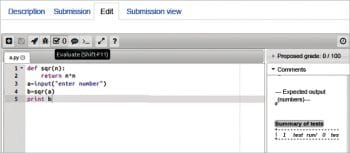
After this, test cases should be provided to conduct automatic code evaluation. The more the test cases, the better, because you will be able to make the evaluation more rigorous. You also need to provide submission and grading related parameters for the test, like how many submissions are allowed, the deadline for submissions, etc. Now the test is ready; so let us attend it. Also remember that just like CodeRunner, any number of questions can be added in a VPL activity. Participants can log in as students or guest users to attempt this, depending on the privileges given to them. After logging in, the participants can either upload their program or use the editor, like in CodeRunner. Figure 6 shows the program execution environment of VPL.
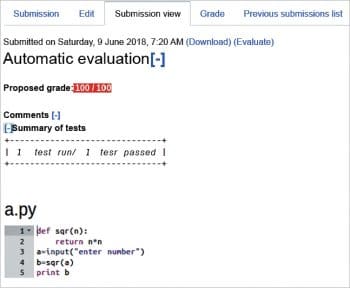
For this article, we have used a Python script called a.py, which finds the square of a given number. This program can be executed directly from the VPL environment. The jail server automatically detects a.py as a Python script by the extension py. On execution, the jail server will automatically check the script and give the result shown in Figure 7. From the figure, it is clear that there was only a single test case provided for evaluating the script and it has passed that test. So, in this manner, VPL can be used to create and conduct online programming tests. Only the bare minimum features of VPL are discussed here; for a more detailed discussion, please refer to the Moodle plugins directory.
Additional features of VPL
Earlier we have seen how VPL allows us to check for plagiarism. We also saw how the jail server will automatically assign compilers to test programs written in different languages. But plagiarism checking and automatic compiler selection are not the only attractive features provided by VPL. Just like in CodeRunner, VPL also allows users to edit the program source code in the browser. Another feature that is available with both CodeRunner and VPL is the ability to run programs interactively in the browser. One major difference between CodeRunner and VPL is that VPL allows you to upload program files written offline for verification. This is a very useful feature when the assignment involves large programs that might take a lot of time to complete. Another advantage of VPL is that it allows you to run tests to review the programs rather than the final submission for grading. In CodeRunner, incorrect submissions may lead to a reduction in the score for that program. VPL also allows users to set editing restrictions on the programming environment like disabling external text pasting. These features and the plagiarism-checking capability of VPL make it a powerful tool in the hands of online technology content providers.
We hope that the article will create a general awareness regarding Moodle plugins and motivate a lot of people to explore the hundreds of Moodle plugins available online. Exploring and adopting Moodle and its plugins will lead to a better teaching-learning process, and education will then become edutainment.


