


Consul supports multiple data centres, can be used as a key/value store, and can monitor cluster health. In this 17th article in the DevOps series, we discuss the Ansible deployment of Consul.
Consul is a tool that has been written by HashiCorp, and can be used for creating health checks for services and systems. It provides a simple HTTP API for using it as a key/value store. Consul is distributed, highly available, and is data centre aware. The recommended number of Consul nodes is three or five in a cluster, in order to handle failures. Every data centre can contain a Consul cluster. Consul is released under the Mozilla Public License 2.0.
Setting up Consul
We are going to set up and configure a Consul cluster with three Debian 9 (x86_64) guest virtual machines (VMs) using KVM/QEMU.
The host system is a Parabola GNU/Linux-libre x86_64 system and Ansible is installed using the distribution package manager. The version of Ansible used is 2.5.3 as indicated below:
$ ansible --version

ansible 2.5.3

config file = /etc/ansible/ansible.cfg

configured module search path = [‘/home/guest/.ansible/plugins/modules’, ‘/usr/share/ansible/plugins/modules’]

ansible python module location = /usr/lib/python3.6/site-packages/ansible

executable location = /usr/bin/ansible

python version = 3.6.5 (default, May 11 2018, 04:00:52) [GCC 8.1.0]
On the host system, we will create a project directory structure to store the Ansible playbooks, inventory and configuration files, as shown below:
ansible/inventory/kvm/

/playbooks/configuration/

/files/
The inventory/kvm/inventory file contains the following:
[consul1]

host1 ansible_host=192.168.122.140 ansible_connection=ssh ansible_user=debian ansible_password=password

[consul2]

host2 ansible_host=192.168.122.208 ansible_connection=ssh ansible_user=debian ansible_password=password

[consul3]

host3 ansible_host=192.168.122.59 ansible_connection=ssh ansible_user=debian ansible_password=password

[bootstrap:children]

consul1

[server:children]

consul2

consul3

[all:children]

bootstrap

server
We have three Consul guest VMs running that are labelled as ‘consul1’, ‘consul2’ and ‘consul3’. consul1 is defined as the bootstrap node. The other members (consul2 and consul3) of the Consul cluster belong to the server group. The ‘all’ group consists of all the three nodes.
The default Debian 9 installation does not have the sudo package installed. Log in as the root user, and install the sudo package on all the three VMs. The ‘debian’ user also requires sudo access:
root@debian:~# apt-get install sudo

root@debian:~# adduser debian sudo

Adding user `debian’ to group `sudo’...

Adding user debian to group sudo

Done.
You can now test connectivity from Ansible to the individual Consul nodes as well as collectively, by using the following commands:
$ ansible -i inventory/kvm/inventory consul1 -m ping

consul1 | SUCCESS => {

“changed”: false,

“ping”: “pong”

}

$ ansible -i inventory/kvm/inventory consul2 -m ping

consul2 | SUCCESS => {

“changed”: false,

“ping”: “pong”

}

$ ansible -i inventory/kvm/inventory consul3 -m ping

consul3 | SUCCESS => {

“changed”: false,

“ping”: “pong”

}

$ ansible -i inventory/kvm/inventory all -m ping

consul2 | SUCCESS => {

“changed”: false,

“ping”: “pong”

}

consul3 | SUCCESS => {

“changed”: false,

“ping”: “pong”

}

consul1 | SUCCESS => {

“changed”: false,

“ping”: “pong”

}

Consul
The first step is to install Consul on all the nodes. The software package repository is updated, and a few network tools are installed. The ‘consul’ binary is extracted from a Zip file obtained at HashiCorp’s website and copied to /usr/local/bin/consul. The execution of the binary is verified. A ‘consul’ user account is created in the system, and the /var/consul directory is created and owned by the ‘consul’ user. The playbook to install Consul is provided below for reference:
---

- name: Install Consul

hosts: all

become: yes

become_method: sudo

gather_facts: yes

tags: [consul]

tasks:

- name: Update the software package repository

apt:

update_cache: yes

- name: Install dependencies

package:

name: "{{ item }}"

state: latest

with_items:

- curl

- net-tools

- unzip

- name: Install consul

unarchive:

src: https://releases.hashicorp.com/consul/1.1.0/consul_1.1.0_linux_amd64.zip

dest: /usr/local/bin

remote_src: yes

- name: Verify consul installation

shell: "consul --version"

register: consul_version

- assert:

that:

- "'Consul' in consul_version.stdout"

- name: Create consul user

user:

name: consul

- name: Create Consul /var directory

file:

path: /var/consul

state: directory

owner: consul

group: consul

mode: 0755
The above playbook can be invoked using the following command:
$ ansible-playbook -i inventory/kvm/inventory playbooks/configuration/consul.yml --tags consul -vv -K
The ‘-vv’ represents the verbosity in the Ansible output. You can use up to four ‘v’s for a more detailed output. The ‘-K’ option prompts for the sudo password for the debian user account.
You can also now log in to any one of the nodes and check the version output by running Consul as indicated below:
$ consul --version

Consul v1.1.0

Protocol 2 spoken by default, understands 2 to 3 (agent will automatically use protocol >2 when speaking to compatible agents)
Bootstrap node
The bootstrap Consul node is the first to be configured. The /etc/consul.d/bootstrap directory is created and its configuration file (bootstrap-config.json) is copied to it. Its file contents are as follows:
{

“bootstrap”: true,

“client_addr”: “0.0.0.0”,

“server”: true,

“datacenter”: “chennai”,

“data_dir”: “/var/consul”,

“encrypt”: “PfCkrq/lFPem7slKP5N2Cw==”,

“log_level”: “INFO”,

“enable_syslog”: true

}
The configuration specifies that this is a bootstrap node, and the server should bind to any IP address. We specify a name to the data centre, and also the path to the data directory. An encryption key is specified to encrypt the traffic between the Consul nodes. Finally, the log level and use of syslog is specified in the configuration file.
We also create a systemd configuration file for starting the bootstrap Consul node as shown below:
[Unit]

Description=Consul service discovery agent

Requires=network-online.target

After=network-online.target

[Service]

Environment=GOMAXPROCS=2

Restart=on-failure

ExecStart=/usr/local/bin/consul agent -server -ui -data-dir=/tmp/consul -node=host1 -config-dir=/etc/consul.d/bootstrap -enable-script-checks=true

ExecReload=/bin/kill -HUP $MAINPID

KillSignal=SIGTERM

[Install]

WantedBy=multi-user.target
The ‘-ui’ option is provided to enable the Web front-end for Consul. The bootstrap node’s name is ‘host1’. The entire playbook to set up and start the bootstrap node is as follows:
- name: Configure bootstrap Consul node

hosts: bootstrap

become: yes

become_method: sudo

gather_facts: true

tags: [bootstrap]

tasks:

- name: Create Consul bootstrap directory

file:

path: /etc/consul.d/bootstrap

state: directory

mode: 0755

- name: Copy configuration file

copy:

src: ../../files/bootstrap-config.json

dest: /etc/consul.d/bootstrap/config.json

- name: Copy systemd bootstrap consul.service

copy:

src: ../../files/bootstrap-consul.service

dest: /etc/systemd/system/consul.service

- name: Start bootstrap Consul

systemd:

name: consul.service

state: started
A sample execution of the above playbook is given below:
$ ansible-playbook -i inventory/kvm/inventory playbooks/configuration/consul.yml --tags bootstrap -K

SUDO password:

PLAY [Install Consul] ***************************************

TASK [Gathering Facts] ********************************************************************************ok: [host1]

ok: [host2]

ok: [host3]

PLAY [Configure bootstrap Consul node] ***********************

TASK [Gathering Facts] *************************************

ok: [host1]

TASK [Create Consul bootstrap directory] ********************

changed: [host1]

TASK [Copy configuration file] ********************************

changed: [host1]

TASK [Copy systemd bootstrap consul.service] ****************

changed: [host1]

TASK [Start bootstrap Consul] *******************************

changed: [host1]

PLAY [Configure other Consul nodes] **************************

TASK [Gathering Facts] **************************************

ok: [host2]

ok: [host3]

PLAY RECAP **************************************************

host1 : ok=6 changed=4 unreachable=0 failed=0

host2 : ok=2 changed=0 unreachable=0 failed=0

host3 : ok=2 changed=0 unreachable=0 failed=0
Other Consul nodes
The last step is to configure the other Consul nodes in the cluster. A /etc/consul.d/server directory is created and the node configuration file is copied to it. The contents of the configuration file are as follows:
{

“bootstrap”: false,

“server”: true,

“datacenter”: “chennai”,

“data_dir”: “/var/consul”,

“encrypt”: “PfCkrq/lFPem7slKP5N2Cw==”,

“log_level”: “INFO”,

“enable_syslog”: true,

“start_join”: [ {% for item in groups[‘all’] %} “{{ hostvars[item].ansible_default_ipv4.address }}” {% if not loop.last %} , {% endif %} {% endfor %} ]

}
The configuration specifies that this is not a bootstrap node but is part of the Consul cluster. The data centre, data directory and encryption keys are specified. The log level information is also supplied. Finally, the IP addresses of all the Consul nodes are mentioned to join the cluster.
A systemd configuration file is also created to start the Consul service on these nodes, as shown below:
[Unit]

Description=Consul service discovery agent

Requires=network-online.target

After=network-online.target

[Service]

Environment=GOMAXPROCS=2

Restart=on-failure

ExecStart=/usr/local/bin/consul agent -server -data-dir=/tmp/consul -node={{ inventory_hostname }} -config-dir=/etc/consul.d/server -enable-script-checks=true

ExecReload=/bin/kill -HUP $MAINPID

KillSignal=SIGTERM

[Install]

WantedBy=multi-user.target
The inventory_hostname is used as the node name when starting the Consul service. The playbook for setting up the Consul nodes is given below:
- name: Configure other Consul nodes

hosts: server

become: yes

become_method: sudo

gather_facts: true

tags: [nodes]

tasks:

- name: Create Consul server directory

file:

path: /etc/consul.d/server

state: directory

mode: 0755

- name: Copy configuration file

template:

src: “../../files/node-config.json.j2”

dest: /etc/consul.d/server/config.json

- name: Copy systemd node consul.service

template:

src: “../../files/node-consul.service.j2”

dest: /etc/systemd/system/consul.service

- name: Start Consul service

systemd:

name: consul.service

state: started
The above playbook can be invoked as follows:
$ ansible-playbook -i inventory/kvm/inventory playbooks/configuration/consul.yml --tags nodes -vv -K
Verification
You can now verify the nodes that are part of the Consul cluster using the following commands from any host:
$ consul members

Node Address Status Type Build Protocol DC Segment

host1 192.168.122.140:8301 alive server 1.1.0 2 chennai <all>

host2 192.168.122.208:8301 alive server 1.1.0 2 chennai <all>

host3 192.168.122.59:8301 alive server 1.1.0 2 chennai <all>
The web UI listens on Port 8500 on host1, and you can make a Curl request for the same as shown below:
$ curl localhost:8500/v1/catalog/nodes

[

{“ID”:”f5de050b-df4d-5235-bb13-ffefe6c81032”,

“Node”:”host1”,

“Address”:”192.168.122.140”,

“Datacenter”:”chennai”,

“TaggedAddresses”:{“lan”:”192.168.122.140”,”wan”:”192.168.122.140”},

“Meta”:{“consul-network-segment”:””},

“CreateIndex”:5,”ModifyIndex”:6},

{“ID”:”96552ff0-7692-3553-d6dd-95077365699d”,

“Node”:”host2”,

“Address”:”192.168.122.208”,

“Datacenter”:”chennai”,

“TaggedAddresses”:{“lan”:”192.168.122.208”,”wan”:”192.168.122.208”},

“Meta”:{“consul-network-segment”:””},

“CreateIndex”:10,”ModifyIndex”:13},

{“ID”:”fa17e937-86db-597d-7951-ffcb402f439e”,

“Node”:”host3”,

“Address”:”192.168.122.59”,

“Datacenter”:”chennai”,

“TaggedAddresses”:{“lan”:”192.168.122.59”,”wan”:”192.168.122.59”},

“Meta”:{“consul-network-segment”:””},

“CreateIndex”:12,”ModifyIndex”:14}

]
You can open the URL http://192.168.122.140:8500/ui in a Web browser to see the default Web UI, as shown in Figure 1.
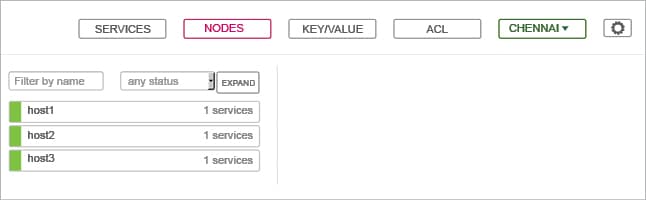
The nodes’ link in the UI provides the status of the Consul hosts, as shown in Figure 2.
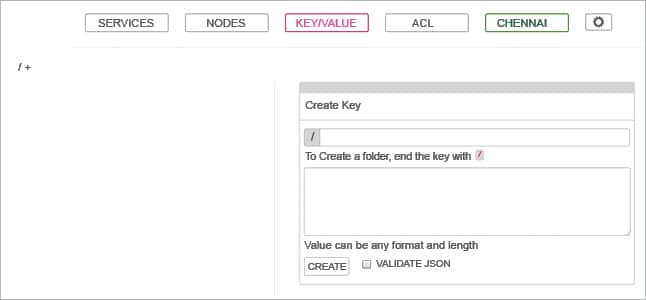
The ‘key/value’ link allows you to store and retrieve key values from Consul. Its UI is provided in Figure 3.
Do read the Consul documentation at https://www.consul.io/docs/index.html to learn more!


