


Android developers face the common challenges of handling life cycle events, maintaining state and storing data while building Android apps. These things make Android app development difficult. Moreover, the Android team members have never given their opinion on which architecture to use. They have always recommended the use of any architecture best suited to the app, which most of the time has led to more confusion than clarity.
Fortunately, the Android team has now announced Architecture Components along with the guidelines to help solve common problems while building Android apps.
What are Architecture Components?
According to the Android team that developed them, “Architecture Components are a new collection of libraries that help you design robust, testable and maintainable apps. They start with classes for managing your UI component life cycle and handling data persistence.”
Architecture Components are sets of libraries created by the Android team at Google. These libraries will help developers address common problems like configuration changes, memory leaks, writing testable apps, and reducing boilerplate code while maintaining the architecture.
The following are the modular components that can be used together or independently:
- Lifecycle
- LiveData
- ViewModel
- Room
Note: There are a couple of more components which were recently released but I won’t be talking about them because they are still in the early stages of development.
Lifecycle
Handling the life cycle is one of the biggest challenges when building Android apps. This life cycle is even more complicated if you use Fragments, as their life cycle varies slightly on different Android versions (an issue that has now been solved by the AppCompat library). Let’s look at how the Lifecycle component helps us in tackling this challenge.
Lifecycle provides classes and interfaces that let you build life cycle-aware components, which can automatically adjust their behaviour based on the current life cycle of an activity or fragment. It allows other objects to observe the life cycle.
This component is used to add life cycle awareness. It will be helpful for library makers to clear up their resources, depending upon the life cycle.
Let us now see how the Lifecycle component helps. Here is an example of how we write networking code:
override fun onCreate(savedInstanceState: Bundle?) {

super.onCreate(savedInstanceState)

setContentView(R.layout.activity_main)

// Network call

api.get().onResponse { data ->

textView.text = data

}

}
Note: The code snippet given above is in Kotlin, as it’s now the official language for building Android apps.
It’s a simple networking code which sends a GET request to the Web and sets the response to the TextView. It looks simple, but sadly it’s not, because when you rotate the device or close the app, the request will still be running in the background, and on getting a response, will crash because TextView doesn’t exist anymore as the Activity is already destroyed.
Android developers are aware of this problem as the life cycle is controlled by the system. To solve this problem, we need to cancel the request when Activity is destroyed, as shown below:
override fun onCreate(savedInstanceState: Bundle?) {

///....

// Network call

request = api.get()

request.onResponse { data ->

textView.text = data

request = null

}

}


override fun onDestroy() {

if (request != null) request.cancel()

}
However, as the complexity of the application increases, this becomes quite challenging to manage and is very easy to miss, not to mention the extra boilerplate code.
The Lifecycle component is designed to solve such problems by making components life cycle-aware (so that they are aware about the state of the Activity). Let’s look at the same code snippet using the Lifecycle library:
override fun onCreate(savedInstanceState: Bundle?) {

super.onCreate(savedInstanceState)

setContentView(R.layout.activity_main)

// Network call

api.get().onResponse(getLifecycle()) { data ->

textView.text = data

}

}
Note: This is an imaginary networking code showing how other libraries can observe the life cycle and automatically clean themselves up.
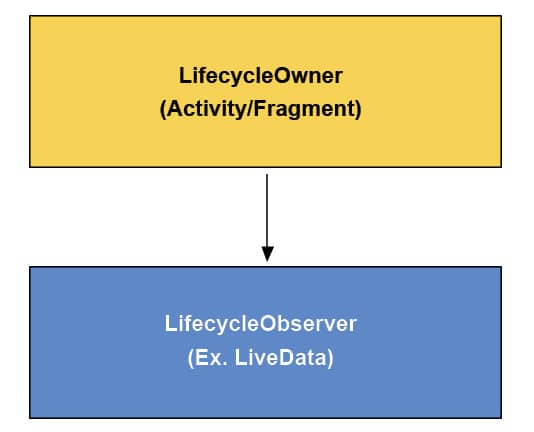
Anatomy of the Lifecycle component: There are two main parts to the Lifecycle component—Lifecycle owners and Lifecycle observers.
- Lifecycle owners are the UI controllers, which have their own life cycle—for example, Activity and Fragment.
2. Lifecycle observers observe Lifecycle owners and are notified about life cycle changes. We use ‘LifecycleObserver’ to build life cycle-aware components.

LiveData
LiveData is used to instantly notify changes in the data to the UI. The following list describes what LiveData is:
- An observable data holder
- It notifies the observers when data changes so that it can update the UI
- Respects Lifecycle, i.e., it is life cycle-aware
- It is pretty similar to RxJava
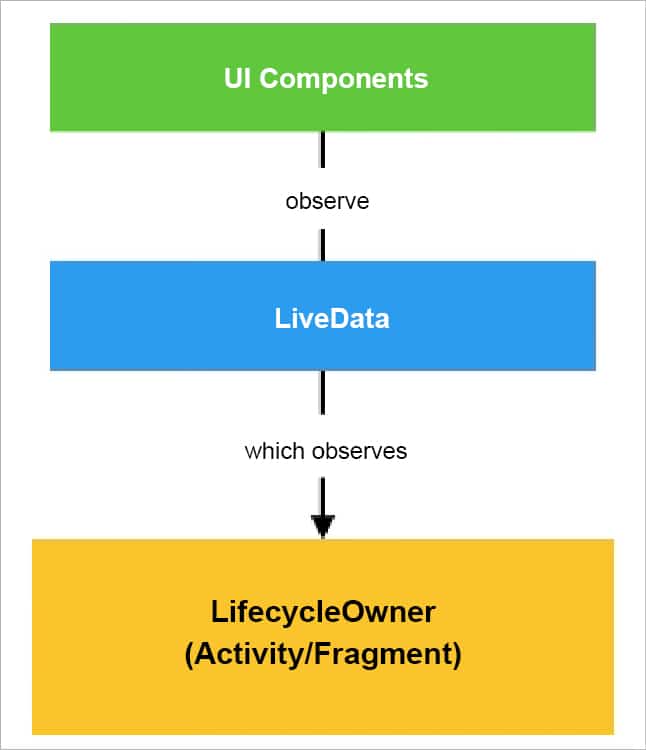
Overall flow of LiveData: The UI components observe changes in LiveData, which in turn observes Lifecycle owners, i.e., Activity or Fragment for Lifecycle.
Here is how LiveData works internally. It observes for updates or changes in the data and when the value is updated, it checks if the UI controller—i.e., Activity or Fragment—is in the STARTED or RESUMED state (which means the UI is shown to the user) to notify the observer to update the UI.
There is more to this flow but, for the sake of simplicity, I have focused only on the important parts in Figure 3.
- Listed below are the key advantages of LiveData:
- Always updates data
- It is life cycle-aware
- Handles proper configuration changes
- Has no memory leaks
ViewModel
ViewModel is a container to store all your UI related data. It contains data required by the UI. For example, if the UI is a list of news items, then ViewModel will contain/store news and provide it to the UI when required.
This enables a separation of concerns, and the UI controller (Activity and Fragment) contains purely UI related code like findViewById, click listeners, manipulating widgets, etc, while the ViewModel contains data which is to be shown on the UI.
This decoupling solves a major problem which Android developers face, i.e., the app crashing or data getting cleared on rotating the device. In a nutshell, ViewModels survive configuration changes.
An example: Let’s say you want to build a UI showing a list of news articles. Here, the data required is a list of news articles. Hence our ‘ViewModel’ will look something like what’s shown below:
class NewsViewModel() : ViewModel() {

private var newsArticles: List<NewsArticles>

init {

// Load the data over here

newsArticles = ....

}


fun getNewsArticles(): List<NewsArticles> {

return newsArticles

}

}
The NewsViewModel is holding the data, which in this case is ‘newsArticles’, and is fetching it from somewhere (ideally it is delegated to a repository, which we will look at later). As discussed earlier, ViewModel will usually hold the data in the form of LiveData to update the UI immediately when data changes.
class NewsViewModel() : ViewModel() {

private var newsArticles: LiveData<List<NewsArticles>>


init {

// Load the data over here

newsArticles = ....

}


fun getNewsArticles(): LiveData<List<NewsArticles>> {

return newsArticles

}

}
Now, let’s look at our UI controller (Activity and Fragment):
class NewsActivity: AppCompatActivity() {

override fun onCreate(savedInstanceState: Bundle?) {

super.onCreate(savedInstanceState)

setContentView(R.layout.activity_news)

// Get ViewModel

val newsViewModel = ViewModelProviders.of(this).get(NewsViewModel::class.java)


// Observing for data change

newsViewModel.getNewsArticles().observe(this, Observer<List<NewsArticles>> {

// Update the UI

})

}

}
In the Activity or Fragment we get an instance of the ViewModel using ViewModelProviders and then get the data using the ‘getters’ that we defined. As we are returning data wrapped in LiveData, we will be able to observe data changes.
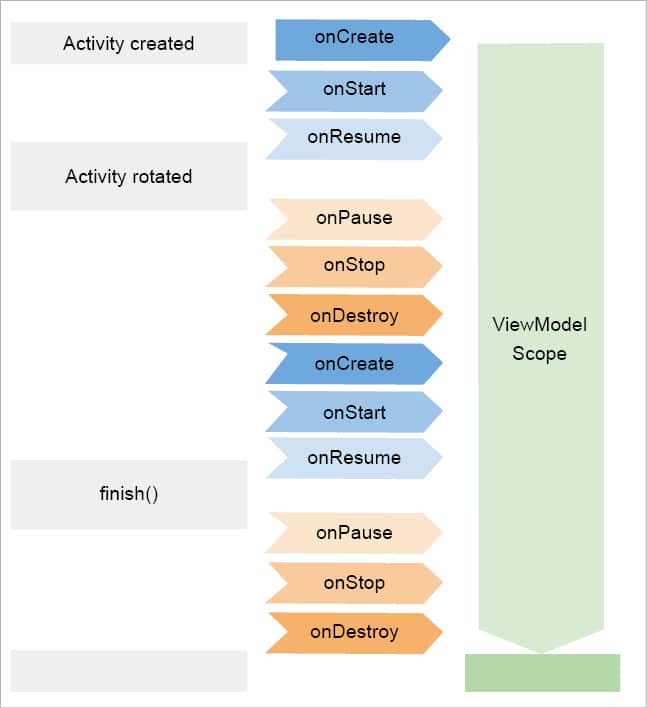
Behind the scenes: ViewModel is created when the Activity is created and is destroyed only when the Activity is concluded. Finally, when the owner Activity is finished, the framework automatically calls ViewModel’s onCleared() method so that it can clean up resources.
Listed below are some of the advantages of ViewModel:
- It is designed to hold and manage UI related data
- Survives configuration changes
- It is life cycle-aware
- It will often store LiveData objects
- Helps to communicate between Activity and Fragment
- Eliminates ‘God Activities’
Room
Room is a persistence library designed to help you save your app data in the SQLite database that ships with every Android version.
Its features include the following:
- It provides local data persistence
- An abstraction layer over the existing SQLite database
- Checks SQL queries at compile time
- Has the ability to observe for changes in the database using LiveData
- Eliminates the boilerplate code
- Plays well with LiveData and RxJava
Anatomy of Room: There are various components of the Room persistence library and they include the following.
Entity
- For each entity, a database table is created.
- It represents a class, which holds a database row.
Database access objects (DAO)
- These are the main components of Room because they are responsible for defining methods that access the database.
- They define the methods for interacting with the database.
- The implementation is auto-generated at compile-time (annotation processing).
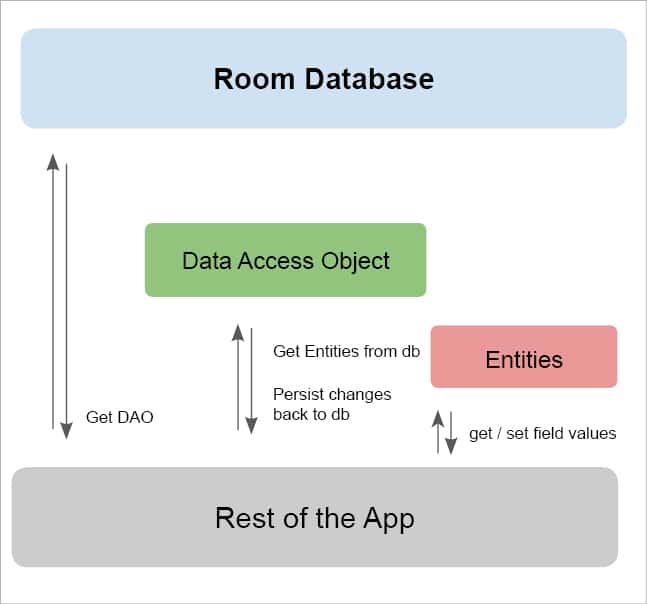
Database
- This defines the database holder.
- It is the main access point to the database connection.
- It defines the list of entities and database access objects (DAO).
Let’s assume our news app stores the articles in the SQLite database so that users can read the news even if offline. The entity will represent news articles as shown below:
@Entity(tableName = “news_articles”)

data class NewsArticle(

@PrimaryKey(autoGenerate = true)

var id: Int = 0,

var author: String? = null,

var title: String = “”,

var description: String = “”)
This will create a table called ‘news_articles’ in the SQLite database of the app, and use ‘ID’ as the primary key. To access the ‘news_articles’ table, we will need to create a DAO (database access object) to provide abstraction over the database logic, and provide a way to interact with the underlying database.
To define a DAO, we need to create an interface and annotate it with @Dao annotation, and define the methods to play with the ‘news_articles’ table.
The DAO for ‘NewsArticle’ will look something like what’s shown below:
-

@Dao

interface NewsArticlesDao {

}
Insert
Inserting a record is pretty easy. We just need to add a function in the DAO and annotate it with the @Insert annotation.
@Dao

interface NewsArticlesDao {

@Insert

fun insertArticle(article: NewsArticle)

}
You can even bulk-insert lists or arrays of ‘NewsArticle’ as shown below:
@Insert

fun insertArticles(articles: List<NewsArticle>)
Update
Similar to insert, to update a query, we just need to annotate the function with @Update annotation.
@Update

fun updateArticle(article: NewsArticle)
Internally, the Room library performs the update operation using the primary key of the entity.
Delete
To delete a query, we just need to annotate the function with @Delete annotation.
@Delete

fun deleteArticle(article: NewsArticle)
Internally, the Room library performs the delete operation using the primary key of the entity.
Read/select
Select queries are a little different with Room. We need to write the SQL query, which is verified at compile time (you also get Autocomplete, which is awesome). To perform select queries, we need to use the @Query annotation and specify the SQL query; then Room internally maps the query result with the Kotlin/Java class.
@Query(“SELECT * FROM news_articles”)

fun getNewsArticles(): List<NewsArticle>
You can even get observable data using LiveData, as follows:
@Query(“SELECT * FROM news_articles”)

fun getNewsArticles(): LiveData<List<NewsArticle>>
This way, you’ll be able to update the UI when something in the table changes.
On the other hand, if you are a fan of RxJava, you can also get Maybe, Single, Flowable instead of LiveData.
@Query(“SELECT * FROM news_articles”)

fun getNewsArticles(): Flowable<List<NewsArticle>>
Benefits of Architecture Components
Some of the main advantages of Android Architecture Components are given below.
- These components make your app modular and focus on ensuring a separation of concerns.
- They will help you to manage an app’s life cycle and tackle those pesky app crashes on rotating the phone.
- They will help you persist data for building offline apps.
- They will help you prevent memory leaks and other common issues.
- And they will prevent you from writing boring boilerplate code.
Final architecture
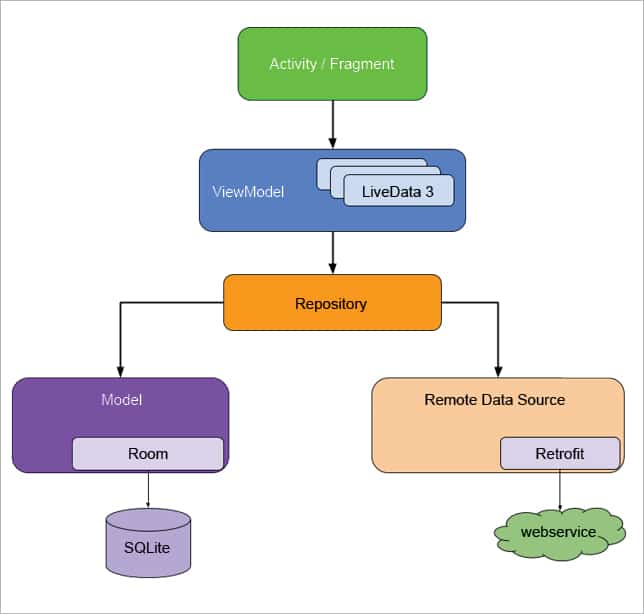
Google has announced some guidelines with Architecture Components to help build modern Android apps and even recommended which architecture to use for the purpose.
Figure 6 gives the architecture diagram recommended by the Android team in its Architecture Guidelines.
- It suggests keeping Activity and Fragments lean by only maintaining UI related code like click listeners, etc.
- The ViewModel provides the data required by the UI controllers like Activity and Fragments; this helps in surviving configuration change.
- While ViewModel gets the data from the repository, which acts as a single source of truth for the data, it means that whenever your app requires data, it always comes from the repository.
- It’s the repository that decides if the data is to be fetched from the local database using Room or from a Web service using Retrofit.
Google recommends the use of Retrofit for networking related code and the use of dependency injection (probably Dagger) to glue all the components.
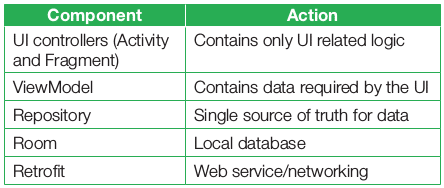
Table 1 sums up all these features, in a nutshell.
You can check out my GitHub repository for concrete code and complete apps built using Architecture Components and Guidelines at https://github.com/AkshayChordiya/android-arch-news-sample/.
Testing
The Architecture Guidelines help to keep all the components isolated, which is excellent for testing. It’s a good practice to test no matter what app you are building. Table 2 gives a ready reckoner to show how to do testing with Architecture Guidelines.
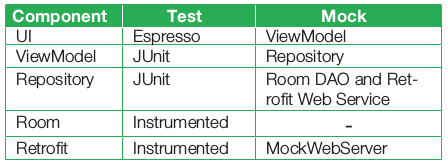
Note: Instrumented test cases refer to the test cases that need to run on an Android device.
The Android Architecture Components are amazing independent sets of libraries built to help make Android development easier. With Architecture Guidelines, we get a guide from the Android team on how modern and production-quality android apps should be built.
Note: There is no perfect architecture for every use case and the architecture mentioned in Architecture Guidelines is just a recommendation. Hence, feel free to use whatever suits your use case the best way.
Libraries like WorkManager and Navigation have recently been added as part of Architecture Components. And more libraries will undoubtedly follow to make Android development easy and fun.


