This article presents an overview of Docker networks and the associated networking concepts.
Customisation and the manipulation of default settings is an important part of software engineering. Docker networking has evolved from just a few limited networks to customisable ones. And with the introduction of Docker Swarm and overlay networks, it has become very easy to deploy and connect multiple services running on Docker containers – irrespective of whether they are running on a single or multiple hosts. To play around with Docker networking and tune it as per our requirements, we need to first understand the fundamentals as well as its intricacies. Assigning specific IP addresses to containers rather than using the default IPs, creating user-defined networks, and communication between containers running on multiple hosts are some of the challenges we will address in this article.
The idea of running machines on a machine is quite fascinating. This fascination was converted into reality when virtualisation came into existence. Virtual machines (VMs) are the basis of this process of virtualisation. VMs are being used everywhere—from small organisations to cloud data centres. They enable us to run multiple operating systems simultaneously with the help of hardware virtualisation.
Along with the IT industry’s shift towards microservices (the small independent services required to support complete software suites or systems), a need arose for machines that consume less computing resources in comparison to VMs. One of the popular technologies that addresses this requirement is containers. These are lightweight in terms of resources, compared to VMs. Besides, containers take less time to create, delete, start or stop, when compared to Vms.
Docker is an open source tool that helps in the management of containers. It was launched in 2013 by a company called dotCloud. It is written in Go and uses Linux kernel features like namespaces and cgroups. It has been just five years since Docker was launched, yet, communities have already shifted to it from VMs.
When we create and run a container, Docker, by itself, assigns an IP address to it, by default. Most times, it is required to create and deploy Docker networks as per our needs. So, Docker lets us design the network as per our requirements.
Let us look at the various ways of creating and using the Docker network.
Aspects of the Docker network
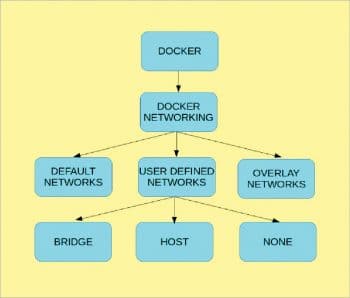
There are three types of Docker networks—default networks, user-defined networks and overlay networks. Let us now discuss tasks like: (i) the allocation of specific IP addresses to Docker containers, (ii) the creation of Docker containers in a specified IP address range, and (iii) establishing communication amongst containers that are running on different Docker hosts (multi-host Docker networking).
Figure 1 depicts the topology of Docker networking.
Why Docker and not virtual machines?
We will not use virtual machines to perform the above tasks because there are already many open source and commercial tools such as VirtualBox and VMware, which can be used to set up network configuration on virtual machines. They also provide good user interfaces. So, performing the above tasks using a VM is not a big challenge, but with Docker, the community is still growing. As per our experience, no such tools are available directly. Docker only provides command line support for dealing with network configurations.
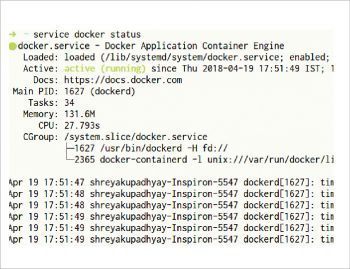
We assume that Docker is installed and running on your machine. Just like any other service in Linux, we can check if it is running by using the $ service docker status command. The output should be similar to what is shown in Figure 2. We can also see other information like the process ID of the Docker daemon, the memory, etc.
If Docker is not already installed, the links f will guide you to understand the concepts and its installation steps.


Docker networking
Docker creates various default networks, which are similar to what we get in VMs, by using tools like VirtualBox, VMware and Kernel Virtual Machine (KVM). To get a list of all the default networks that Docker creates, run the command as shown in Figure 3.
As can be seen in this figure, there are three types of networks:
- Bridged network
- Host network
- None network
We can assign any one of the networks to the Docker containers. The –network option of the ‘docker run’ command is used to assign a specific network to the container:
$ docker run --network=<network name>
In Figure 4, the network type of the container is given as ‘host’ by using the —network option of the ‘docker run’ command. The network assigned to the container is demo1 using the –name option and the docker image is ubuntu. ‘-i’ is for interactive, ‘-t’ is for pseudo-TTY, and ‘-d’ is the detach option. This runs the container in the background and prints the new container ID (see Figure 3).
The following command gives detailed information about a particular network.
$ docker network inspect <network name>
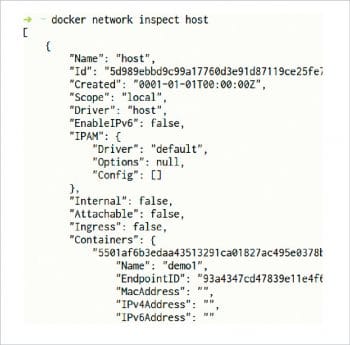
From Figure 5, we have configured the network to be the host. So, we will get the information about the host network and the container details that we created earlier. We can see that it gives the output in JSON format with information about the containers connected to that network, the subnet and gateway of that network, the IP address and MAC address of each of the containers connected to that network, and much more. The container demo1, which we created above, is shown in Figure 5.
Bridged network: When a new container is launched, without the –network argument, Docker connects the container with the bridge network, by default. In bridged networks, all the containers in a single host can connect to each other through their IP addresses. This type of network is created when the span of Docker hosts is one, i.e., when all the containers run on a single host. To create a network that has a span of more than one Docker host, we need an overlay network.
Host network: Launching a Docker container with the –network=host argument pushes the container into the host network stack where the Docker daemon is running. All interfaces of the host (the system the Docker daemon is running in) are accessible from the container which is assigned the host network.
None network: Launching a Docker container with the –network=none argument puts the Docker container in its own network stack. So, IP addresses are not assigned to the containers in the none network, because of which they cannot communicate with each other.
So far, we have discussed the default networks created by Docker. In the next sections, we will see how users can create their own networks and define them as per their requirements.


Assigning IP addresses to Docker containers
While creating Docker containers, random IP addresses are allocated to the containers. An IP address is assigned only to running containers. A container will not be assigned any IP address if it is assigned a none network. So, use the bridge network to view the command displaying the IP address. The standard ifconfig command displays the networking details including the IP address of different network interfaces. Since the ifconfig command is not available in a container, by default, we use the following command to get the IP address. The container ID can be taken from the output of the $ docker ps command.
$docker inspect --format ‘{{ .NetworkSettings.IPAddress }}’ <Container ID>
In the above command, –format defines the output as .NetworkSettings.IPAddress. Inspecting the network or container returns all the networking information related to it. .NetworkSettings.IPAddress will filter out the IP address from all the networking information.
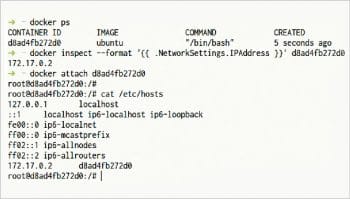
In addition, you can also look at the /etc/hosts file to get the IP address of the Docker container. This file contains the networking information of the container, which also includes the IP address. These two ways of checking the IP address of a container are shown in Figure 6.
We can also assign any desired IP address to the Docker container. If we are creating a bunch of containers, we can specify the range of IP addresses within which these addresses of the containers should lie. This can be done by creating user-defined networks.

Creating user-defined networks
We can create our own networks called user-defined networks in Docker. These are used to define the network as per user requirements, and this dictates which containers can communicate with each other, what IP addresses and subnets should be assigned to them, etc. How to create user-defined networks is shown below.
$docker network create --subnet=172.18.0.0/16 demonet
In the command shown in Figure 7, network create is used to create user-defined networks. The –subnet option is used to specify the subnet in which the containers assigned to this network should reside. Assign demonet as the name of the network being created. This command also has a –driver option, which takes bridge’or overlay. If the option is not specified, by default it creates the network with the bridge driver. Hence, here the network demonet has the bridge network driver.
The containers we create in that network should have IP addresses in that specified subnet. After creating a network with a specific subnet, we can also specify the exact IP address of a container.
$docker run --net <user-defined network name> --ip <IP Address> -it ubuntu
The command in Figure 8 shows that the –net option of the docker run command is used to mention the network to which the container should belong. –ip is to assign a particular IP address to the container. Do remember that the IP address in Figure 8 should belong to the specified subnet in Figure 7.
Creating multiple containers in a specified address range
We have already created a user-defined network demonet with a specific subnet. Now, let us learn how to create multiple Docker containers, the IP addresses of which all fall in a given range.
We can write a shell script to create any number of containers, as required. We just have to execute the docker run command in a loop. In the docker run command, –net should be added to the name of the user-defined network, which in this case is demonet. The containers will be created with names container1, container2, and so on.
The IP addresses of the containers created in Figure 10 will be in a sequence in the given range, specified while creating the user-defined network.

Establishing communication between containers running on different hosts
So far we were dealing with the communication between containers running on a single host, but things get complicated when containers running on different hosts have to communicate with each other. For such communication, overlay networks are used. An overlay network enables communication between various hosts in which the Docker containers are running.
Terminology
Before creating an overlay network, we need to understand a few commonly used terms. These are: Docker Swarm, key-value store, Docker Machine and consul.
Docker Swarm: This is a group or a cluster of Docker hosts that has the Swarm service running in them. This helps in connecting multiple Docker hosts into a cluster using the Swarm service. The hierarchy of the Swarm service contains the master and nodes, which lie in the same Swarm service. First, we create a Swarm master and then add all the other containers as Swarm nodes.
Key-value store: A key-value store is required to store information regarding a particular network. Information such as hosts, IP addresses, etc, is stored in these key-value stores. There are various key-value stores available but, in this article, we will only use the consul key-value store.
Consul: This is a service discovery and configuration tool that helps the client to have an updated view of the infrastructure. The consul agent is a main process in consul. It keeps information about all nodes that are a part of the consul and runs update checks regularly. The consul agent can run in either server mode or client mode.
Docker Machine: Docker Machine is a tool that allows us to install and run Docker on virtual hosts (virtual machines). We can manage these created hosts as we manage virtual machines using the Docker Machine commands or also from a VirtualBox interface. As Docker Machine uses VirtualBox drivers, the commands of the former will not run inside a VirtualBox. It requires the host system to run the Docker Machine commands.
Let’s now create an overlay network. The four steps given below will help to do so.


Creating multiple virtual hosts with the key-value store
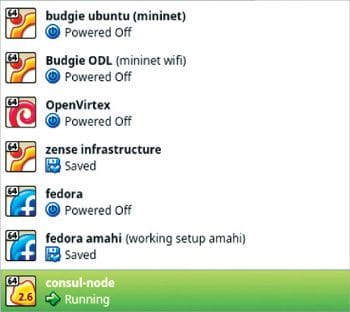
Starting with the creation of hosts, the consul container runs in the first host, which is responsible for managing the key-value store of the network properties. The first host which we create has the consul container (key-value store) running on it, so that it becomes easier to connect further containers to access this key-value store while creating them.
To create virtual hosts, install Docker Machine, which helps in creating virtual hosts using VirtualBox drivers. The command below is used for the same.
$ docker-machine create -d virtualbox consul-node
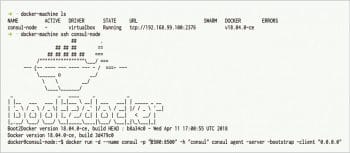
The above command creates a key-value store virtual host using VirtualBox drivers. consul-node is the name of the virtual host. Docker also supports Etcd and ZooKeeper key-value stores other than consul. For this command to be successful, VirtualBox should be installed in the system. Use ssh to log in to the created virtual host and use it. To run the consul store inside the created virtual host, use the commands given below. These commands need to be run from inside the virtual host. This creates our first virtual host with the key-value store running on port 8500.
$ docker-machine ssh consul-node

$ docker run -d --name consul -p “8500:8500” -h “consul” consul agent -server -bootstrap -client “0.0.0.0”
In the above command, -d is the detach option. This runs the container in the background and prints its container ID. –name is used to give a name to the container, which in this case is consul. To publish the container’s port to the host, -p is used. As the service runs inside the container and we need to access outside containers, we publish the 8500 port that is inside the container and map it with port 8500 of the host. -h gives the container hostname, which is given here as consul. -server is the bootstrap and the client is ‘0.0.0.0’.
Creating a Swarm master
Use the commands given in Figure 13 to create a Swarm master after setting up the key-value store.
In the command, the –swarm option is used to configure a machine with a Swarm and –swarm-master is used to configure that virtual host as the swarm master. –engine-opt is used to include more parameters with the key=value format. Here, the engine refers to the Docker engine. Consul is used as an external key-value store here. The Swarm manager stores networking information of the Swarm mode network and –swarm-discovery is used to locate the Swarm manager.
Creating Swarm nodes
Next, we’ll create Swarm nodes to make an overlay network of Docker containers. In this case –swarm-master isn’t an argument, which means this is a worker node of the swarm and not a master node.
So far we have set up the Swarm master and Swarm node. In the next step, the procedure to create an overlay network is given.
Figure 15 shows us the Swarm node, the Swarm master and the Swarm manager (consul node).
Creating multiple overlay networks
We will now create two overlay networks, and check the connectivity inside and across the network. Similar to any other network, containers in the same overlay network can communicate with each other, but they cannot do so if they are in different networks.
1. Overlay Network 1: (overlay-net)
Go into one of the Swarm nodes using ssh:

$docker-machine ssh swarm-node1

$docker network create --driver overlay --subnet=13.1.10.0/24 overlay-net
2. Overlay Network 2: (overlay-net2)
Go into Swarm master using ssh:

$docker-machine ssh swarm-master

$docker network create --driver overlay --subnet=14.1.10.0/24 overlay-net2
Assign the subnet to the network of the Docker container. We have created two overlay networks. All the containers in the first overlay network named overlay-net are able to communicate with all other containers in that same overlay network. But, containers belonging to different overlay networks are not able to communicate with each other. We will also test if any container in the overlay-net network is able to connect to any other container in the same network, even if these are running on different hosts, but is not able to connect to a container in the overlay-net2 network, even if these are running on the same host.

Testing multi-hosts and multi-networks
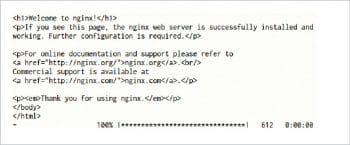
For testing the networks we have created, we need client and server terminology. So, here let us take an Nginx server with a simple Web page hosted on it and the client, which is the Docker container, inside or outside the network. If the client gets the hosted Web page on request, it shows that the client is in the same network of the Nginx server. If the server does not respond, it shows that client and Nginx server are in different networks. To avoid installing and setting up the Nginx server, we use a Docker container for Nginx and directly run it. The following commands create a Nginx Docker container in Swarm master with the network overlay-net and run a Busybox container in Swarm-node1, also with the same network overlay-net.
$ docker-machine ssh swarm-master

$ docker run -itd --name=web --network=overlay-net nginx:alpine

$ docker-machine ssh swarm-node1

$ docker run -it --rm --network=overlay-net busybox wget -O- http://web
As both Nginx and Busybox containers are on the same network (overlay-net), Busybox gets the Nginx page. However, it will not be able to access the httpd page which is in the other network, even if both containers are running on the same host.
Let’s create a httpd Docker container in Swarm-node1 with network overlay-net2 and run a Busybox container in the Swarm master with the same network.
$ docker-machine ssh swarm-node1

$ docker run -itd --name=web --network=overlay-net2 httpd:alpine

$ docker-machine ssh swarm-master

$ docker run -it --rm --network=overlay-net2 busybox wget -O- http://web
Figure 17 gives the output from the httpd container but not from the Nginx container.
This verifies our test of creating an overlay network on multiple hosts and accessing Docker containers using those networks.


