There are a number of steps that need to be taken before Network File System (NFS) allows clients access to data. This article describes those steps and also guides the reader on some other aspects of NFS.
Network File System or NFS is an Internet standard protocol used by Linux, UNIX and similar operating systems as their native network file system. It is an open standard under active extension, which supports native Linux permissions and file system features. Red Hat Enterprise Linux 7 supports NFSv4 (version 4 for the protocol) by default, and falls back automatically to NFSv3 and NFSv2 if that is not available. NFSv4 uses the TCP protocol to communicate with the server, while older versions of NFS may use either TCP or UDP.
NFS servers export share directories and NFS clients mount an exported share to a local mount point (directory). The local mount point must exist. NFS shares can be mounted in a number of ways:
- Manual mounting using the mount command
- Automatic mounting at boot time using /etc/fstab
- Mounting on demand through a process known as automounting
Securing file access on NFS shares

NFS servers secure access to files using a number of methods such as none, sys, krb5, krb5i and krb5p. The NFS server can choose to offer a single or multiple methods for each exported share. NFS clients must connect to the exported share using one of the methods mandated for that share, specified as a mount option sec= method.
Methods used to secure access to files
- None: This gives anonymous access to the files, and writes to the server (if allowed) are allocated UID and GID of nfsnobody.
- Sys: This gives file access based on standard Linux file permissions for UID and GID values. If not specified, this is the default.
- Krb5: Clients must prove their identity using Kerberos, and then standard Linux file permissions apply.
- Krb5i adds a cryptographically strong guarantee that the data in each request has not been tampered with.
- Krb5p adds encryption to all requests between the client and the server, preventing data exposure on the network. This has a performance impact.
Important: Kerberos options will require, as a minimum, a /etc/krb5. keytab and additional authentication configuration. The /etc/krb5. keytab will normally be provided by the authentication or security administrator. Request a keytab that includes either a host principal, NFS principal, or (ideally) both.
NFS uses the nfs-secure service to help negotiate and manage communication with the server when connecting to Kerberos-secured shares. It must be running to use the second NFS shares; start and enable it to ensure it is always available.
# systemctl enable nfs-secure# systemctl start nfs-secure |
Note: The nfs-secure command is part of the nfs-utils package, which should be installed, by default. If it is not installed, use the following command:
# yum –y install nfs-utils |

Exporting NFS
The Network File System (NFS) is commonly used by UNIX systems and network attached storage devices to allow multiple clients to share access to files over the network. It provides access to shared directories or files from client systems.
NFS exports
An NFS server installation requires the nfs-utils package to be installed. It provides all the necessary utilities to export a directory with NFS to clients. The configuration file for the NFS server exports the /etc/exports file. This file lists the directory to share to client hosts over the network, and indicates which hosts or networks have access to the export.
Note: Instead of adding the information required for exporting directories to the /etc/exports file, a newly created file named *.exports can be added to the /etc/exports.d/ directory holding the configuration of exports.
Warning: Exporting the same directory with NFS and Samba is not supported on Red Hat Enterprise Linux 7, because NFS and Samba use different file locking mechanisms, which can cause file corruption.
One or more clients can be listed, separated by a space, as any of the following:
1. DNS-resolvable host name, like server.example.com in the following example, where the /myshare directory is exported and can be mounted by serverX.example.com.
1 | /myshare server.example.com |
2. DNS resolvable host name with the wildcards ‘*’ for multiple character and ‘/’ or ‘?’ for a single character. The following example allows all sub-domains in the example.com domain to access the NFS export:
/myshare *.example.com |
3. DNS resolvable host name with character class lists in square brackets. In this example, the hosts server1.example.com, server2.example.com,…and server20.example.com have access to the NFS export.
/myshare server[0-20].example.com |
4. IPv4 address. The following example allows access to the /myshare NFS share from the 172.25.21.21 IP address.
/myshare 172.25.21.21 |
5. IPv4 network. This example shows a /etc/exports entry, which allows access to the NFS-exported directory /myshare from the 172.25.0.0/16 network.
/myshare 172.25.0.0/16 |
6. IPv6 address without square brackets. The following example allows the client with the IPv6 address 2000:472:18:b51:c32:a21 access to the NFS exported directory /myshare.
/myshare 2000:472:18:b51:c32:a21 |
7. IPv6 network without square brackets. This example allows the IPv6 network 2000:472:18:b51::/64 access to the NFS export.
/myshare 2000:472:18:b51::/64 |
8. A directory can be exported to multiple hosts simultaneously by specifying multiple targets with their options, separated by spaces following the directory to export.
/myshare *.example.com 172.25.0.0/16 |
Optionally, there can be one or more export options specified in round brackets as a comma-separated list, directly followed by each client definition. Three commonly used export options are given below.
ro, read-only: This is the default setting when nothing is specified. It is allowed to explicitly specify it with an entry. This restricts the NFS clients to read files on the NFS share. Any write operation is prohibited. The following example explicitly states the ro flag for the server.example.com host.
/myshare desktop.example.com(ro) |
rw, read-write: This allows read and write access for the NFS clients. In the following example, the desktop.example.com is able to access the NFS export read-only, while server[0-20].example.com has read-write access to the NFS share.
/myshare desktop.example.com(ro) server[0-20].example.com(rw) |
no_root_squash: By default, root on an NFS client is treated as user nfsnobody by the NFS server. That is, if root attempts to access a file on a mounted export, the server will treat it as an access by the user nfsnobody instead. This is a security measure that can be problematic in scenarios where the NFS export is used as / by a diskless client and root needs to be treated as root. To disable this protection, the server needs to add no_root_squash to the list of options set for the exports in /etc/exports.
/myshare diskless.example.com(rw,no_root_squash) |
Warning: Note that this particular configuration is not secure, and would be better done in conjunction with Kerberos authentication and integrity checking.


Configuring an NFS export
In this example, we follow the steps on how to share a directory that is IP-based, with NFS. The directory /myshare is on server0 and will be mounted on the client desktop0 system.
1. Configure an IP based NFS share on server0 that provides a newly created share directory /nfsshare for the desktop0 machine with read and write access.
- Start the NFS service on server with the systemctl command:
# systemctl start nfs-server |
- Enable the NFS service to start at boot on server0:
# systemctl enable nfs-server |
Create the directory /myshare to share it with NFS on the server0 system.
# mkdir /myshare |
Export the /myshare directory on server0 to the desktop0 client as a read and write enabled share. To do that, add the following line to the /etc/exports file on server0:
# echo “/myshare desktop0(rw)” >> /etc/exports |
- After the changed /etc/exports file has been saved, apply the changes by executing the following command:
# exportfs –r |
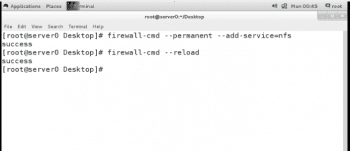
- The NFS port 2049/tcp for nfsd must be open on the server. To configure firewalld to enable access to the NFS exports immediately, run the following command:
# firewall-cmd --permanent --add-service=nfs |
- Reload the firewalld rules so that the new rule gets applied, as follows:
# firewall-cmd --reload |


2. Mount the NFS export from the server0 system on the /mnt/nfsshare mount point on desktopX permanently.
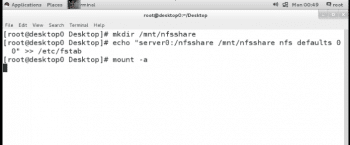
- Create the mount point /mnt/nfsshare on the desktop0 system.
# mkdir /mnt/nfsshare. |
- Create the required entry in /etc/fstab to mount the exported NFS share on the newly created /mnt/nfsshare directory on the desktop0 system permanently.
# echo “server0:/myshare /mnt/nfsshare nfs defaults 0 0” >> /etc/fstab. |
- Mount the exported NFS share on the newly created /mnt/nfsshare directory on the desktop0 system and verify the /etc/fstab entry works as expected:
# mount –a |
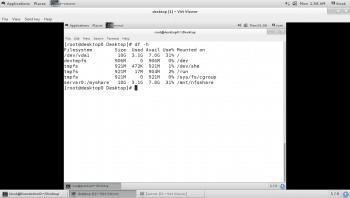
- Verify by using the df-h command in the myshare directory shared from server0 as shown in Figure 7.
So by following the steps listed above, NFS servers can export their file systems to multiple clients over the network. The NFS protocols transmit data in clear text over the network. However, here the server relies on the client to identify users. So it is not recommended that you export directories with sensitive information without the use of any encryption like Kerberos. In the future, NFS can be scaled by using metadata instead of data—this will increase its speed.


