


In this 13th article in the DevOps series, we will install and set up an Aerospike NoSQL database cluster.
Aerospike is a free and open source, distributed NoSQL database written in C. It is primarily designed for high throughput and low latency applications. It is a key-value store optimised for Flash storage devices and runs on *nix platforms. It can also be used as an in-memory database residing entirely on RAM. Following the CAP (Consistency, High Availability, Partition Tolerance) theorem, at present, the database can be operated in AP mode. The database functions in three layers — the data storage layer, the clustering and distribution layer, and the client layer. As in many distributed databases, the server supports rolling upgrades and failover mechanisms in the cluster.
A number of client libraries for various programming language environments like C, Java, Go, Python, Node.js, etc, are available to create applications that can communicate with the Aerospike server. The basic data types that are supported are integer, string, bytes, double, list, map, GeoJSON and blobs (language serialised). Support for user defined functions (UDF) also exists, using the Lua programming language. The Aerospike tooling ecosystem has a number of connectors for the Spring framework, Hadoop, Kafka, etc. The Aerospike Management Console (AMC) is a Web-based application used to monitor the Aerospike cluster. The Aerospike server was first launched in 2012, and is released under the Affero General Public License.
GNU/Linux
A host system running Ubuntu 16.04.3 LTS (Xenial) with Vagrant and VirtualBox is used to launch three CentOS 6.9 virtual machines, on which the Aerospike server will be installed and set up. The Vagrant file to launch the three nodes is shown below:
BOX_IMAGE = “bento/centos-6.9”NODE_COUNT = 3Vagrant.configure(“2”) do |config|(1..NODE_COUNT).each do |i|# Create Aerospike server nodeconfig.vm.define “as#{i}” do |node|node.vm.box = BOX_IMAGEnode.ssh.forward_agent = true# https://github.com/mitchellh/vagrant/issues/4967node.ssh.insert_key = falsenode.ssh.username = ‘vagrant’node.ssh.password = ‘vagrant’node.vm.network :private_network, ip: “10.0.0.#{i + 10}”node.vm.hostname = “as#{i}”node.vm.provider “virtualbox” do |vb|vb.name = “Aerospike-server-#{i}”vb.memory = “2048”endendendend |
The three instances are named ‘as1’, ‘as2’ and ‘as3’, and are assigned private IP addresses that can be accessed from the host system. The machines are brought up using the following command:
$ vagrant up |
The version of Ansible used on the host system is 2.2.0.0. A project directory structure is created to store the Ansible playbooks and inventory, as follows:
ansible/inventory/vbox//playbooks/configuration/ |
An ‘inventory’ file is created inside the inventory/vbox folder, which contains access information for each node:
[nodes]as1 ansible_host=10.0.0.11 ansible_connection=ssh ansible_user=vagrant ansible_ssh_private_key_file=~/.vagrant.d/insecure_private_keyas2 ansible_host=10.0.0.12 ansible_connection=ssh ansible_user=vagrant ansible_ssh_private_key_file=~/.vagrant.d/insecure_private_keyas3 ansible_host=10.0.0.13 ansible_connection=ssh ansible_user=vagrant ansible_ssh_private_key_file=~/.vagrant.d/insecure_private_key |
We also create ‘inventory/vbox/group_vars/all/all.yml’ with the following variables:
---aerospike_edition: “community”aerospike_version: “latest”amc_version: 3.6.13 |
Installing Aerospike
The entire set of playbooks is available in the playbooks/configuration/aerospike.yml file. The first step is to install the Aerospike server on all the three nodes using Ansible, as shown below:
---- name: Configure Aerospike cluster nodehosts: nodesbecome: yesbecome_method: sudogather_facts: truetags: [server]tasks:- name: Create downloads directoryfile: path=”/home/{{ ansible_user }}/downloads” state=directory- name: Create installs directoryfile: path=”/home/{{ ansible_user }}/installs” state=directory- name: Download Aerospike community server (RPM)get_url: url=”http://aerospike.com/download/server/{{ aerospike_version }}/artifact/el6” dest=”/home/{{ ansible_user }}/downloads/”register: __community_server_file- set_fact:server_version: “{{ __community_server_file.dest | basename }}”- name: Extract Aerospike servercommand: tar xzvf “/home/{{ ansible_user }}/downloads/{{ server_version }}” -C installs- name: Yum updateyum: name=* update_cache=yes state=present- name: Install RPM dependenciesbecome: yesbecome_method: sudoyum:name: “{{ item }}”state: latestwith_items:- python- libselinux-python- name: Run asinstallshell: cd “/home/{{ ansible_user }}/installs/{{ server_version | regex_replace(‘\.tgz’, ‘’) }}” && sudo ./asinstall- name: Start Aerospike server (RPM)shell: sudo service aerospike start- name: Wait for server to be up and runningwait_for:port: 3000delay: 5state: started |
The ‘downloads’ and ‘installs’ directories are first created. The Aerospike server package for CentOS 6 is then downloaded and extracted. The YUM update command is used to update the software repository, following which the dependencies and the Aerospike server are installed. The database server is then started, and the playbook waits for the server to listen on port 3000. The above playbook can be run as follows:
$ ansible-playbook -i inventory/vbox/inventory playbooks/configuration/aerospike.yml --tags server |
Setting up a multicast cluster
The Aerospike cluster can be set up either in multi-cast or mesh mode. The following playbook configures the cluster in multicast mode:
- name: Create multicast clusterhosts: nodesgather_facts: truesudo: yestags: [multicast]vars:ip_address: “{{ ansible_eth1[‘ipv4’][‘address’] }}”line_address: “ address {{ ip_address }}”tasks:- name: Stop aerospike servercommand: service aerospike stop- name: Specify multicast configuration file parameterslineinfile:dest: /etc/aerospike/aerospike.confinsertafter: “{{ item.insertafter }}”line: “{{ item.line }}”state: presentwith_items:- { insertafter: ‘proto-fd-max 15000’, line: “ node-id-interface eth1” }- { insertafter: ‘port 9918’, line: “{{ line_address }}” }- { insertafter: ‘fabric’, line: “{{ line_address }} # Multicast: Specify private IP address” }- name: Update network service addressreplace:name: /etc/aerospike/aerospike.confregexp: ‘address any’replace: “address {{ ansible_eth1[‘ipv4’][‘address’] }}”- name: Start aerospike servercommand: service aerospike start |
The above playbook can be executed using the following command:
$ ansible-playbook -i inventory/vbox/inventory playbooks/configuration/aerospike.yml --tags multicast |
You can verify the multi-cast cluster setup by logging into one of the virtual machines, and using the Aerospike Admin (asadm) tool as illustrated below:
[vagrant@as1 ~]$ asadmAerospike Interactive Shell, version 0.1.15Found 3 nodesOnline: 10.0.0.11:3000, 10.0.0.13:3000, 10.0.0.12:3000Admin> exit[vagrant@as1 ~]$ |
Installing the Aerospike Management Console
The Aerospike Management Console (AMC) dashboard provides a graphical user interface (GUI) for the Aerospike server. Its installation playbook is as follows:
- name: Install Aerospike Management Consolehosts: nodesbecome: yesbecome_method: sudogather_facts: truetags: [amc]tasks:- name: Download AMC Community RPM packageget_url: url=”http://www.aerospike.com/download/amc/{{ amc_version }}/artifact/el6” dest=”/home/{{ ansible_user }}/downloads/”register: __community_amc_file- set_fact:amc_file: “{{ __community_amc_file.dest }}”- name: Install RPM dependenciesyum:name: “{{ item }}”state: latestwith_items:- gcc- python-devel- name: Install RPM amccommand: rpm -ivh “{{ amc_file }}”- name: Start AMC server (RPM)shell: sudo service amc start |
The invocation of the above playbook and a sample execution run is shown below:
$ ansible-playbook -i inventory/vbox/inventory playbooks/configuration/aerospike.yml --tags amcPLAY [Configure Aerospike cluster node] **********************TASK [setup] ************************************************ok: [as2]ok: [as1]ok: [as3]PLAY [Create multicast cluster] *****************************TASK [setup] ************************************************ok: [as1]ok: [as2]ok: [as3]PLAY [Install Aerospike Management Console] *****************TASK [setup] ************************************************ok: [as1]ok: [as2]ok: [as3]TASK [Download AMC Community RPM package] *******************changed: [as2]changed: [as1]changed: [as3]TASK [set_fact] *********************************************ok: [as1]ok: [as2]ok: [as3]TASK [Install RPM dependencies] *****************************changed: [as1] => (item=[u’gcc’, u’python-devel’])changed: [as2] => (item=[u’gcc’, u’python-devel’])changed: [as3] => (item=[u’gcc’, u’python-devel’])TASK [Install RPM amc] **************************************changed: [as1]changed: [as2]changed: [as3]TASK [Start AMC server (RPM)] *******************************changed: [as1]changed: [as2]changed: [as3]PLAY RECAP **************************************************as1 : ok=8 changed=4 unreachable=0 failed=0as2 : ok=8 changed=4 unreachable=0 failed=0as3 : ok=8 changed=4 unreachable=0 failed=0 |
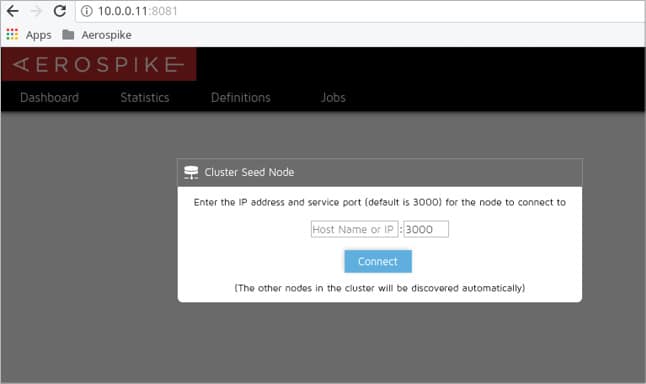
You can now open http://10.0.0.1:8081 in a browser on the host system, and you will be prompted with a modal window, as shown in Figure 1.
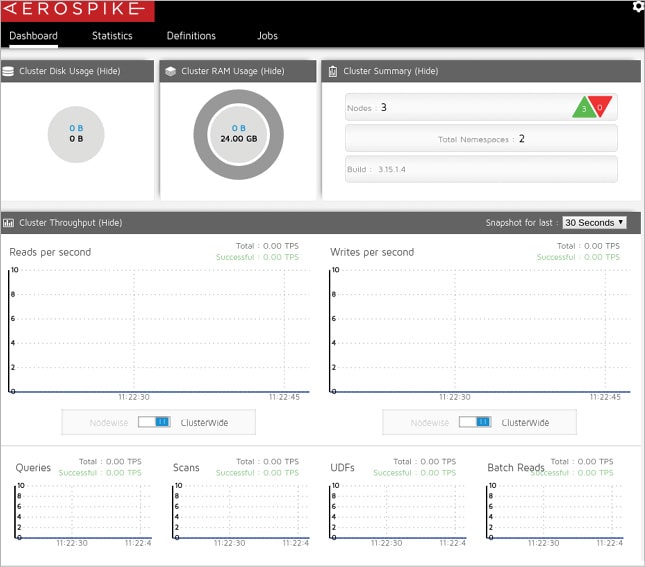
You can input ‘localhost’ for the ‘Host Name’, and the AMC dashboard opens as shown in Figure 2.
Uninstalling Aerospike
An uninstall playbook is written to stop the services, and uninstalls both the Aerospike Management Console (AMC) and the Aerospike server, as follows:
- name: Uninstallhosts: nodesbecome: yesbecome_method: sudogather_facts: truetags: [uninstall]tasks:- name: Stop AMC serverservice:name: amcstate: stopped- name: Uninstall RPM AMCcommand: yum remove aerospike-amc-* -y- name: Stop servercommand: service aerospike stop- name: Uninstall servershell: yum remove aerospike-* -y |
The above playbook can be run using the following command:
$ ansible-playbook -i inventory/vbox/inventory playbooks/configuration/aerospike.yml --tags uninstall |
You can read the documentation at https://www.aerospike.com/docs/ to learn more about Aerospike.


