Virtualisation is the process of creating software based (or virtual) representation of a resource rather than a physical one. Virtualisation is applicable at the compute, storage or network levels. In this article we will discuss compute level virtualisation, which is commonly referred to as server virtualisation.
Server virtualisation (henceforth referred to as virtualisation) allows us to run multiple instances of operating systems (OS) simultaneously on a single server. These OSs can be of the same or of different types. For instance, you can run Windows as well as Linux OS on the same server simultaneously. Virtualisation adds a software layer on top of the hardware, which allows users to share physical hardware (memory, CPU, network, storage and so on) with multiple OSs. This virtualisation layer is called the virtual machine manager (VMM) or a hypervisor. There are two types of hypervisors.
Bare metal hypervisors: These are also known as Type-1 hypervisors and are directly installed on hardware. This enables the sharing of hardware resources with a guest OS (henceforth referred to as ‘guest’) running on top of them. Each guest runs in an isolated environment without interfering with other guests. ESXi, Xen, Hyper-V and KVM are examples of bare metal hypervisors.
Hosted hypervisors: These are also known as Type-2 hypervisors. They cannot be installed directly on hardware. They run as applications and hence require an OS to run them. Similar to bare metal hypervisors, they are able to share physical resources among multiple guests and the physical host on which they are running. VMware Workstation and Oracle VM VirtualBox (hereafter referred to as VirtualBox) are examples of hosted hypervisors.
An introduction to VirtualBox
VirtualBox is cross-platform virtualisation software. It is available on a wide range of platforms like Windows, Linux, Solaris, and so on. It extends the functionality of the existing OS and allows us to run multiple guests simultaneously along with the host’s other applications.
VirtualBox terminology
To get a better understanding of VirtualBox, let’s get familiar with its terminology.
1) Host OS: This is a physical or virtual machine on which VirtualBox is installed.
2) Virtual machine: This is the virtual environment created to run the guest OS. All its resources, like the CPU, memory, storage, network devices, etc, are virtual.
3) Guest OS: This is the OS running inside VirtualBox. VirtualBox supports a wide range of guests like Windows, Solaris, Linux, Apple, and so on.
4) Guest additions: These are additional software bundles installed inside a guest to improve its performance and extend the functionality. For instance, these allow us to share folders between the host and guest, and to drag and drop functionality.
Features of VirtualBox
Let us discuss some important features of VirtualBox.
1) Portability: VirtualBox is highly portable. It is available on a wide range of platforms and its functionality remains identical on each of those platforms. It uses the same file and image format for VMs on all platforms. Because of this, a VM created on one platform can be easily migrated to another. In addition, VirtualBox supports the Open Virtualisation Format (OVF), which enables VM import and export functionality.
2) Commodity hardware: VirtualBox can be used on a CPU that doesn’t support hardware virtualisation instructions, like Intel’s VT-x or AMD-V.
3) Guest additions: As stated earlier, these software bundles are installed inside a guest, and enable advanced features like shared folders, seamless windows and 3D virtualisation.
4) Snapshot: VirtualBox allows the user to take consistent snapshots of the guest. It records the current state of the guest and stores it on disk. It allows the user to go back in time and revert the machine to an older configuration.
5) VM groups: VirtualBox allows the creation of a group of VMs and represents them as a single entity. We can perform various operations on that group like Start, Stop, Pause, Reset, and so on.
Getting started with VirtualBox
System requirements
VirtualBox runs as an application on the host machine and for it to work properly, the host must meet the following hardware and software requirements:
1) An Intel or AMD CPU
2) A 64-bit processor with hardware virtualisation is required to run 64-bit guests
3) 1GB of physical memory
4) Windows, OS X, Linux or Solaris host OS
Downloading and installation
To download VirtualBox, visit https://www.virtualbox.org/wiki/Downloads link. It provides software packages for Windows, OS X, Linux and Solaris hosts. In this column I’ll be demonstrating VirtualBox on Mint Linux. Refer to the official documentation if you wish to install it on other platforms.
For Debian based Linux, it provides the ‘.deb’ package. Its format is virtualbox-xx_xx-yy-zz.deb where xx_xx-yy is the version and build number respectively and zz is the host OS’s name and platform. For instance, in case of a Debian based 64-bit host, the package name is virtualbox-5.2_5.2.0-118431-Ubuntu-xenial_amd64.deb.
To begin installation, execute the command given below in a terminal and follow the on-screen instructions:
$ sudo dpkg -i virtualbox-5.2_5.2.0-118431-Ubuntu-xenial_amd64.deb
Using VirtualBox
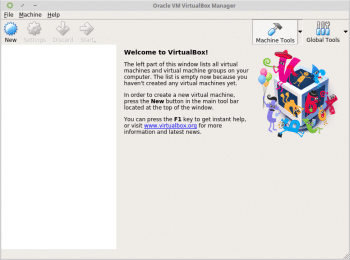
After successfully installing VirtualBox, let us get our hands dirty by first starting VirtualBox from the desktop environment. It will launch the VirtualBox manager window as shown in Figure 1.
This is the main window from which you can manage your VMs. It allows you to perform various actions on VMs like Create, Import, Start, Stop, Reset and so on. At this moment, we haven’t created any VMs; hence, the left pane is empty. Otherwise, a list of VMs are displayed there.
Creating a new VM
Let us create a new VM from scratch. Follow the instructions given below to create a virtual environment for OS installation.
1) Click the ‘New’ button on the toolbar.
2) Enter the guest’s name, its type and version and click the ‘Next’ button to continue.
3) Select the amount of memory to be allocated to the guest and click the ‘Next’ button.
4) From this window we can provide storage to the VM. It allows us to create a new virtual hard disk or use the existing one.
4a) To create a new virtual hard disk, select the ‘Create a virtual hard disk now’ option and click the ‘Create’ button.
4b) Select the VDI disk format and click on ‘Continue’.
4c) On this page, we can choose between a storage policy that is either dynamically allocated or a fixed size:
i) As the name suggests, a dynamically allocated disk will grow on demand up to the maximum provided size.
ii) A fixed size allocation will reserve the required storage upfront. If you are concerned about performance, then go with a fixed size allocation.
4d) Click the ‘Next’ button.
5) Provide the virtual hard disk’s name, location and size before clicking on the ‘Create’ button.
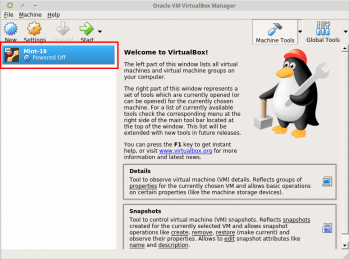
This will show a newly created VM on the left pane as seen in Figure 2.
Installing a guest OS
To begin OS installation, we need to attach an ISO image to the VM. Follow the steps given below to begin OS installation:
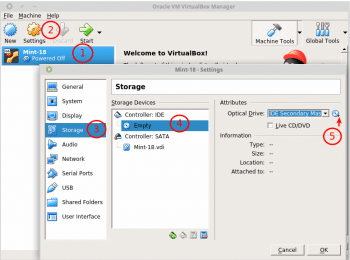
1) Select the newly created VM.
2) Click the ‘Settings’ button on the toolbar.
3) Select the storage option from the left pane.
4) Select the optical disk drive from the storage devices.
5) Provide the path of the ISO image and click the ‘OK’ button. Figure 3 depicts the first five steps.
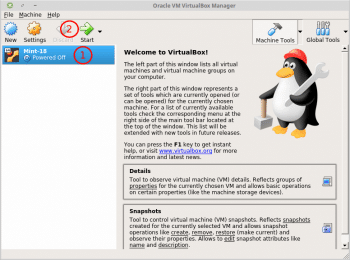
6) Select the VM from the left pane. Click the ‘Start’ button on the toolbar. Follow the on-screen instructions to complete OS installation.
VM power actions
Let us understand VM power actions in detail.
1) Power On: As the name suggests, this starts the VM at the state it was powered off or saved in. To start the VM, right-click on it and select the ‘Start’ option.
2) Pause: In this state, the guest releases the CPU but not the memory. As a result, the contents of the memory are preserved when the VM is resumed. To pause the VM, right-click on it and select the ‘Pause’ option.
3) Save: This action saves the current VM state and releases the CPU as well as the memory. The saved machine can be started again in the same state. To save the VM, right-click on it and select the ‘Close->Save State’ option.
4) Shutdown: This is a graceful turn-off operation. In this case, the shutdown signal is sent to the guest. To shut down the VM, right-click on it and select the ‘Close->ACPI Shutdown’ option.
5) Poweroff: This is non-graceful turn-off operation. It can cause data loss. To power off the VM, right-click on it and select the ‘Close->Poweroff’ option.
6) Reset: The Reset option will turn off and turn on the VM, respectively. It is different from Restart, which is a graceful turn-off operation. To reset the VM, right-click on it and select the ‘Reset’ option.
Removing the VM
Let us explore the steps we need to take to remove a VM. The remove operation can be broken up into two parts.
1) Unregister VM: This removes the VM from the library, i.e., it will just unregister the VM from VirtualBox so that it won’t be visible in VirtualBox Manager. To unregister a VM, right-click on it, select the ‘Remove’ option and click the ‘Remove Only’ option. You can re-register this VM by navigating to the ‘Machine->Add’ option from VirtualBox Manager.
2) Delete VM: This action is used to delete the VM permanently. It will delete the VM’s configuration files and virtual hard disks. Once performed, this action cannot be undone. To remove a VM permanently, right-click on it, select the ‘Remove’ option and click the ‘Delete all files’ option.
VirtualBox—beyond the basics
Beginners will get a fair idea about virtualisation and VirtualBox by referring to the first few sections of this article. However, VirtualBox is a feature-rich product; this section describes its more advanced features.
Export appliance
We can export a VM as an appliance in the Open Virtualisation Format (OVF). It comes in a two-file format.
1) OVF file format: In this format, several VM related files will be generated. For instance, there will be separate files for virtual hard disks, configurations and so on.
2) OVA file format: In this format, all VM related files will be archived into a single file and the .ova extension will be assigned to it.
By leveraging this feature, we can create a Golden Image of a VM and deploy multiple instances of it. OVF is a platform-independent, efficient, extensible, and open packaging and distribution format for VMs. As it is platform-independent, it allows the import of OVF virtual machines exported from VirtualBox into VMware Workstation Player and vice versa.
To export a VM, perform the steps listed below:
1) Select a VM from the VirtualBox manager. Navigate to the ‘File->Export Appliance’ option.
2) Select the VMs to be exported, and click the ‘Next’ button.
3) Provide the directory’s location and OVF format version.
4) Provide the appliance settings and click the ‘Export’ button.
Import appliance
To import a VM, perform the steps given below:
1) Open VirtualBox Manager and navigate to the ‘File->Import Appliance’ option.
2) Select ‘Virtual appliance’ and click on the ‘Next’ button.
3) Verify appliance settings and click on the ‘Import’ button.
You will see that a new VM appears in VirtualBox Manager’s left pane.
Cloning a VM
VirtualBox also provides an option to clone existing VMs. As the name suggests, it creates an exact copy of the VM. It supports the following two types of clones.
1) Full clone: In case of a full clone, it will duplicate all the VM’s files. As this is a totally separate VM copy, we can easily move this VM to another host.
2) Linked clone: In case of linked clones, it will not copy virtual hard disks but, instead, it will take a snapshot of the original VM. It will create a new VM, but this one will refer to the virtual hard disks of the original VM. This is a space efficient clone operation, but the downside is that you cannot move the VM to another host as the original VM and the cloned one share the same virtual hard disks.
To create a clone, perform the steps given below:
1) Select the VM from VirtualBox Manager. Right-click the VM and select the ‘Clone’ option.
2) Provide the name of the clone VM and click the ‘Next’ button.
3) Select the clone type and click the ‘Clone’ button.
You will see that a new cloned VM appears in VirtualBox Manager’s left pane.
Group VMs
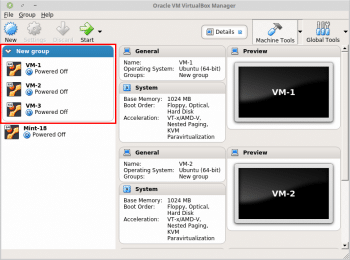
VirtualBox allows you to create groups of VMs, and to manage and perform actions on them as a single entity. You can perform various actions on them like expanding/shrinking the group, renaming the group, or Start, Stop, Reset and Pause actions on the group of VMs.
To create a VM group, perform the following steps:
1) Select multiple VMs from VirtualBox Manager. Hold the ‘Ctrl’ key for multiple selections.
2) Right-click it and select the ‘Group’ option.
This will create a VM group called ‘New group’ as shown in Figure 5.
If you right-click on the group, it will show various options like ‘Add VM to group’, ‘Rename group’, ‘Ungroup’, ‘Start’ and so on. To remove a VM from the group, just drag and drop that particular VM outside the group.
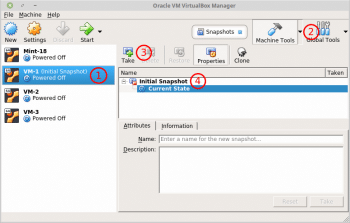
With snapshots, you can save a particular state of a VM for later use, at which point, you can revert to that state.
To take a snapshot, perform the following steps:
1) Select a VM from VirtualBox Manager.
2) Click the ‘Machine Tools’ drop down arrow from the toolbar and select the ‘Snapshots’ option.
3) Click the ‘Take’ button.
4) Enter the snapshot’s name and description before clicking on the ‘OK’ button. Figure 6 depicts the above steps.
This window provides various options related to snapshots like Delete, Clone, Restore and so on. Click on the ‘Properties’ button to see more details about the selected snapshot.
Shared folders
Shared folders enable data sharing between the guest and host OS. They require VirtualBox guest additions to be installed inside the guest. This section describes the installation of guest additions along with the shared folder feature.
To enable the shared folder feature, perform the following steps:
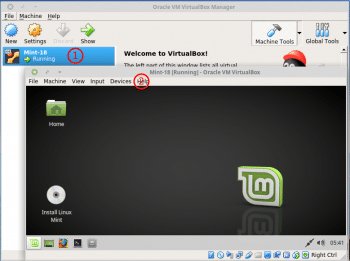
1) Start the VM from VirtualBox Manager.
2) Go to the Devices->Insert Guest Additions CD image option. Follow the on-screen instructions to perform the guest additions installation. Figure 7 depicts the first two steps.
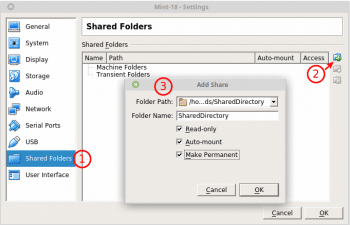
3) Navigate to Devices->Shared Folders->Shared Folder Settings.
4) Click the ‘Add new shared folder’ button. Enter the folder’s name, its path and select ‘Permissions’. Click the ‘OK’ button. Figure 8 illustrates the above steps.
You can mount the shared folder from the guest in the same way as an ordinary network share. Given below is the syntax for that:
mount -t vboxsf [-o OPTIONS] <sharename> <mountpoint>
Understanding virtual networking
This section delves deep into the aspects of VirtualBox’s networking, which supports the network modes
Not Attached, NAT, bridged adapters, internal networks and host-only adapters.
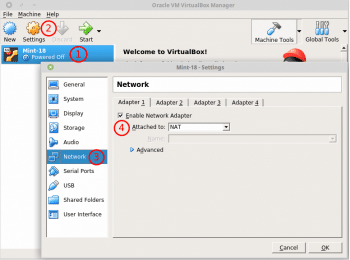
Perform the steps given below to view/manipulate the current network settings:
1) Select the VM from the VirtualBox Manager.
2) Click the ‘Settings’ button on the toolbar.
3) Select the ‘Network’ option from the left pane.
4) Select the adapter. The current networking mode will be displayed under the ‘Attached to’ drop-down box.
5) To change the mode, select the required network mode from the drop-down box and click the ‘OK’ button.
Figure 9 illustrates the above steps.
VirtualBox network modes
Let us discuss each network mode briefly.
1) Not Attached: In this mode, VirtualBox reports to the guest that the network card is installed but it is not connected. As a result of this, networking is not possible in this mode. If you want to compare this scenario with a physical machine, then it is similar to the Ethernet card being present but the cable not being connected to it.
2) NAT: This stands for Network Address Translation and it is the default mode. If you want to access external networks from the guest, then this will serve your purpose. It is similar to a physical system connected to an external network via the router.
3) Bridged adapter: In this mode, VirtualBox connects to one of your installed network cards and exchanges network packets directly, circumventing the host operating system’s network stack.
4) Internal: In this mode, communication is allowed between a selected group of VMs only. Communication with the host is not possible.
5) Host only: In this mode, communication is allowed between a selected group of VMs and the host. A physical Ethernet card is not required; instead, a virtual network interface (similar to a loopback interface) is created on the host.
An introduction to VBoxManage
VBoxManage is the command line interface (CLI) of VirtualBox. You can manage VirtualBox from your host via these commands. It supports all the features that are supported by the GUI. It gets installed by default when the VirtualBox package is installed. Let us look at some of its basic commands.
To list VMs
Execute the commands given below in a terminal to list all the registered VMs:
$ VBoxManage list vms

“Mint-18” {e54feffd-50ed-4880-8f81-b6deae19110d}

“VM-1” {37a25c9a-c6fb-4d08-a11e-234717261abc}

“VM-2” {03b39a35-1954-4778-a261-ceeddc677e65}

“VM-3” {875be4d5-3fbf-4d06-815d-6cecfb2c2304}
To list groups
We can also list VM groups using the following commands:
$ VBoxManage list groups

“/”

“/VM Group”
To show VM information
We can use the showvminfo command to display details about a VM. For instance, the command given below provides detailed information about the VM. It accepts the VM’s name as an argument.
$ VBoxManage showvminfo Mint-18

Name: Mint-18

Groups: /

Guest OS: Ubuntu (64-bit)

UUID: e54feffd-50ed-4880-8f81-b6deae19110d

Config file: /home/groot/VirtualBox VMs/Mint-18/Mint-18.vbox

Snapshot folder: /home/groot/VirtualBox VMs/Mint-18/Snapshots

Log folder: /home/groot/VirtualBox VMs/Mint-18/Logs

Hardware UUID: e54feffd-50ed-4880-8f81-b6deae19110d

Memory size: 1024MB

Page Fusion: off

VRAM size: 16MB
Note: The remaining output is not shown here, in order to save space.
To turn on the VM
VBoxManage provides a simple command to start the VM. It accepts the VM name as an argument.
$ VBoxManage startvm Mint-18

Waiting for VM

“Mint-18” to power on...

VM “Mint-18” has been successfully started.
To turn off the VM
The controlvm option supports various actions like pause, reset, power-off, shutdown and so on. To power off the VM, execute the command given below at a terminal. It accepts the VM name as an argument.
$ VBoxManage controlvm “Mint-18” poweroff

0%...10%...20%...30%...40%...50%...60%...70%...80%...90%...100%
To unregister VM
The command given below can be used to unregister a VM. It accepts the VM’s name as an argument.
$ VBoxManage unregistervm “Mint-18”
To register VM
The command given below can be used to register a VM. It accepts the VM’s file name as an argument.
$ VBoxManage registervm “/home/groot/VirtualBox VMs/Mint-18/Mint-18.vbox”
To delete VM
To delete a VM permanently, use the –delete option with the unregistervm command. For instance, the following command will delete the VM permanently.
$ VBoxManage unregistervm “VM-1” --delete

0%...10%...20%...30%...40%...50%...60%...70%...80%...90%...100%
VBoxManage provides many more commands and covering them all is beyond the scope of this tutorial. Anyway, you can always dig deeper into this topic by referring to VirtualBox’s official guide. To view all supported commands and their options, execute the following command in a terminal:
$ VBoxManage –hel


