Cloonix is a Linux router and host simulation platform. It fully encapsulates applications, hosts and the network. Simulators like Cloonix offer students and researchers scope for research into various Internet technologies like the Domain Name System (DNS).
Cloonix is a network simulator based on KVM or UML. It is basically a Linux router and host simulation platform. You can simulate a network with multiple reconfigurable VMs in a single PC. The VMs may be different Linux distributions. You can also monitor the network’s activities through Wireshark. Cloonix can be installed on Arch, CentOS, Debian, Fedora, OpenSUSE and their derivative distros.
The main features of Cloonix are:
- GUI based NS tool
- KVM based VM
- VMs and clients are Linux based
- Spice server is front-end for VMs
- Network activity monitoring by Wireshark
- The system requirements are:
- 32/64-bit Linux OS (tested on Ubuntu 16.04 64-bit)
- Wireshark
- Cloonix package: http://cloonix.fr/source_stored/cloonix-37-01.tar.gz
- VM images: http://cloonix.fr/bulk_stored/
To set it up, download the Cloonix package and extract it. I am assuming that Cloonix is extracted in the $HOME directory.
The directory structure of Cloonix is as follows:
cloonix

├── allclean

├── build

├── cloonix

│ ├── client

│ ├── cloonix_cli

│ ├── cloonix_config

│ ├── cloonix_gui

│ ├── cloonix_net

│ ├── cloonix_ocp

│ ├── cloonix_osh

│ ├── cloonix_scp

│ ├── cloonix_ssh

│ ├── cloonix_zor

│ ├── common

│ ├── id_rsa

│ ├── id_rsa.pub

│ ├── LICENCE

│ └── server

├── doitall

├── install_cloonix

├── install_depends

├── pack

└── README

5 directories, 19 files
To install Cloonix, run the following commands, which will install all the packages required, except Wireshark.
$cd $HOME/cloonix

$sudo ./install_depends build
The following command will install and configure Cloonix in your system:
$sudo ./doinstall
The command given below will install Wireshark:
$sudo apt-get install wireshark
You have to download VMs in $HOME/cloonix_data/bulk, as shown below:
bulk

│ ├── batman.qcow2

│ ├── bind9.qcow2

│ ├── centos-7.qcow2

│ ├── coreos.qcow2

│ ├── ethereum.qcow2

│ ├── jessie.qcow2

│ ├── mpls.qcow2

│ ├── stretch.qcow2

│ └── zesty.qcow2
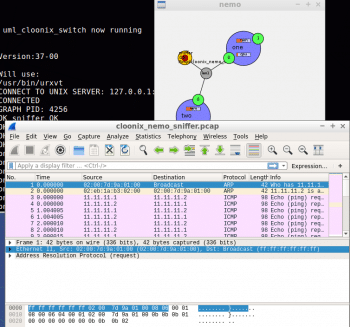
To simulate the networks, you can download the ready-to-demo scripts available in http://cloonix.fr/demo_stored/v-37-01/cloonix_demo_all.tar.gz.
Shown below are the demo scripts available:
├── batman

├── cisco

├── dns

├── dyn_dns

├── eap_802_1x

├── ethereum

├── fwmark2mpls

├── mpls

├── mplsflow

├── netem

├── ntp

├── olsr

├── openvswitch

├── ospf

├── ping

├── strongswan

└── unix2inet
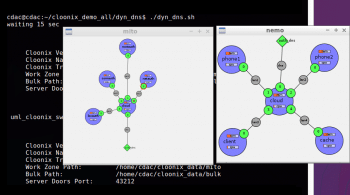
To run any demo for ping, for instance, just go to the ping directory and run the following code:
$./ping.sh
This will create all the required VM(s) and network components. You can also monitor traffic by using Wireshark.
Cloonix is a good tool to run network simulation. All the VMs are basically Linux VMs, which you can easily reconfigure.










But how many VMs could realistically be created on a single host? Is there a docker container based cloonix in the works ?