The programming languages used to build desktop and Web applications are obviously different. Electron is an effort to bridge this gap. With it, you can construct a desktop application with popular Web technologies such as HTML, CSS and JavaScript. This article introduces the basic features and the potential of the Electron framework.
There are three major types of software applications that are built — desktop, Web and mobile. The programming platforms used to construct each of these types of apps are different. Though certain languages such as Java play a key role in each of these application types, there are specialised languages for each category. To name a few, PHP is for server-side scripting, CSS for adding style to Web pages, and XML is for data representation. Similarly, there are frameworks specific to each of these categories. These make the application-building process easier and more efficient for developers.
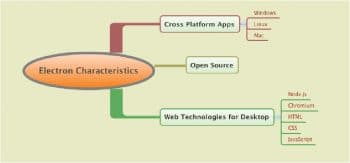
Besides all these options, there are also a few frameworks that developers can use to build both desktop and mobile applications. This article introduces you to one such popular framework named Electron. The three major characteristics of the Electron framework are listed below:
- It uses popular Web technologies such as HTML, CSS and JavaScript for building desktop applications.
- It is open source.
- It supports cross-platform application development. It is compatible with Microsoft Windows (Windows 7 and above), Apple Mac and Linux. The applications built using Electron execute on all these operating systems.
Building apps using the Electron framework is fairly simple. Primarily, Electron was built for the Atom editor (Atom is a popular text editor/IDE — https://atom.io/). The efficiency of Electron is proven by the many leading companies such as Facebook and Microsoft that use it. A sample list of products built using Electron is available in the official home page (https://electron.atom.io/).
Installing Electron
Electron can be installed easily by using the npm install command:
npm install electron --save-dev --save-exact
Obviously, you need to have Node.js installed on your computer.
Quick starting Electron
The quickest way to get started with Electron is to get the ‘Quick start’ app into action. For that you have to carry out the following steps:
# Clone the Quick Start repository using Git

$ git clone https://github.com/electron/electron-quick-start

# Navigate to the folder electron-quick-start

$ cd electron-quick-start

# Install the dependencies and run

$ npm install && npm start
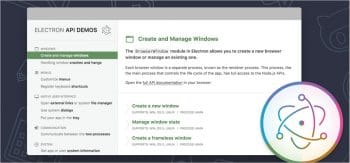
Another easier approach to get familiar with Electron is to check out the Electron-Api-Demos from GitHub. The steps to build this demo app are the same as those mentioned for the ‘Quick start’ app.
$ git clone https://github.com/electron/electron-api-demos

$ cd electron-api-demos

$ npm install

$ npm start
This app can be used to get a basic introduction to what can be done with Electron. You can play around with the source code to get a better understanding of the features of Electron (a screenshot from the official GitHub page of the source is shown in Figure 3).
The application structure
As stated earlier, Electron allows us to build desktop applications with Web technologies. Primarily, Electron facilitates the building of desktop applications with JavaScript as the core language. It provides a runtime with rich native operating system APIs.
The basic structure of the simple Electron app consists of three files inside your application’s folder:
- Package.json
- Main.js
- Index.html
The structure of the package.json is the same as Node’s modules. The script specified in the ‘main’ field is the application’s startup script, which would run the main process. A sample package.json file is shown below:
{

“name” : “your-app”,

“version” : “0.1.0”,

“main” : “main.js”

}
If the main field is left blank in the package.json file, then Electron tries to load a .js file named index.js.
There are two major types of processes in an Electron app, as listed below.
- Main process: This is responsible for running the package.json’s main script. This main process can display a GUI by building Web pages.
- Renderer process: Electron uses Chromium for rendering Web pages. The multi-process architecture of Chromium is also used. These individual GUI (Web) pages also run their own process, which is called the renderer process.
There is a major difference between the normal Web pages that run inside a browser and the Electron app’s Web pages. The normal Web pages are executed in a sand-boxed environment and hence they are denied access to the native system resources. However, Electron Web pages can be used to access the lower level resources of the system with the help of operating system interactions.
The main.js file (which is indicated in the package.json file) needs to build windows and handle events. A sample main.js file is shown below:
const {app, BrowserWindow} = require(‘electron’)

const path = require(‘path’)

const url = require(‘url’)

// Keep a global reference of the window object, if you don’t, the window will be closed automatically when the JavaScript object is garbage collected.

let win

function createWindow ()

{

// Create the browser window.

win = new BrowserWindow({width: 800, height: 600})

// and load the index.html of the app. win.loadURL(url.format({

pathname: path.join(__dirname, ‘index.html’), protocol: ‘file:’,

slashes: true }))

// Open the DevTools.

win.webContents.openDevTools()

// Emitted when the window is closed.

win.on(‘closed’, () => {

win = null })

}

// This method will be called when Electron has finished initialization and is ready to create browser windows. Some APIs can only be used after this event occurs.

app.on(‘ready’, createWindow)

// Quit when all windows are closed.

app.on(‘window-all-closed’, () => {

// On macOS it is common for applications and their menu bar to stay active until the user quits explicitly with Cmd + Q

if (process.platform !== ‘darwin’) {

app.quit()

}

})

app.on(‘activate’, () => {

// On macOS it’s common to re-create a window in the app when the // dock icon is clicked and there are no other windows open.

if (win === null) { createWindow()

}

})

The index.html would consist of the source code of the Web page. A sample is shown below:

<!DOCTYPE html>

<html>

<head>

<meta charset=”UTF-8”>

<title>Hello World!</title>

</head>

<body>

<h1>Hello World!</h1>

We are using node

<script> document.write(process.versions.node)</script>,

Chrome <script> document.write(process.versions.chrome)</script>, and Electron <script> document.write(process.versions.electron)</script>.

</body>

</html>
Now, we have built all the three required files: main.js, package.json and index.html. These will be executed by running the electron command in the source directory (if Electron is installed globally with npm).
electron
Packaging Electron apps
Once the development of the application is over, it can be packaged for distribution. Detailed package building instructions for manually creating the packages are given at https://electron.atom.io/docs/tutorial/application-distribution/. Apart from the manual packaging, there are specific tools available to assist in the package building process. Some of these are listed below:
- Electron-forge
- Electron-builder
- Electron-packager
Accessibility testing of apps
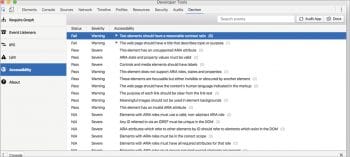
Accessibility of applications has become an important factor these days. The Electron apps can be made accessible effectively and this aspect can be tested. Though the GUIs in the Electron apps are HTML pages, their accessibility cannot be audited directly using accessibility audit tools, as there is no direct URL available for these pages. To facilitate accessibility auditing of the Electron apps, new functionalities have been introduced to Devtron (an Electron DevTools extension—more information can be got at https://electron.atom.io/devtron/) and Spectron (an Electron testing framework – https://electron.atom.io/spectron/).
A sample code for accessibility auditing with Spectron is shown below:
app.client.auditAccessibility().then(function (audit)

{

if (audit.failed)

{

console.error(audit.message)

}

})
Similarly, the accessibility tab has been introduced in Devtron too. A sample screenshot is shown in Figure 4.
This article is a basic introduction to the Electron framework. If you are interested in further exploring it, there are a large number of resources available. The community (https://electron.atom.io/community/) Web page of the Electron framework offers a lot to those interested in getting detailed insights.


