Ubuntu Core is a minimalistic version of Ubuntu. It is lightweight and is designed for use with embedded systems and IoT devices. Snaps are universal Linux packages, which are faster to install, easier to create, and safe to run and work on multiple distributions.
The biggest challenge in delivering Linux applications is dependency resolution. As distributions update underlying libraries frequently, it is not always possible to offer application binaries as offline archives. One can’t think of downgrading an application if underlying packages are upgraded, which are in turn required by some more applications. Also, it’s not possible to keep multiple versions of the same library in view of different applications. Ubuntu Core has a solution for all this complexity, whereby a single device can host multiple isolated applications with their own dependencies.
Ubuntu ‘snaps’ are universal packages supported on many Linux distributions and on various devices. Any Linux application can be bundled as a snap, which can be easily deployed across the distributions and across devices with isolated environments. This ensures secure execution and better transactional management with flexible upgradable or downgradable support.
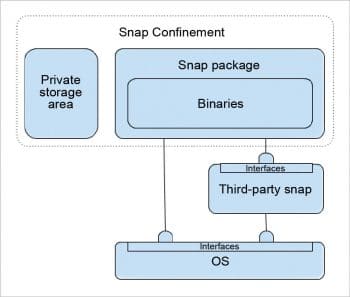
Snaps are based on Ubuntu Core, which is a minimal rendition of Ubuntu, specifically designed for embedded and IoT devices. The core image consists of the kernel, a minimal set of drivers and a basic file system in the form of a core snap with basic functionality. You can’t update the core by adding packages unlike other typical Linux distributions. Each snap is bundled with its own dependencies for the functionality not provided by the core. It supports transactional updates of the snaps, which can be upgraded or downgraded easily without affecting other snaps. Also, snaps can be remotely upgraded.
The snap format file system
When Ubuntu Core is installed, the OS snap gets installed initially. This snap is packed with rootfs, providing basic features like network services, standard libraries and daemon management. It is the platform for subsequent snaps offering application logic. This enables universal packaging as all snaps run on the basis of the OS snap provided by the core, eliminating any dependencies with the host environment.
Each snap comes with an isolated file system in squashfs format, which gets mounted in a sub-directory under /snap. For example, when foo snap is installed, its file system is mounted under /snap/foo/xx, where xx represents a revision of the snap. There can be multiple revisions of file systems under /snap/foo but /snap/foo/current always points to the desired version as per the recent upgrade or downgrade. Each user-accessible application of the snap is linked under /snap/bin, with the <snap-name>.<app-name> convention, e.g., /snap/bin/foo.test for an application named test under the snap foo. The meta data of the snap is available in the form of meta/snap.yaml under the mounted file system.
Use cases
As the underlying stack is read only and each snap has a self-contained file system, Ubuntu Core is the perfect choice for industrial solutions for which security is a critical concern. Here are some cases of Ubuntu Core powered solutions:
- IoT gateways for industrial solutions, like the Dell Edge gateway
- DeviceHive IoT toolkit
- Cloud based servers like NextCloud
- Digital signage
- Robots and drones
Some popular snaps
Here are some popular applications available from the snap store:
- Atom, a text editor
- NextCloud, a cloud based server for data storage
- VLC, a multi-media player
- Docker, a container manager
- Cassandra, a scalable NoSQL database
- Blender, a 3D creation suite
- Stellarium, a planetarium software
- Rocket.Chat, a Web chat server
- The Telegram desktop client
- Jenkins, a leading automation server for building, testing and deployments
- OpenHAB, a home automation middleware software
- Mosquitto, a MQTT broker
- Clients for AWS, like Azure cloud solutions

Installation
Ubuntu Core comes with a snap manager, snapd, which is present by default in Ubuntu Xenial (16.04 LTS) onwards; for older versions of Ubuntu and other distributions you can install the snap manager as follows:
apt-get install snapd
If you are planning to build custom snaps, install snapcraft also, as follows:
apt-get install snapcraft
Replace apt-get with any other package manager like yum, dnf, zypper, pacman, poky, etc, for non-Debian based distributions.
Ubuntu Core is available for dedicated installation for various embedded targets like Raspberry Pi Models 2 and 3, Compute Module 3, Intel Joulie, Dragon Board, Intel NUC kit, Samsung Artik, etc. Also, Ubuntu Core can be installed through KVM on any desktop as a virtual machine, for which you can download the core image for the AMD 64 architecture, extract the archive and run the following command:
qemu-sytem-x86_64 -smp 2 -m 1500 -netdev user, id=mynet0, hostfwd=tcp::8022-:22,hostfwd=tcp::8090-:80 -device virtio-net-pci,netdev=mynet0 -drive file=ubuntu-core-16-amd64.img,format=raw
Now log in to the core using ssh as follows:
ssh username@localhost -p 8022
Working with snaps
Let’s try working with snaps in CLI mode, assuming osfy as the snap’s name.
To search for available snaps based on the osfy keyword, use the following command:
snap find osfy
To install a specific snap from the store, use the command given below:
snap install osfy
Observe the file hierarchy in /snap/osfy/current. Run the application associated with snap by using the following command:
osfy.test #from /snap/bin
For listing of installed snaps, use the command given below:
snap list
To check the information about a particular installed snap, use the following command:
snap info osfy
The following command updates all installed snaps:
\sudo snap refresh
The following command updates a particular installed snap:
sudo snap refresh osfy
To roll back a snap to a previous version, use the command given below:
sudo snap revert osfy
The next command uninstalls a specific snap:
sudo snap remove osfy
The following command removes symlinks of the apps in /snap/bin and stops the associated services:
sudo snap disable osfy
To start the snap services and make symlinks for the apps available in /snap/bin, use the following command:
sudo snap enable osfy
To list the environment variables associated with a snap, use the command given below:
sudo snap run osfy.env
Classic snap
Since the core is read-only and not meant for development purposes, you can install ‘classic snap’ to enter in classic mode on devices deployed with solely Ubuntu Core. Normal package management with apt-get is allowed in classic mode. But avoid this classic snap if secure deployment is the prime concern.
sudo snap install --devmode classic

sudo classic
Now, in the prompt enabled by classic mode, you can try any developer commands such as those shown below:
sudo apt-get update

sudo apt-get install vim gcc snapcraft
Interfaces
Interfaces allow snaps to exchange services with each other. A snap provides the service in the form of slot and another snap can consume it in the form of plug. Some important interfaces are network, network-bind, camera, bluetooth-control, firewall-control, log-observe, etc. To list out all possible interfaces and consumer snaps plugged into each of them, use the following command:
snap interfaces
To list interfaces plugged by a particular snap, the following command should be used:
snap interfaces osfy
In the absence of a plugs entry in the apps section of the manifest file, we need to connect the interfaces manually. For example, if a foo snap is providing a bar interface slot and osfy snap wants to plug into it, run the following command:
snap connect osfy:bar foo:bar
Building custom snaps
You can package any Linux application as a snap. For this, create an empty directory and run the following command to create the basic skeleton of metadata in the name of snapcraft.yaml:
snapcraft init
Now edit the parts, apps sections of snapcraft.yaml as per the tutorial in https://snapcraft.io/docs/build-snaps/your-first-snap. And, finally, run the snapcraft command to build the snap by retrieving all required sources, building each part, and staging and priming the outcome of all parts in stage, prime directories. Finally, the contents of the prime sub-directory will be bundled with the snap file system.
snapcraft
The following command installs the generated local snap:
snap install hello_x.xx_xxx.snap

Plugins
Plugins help snapcraft in building parts of the snap. For listing all available plugins, use the command given below:
snapcraft list-plugins
Here are some standard plugins for building snaps:
- autotools – to build code based on ./configure, make, make install, cycle
- make, cmake – to build Makefile, CMAke
- qmake – to build Qt based projects
- maven,gradle – to build Java code
- python2, python3 – to build Python code or install packages via Pip
- nodejs – to build node.js code or install npm packages
- dump – this just dumps the contents from the snapcraft directory to the snap file system via staging, prime directories
To get more information on each plugin, use the following command:
snapcraft help xxxx
Some snaps are not available in stores but can be installed as custom snaps, by building with snapcraft using suitable plugins. Let’s consider a few case studies on building custom snaps.
Node-RED is a visual prototyping tool for wiring services and components together. It can be easily installed through npm as a node.js package. In the parts section of snapcraft.yaml we’ll specify the node.js plugin and specify each npm package under node-packages. Here is some code for the apps and parts of the manifest file:
apps:

red:

daemon: simple

command: bin/nodered

plugs:

- network-bind

- network

parts:

red:

plugin: nodejs

node-packages:

- node-red
We can specify other parts and apps for any Node-RED add-ons required in this snap (Reference: github.com/muka/nodered.snap).
The InfluxData TICK Stack comes with Telegraf, InfluxDb, Chronograf and Kapacitor for data collection, storage, visualisation and analysis with time series data management support. Since binary tar balls are available for all these four components, the dump plugin can be used to build a snap. Here is the code snippet of snapcraft.yaml (Reference: github.com/morphis/influxdb-snap):
apps:

influxd:

daemon: simple

command: usr/bin/influxd

plugs :

- network-bind

parts:

influxdb:

plugin: dump

source: https://dl.influxdata.com/influxdb/releases/influxdb-<ver>_linux_<arch>.tar.gz
IoT gateways like Eclipse Kura as well as servers like Eclipse Leshan and Californium can be packed as snaps using the Maven plugin to build the parts and suitable apps sections to launch the generated jar files.
Please stay tuned to github.com/rajeshsola/iot-examples/tree/master/snappy-examples for customized snapcraft.yaml for the above snaps.
Publishing your snaps
Custom snaps built by you can be published to the store. Just create an account on dashboard.snapcraft.io, log in, create a namespace and publish the snaps with the following commands:
snapcraft login

snapcraft register osfy-demos

snapcraft push hello_x.xx_xxx.snap


