Containers are the future when it comes to using and shipping applications. But Linux containers or LXC can be used for more than just that. This article covers the use of LXC on a daily basis as well as for production.
Although containers have become popular due to their extensive use of Docker by Docker Inc., which has been in the market since 2013, Linux has also had its own containers for several years now. These native Linux containers are also referred to as LXC. The LXC project has been around since 2008, and is being actively maintained and supported by Canonical Ltd. It is a set of tools (technically, more an API) which gives you an interface to create a container using Linux namespaces and cgroups (Control Groups). Linux namespaces (mnt, pid, net, ipc, uts, user, etc) is a feature of the kernel that is used for a different type of isolation, whereas cgroups is used to set limitations over the resources (mostly hardware like memory and disk size) used by any process.
Mount namespace (mnt): In this namespace, a process views different mount points other than the original system mount point. It creates a separate file system tree associated with different processes, which restricts them from making changes to the root file system.
PID namespace (pid): PID namespace isolates a process ID from the main PID hierarchy. A process inside a PID namespace can have the same PID as a process outside it, and even inside the namespace, you can have a different init with PID 1.
UTS namespace: In the UTS (UNIX Time-sharing System) namespace, a process can have a different set of domain names and host names than the main system. It uses sethostname() and setdomainname() to do that.
IPC namespace: This is used for inter-process communication resources isolation and POSIX message queues.
User namespace (user): This isolates user and group IDs inside a namespace, which is allowed to have the same UID or GID in the namespace as in the host machine. In your system, unprivileged processes can create user namespaces in which they have full privileges.


Network namespace (net): Inside this namespace, processes can have different network stacks, i.e., different network devices, IP addresses, routing tables, etc.
LXC is a set of tools that makes it possible to use these features and create something called a container, which is nothing but a very lightweight VM with less isolation. The reason for less isolation is the absence of a hypervisor layer, which makes containers use the same kernel as the host system. But this absence also makes containers more widely usable, as there is no overhead of configuring and no need for a hypervisor; so you can select which resources you wish to isolate according to your usage. Let’s now dive into the Linux container world.
Note: For demonstration purposes, I will use LXC in Ubuntu 16.04. LXC has great support on Ubuntu since the LXC project is backed by Canonical Ltd, which is also the publisher of the Ubuntu operating system. But you can also install LXC on any other Linux distribution through its official repositories.
Getting started with LXC
In your Ubuntu machine, install LXC and lxc-templates by pasting the following command in your terminal:
$sudo apt install lxc lxc-templates
Once you have the LXC toolset installed, you can check your default configuration with the following command:
$sudo lxc-checkconfig
Now, since we have LXC installed on our Ubuntu system, we can create our first container, as follows:
$sudo lxc-create -n mycontainer -t ubuntu
This will download an Ubuntu container from the Internet and save it in your storage system with the name mycontainer. You need to remember the -n option, as it will be used in most places to give your container a name. -t template_name defines the template we want to use. There are many other distribution templates available for LXC. You can find them at /usr/share/lxc/templates.
You can see all the available containers you have created by using lxc-ls. Creating a container doesn’t mean it is running. To run the container you need to use the lxc-start tool:
$sudo lxc-start -n mycontainer
This will start your first container in the background. You can check all the running containers by using lxc-ls also with the passing option –fancy.
This will show the state of all your containers with a few more specs. You can also use lxc-top to list the running container with the resources it uses.
Now, to start using your container, all you need to do is get attached to the container. To get direct access to the container as the root user without authentication, use the following command:
$sudo lxc-attach -n mycontainer
This is not always recommended due to the root login; so, in its place, you can use the following:
$sudo lxc-console -n mycontainer
This will give you the login prompt (default user name is ubuntu with password ubuntu). To detach from the container, just press Ctrl-a, followed by q.
If you are using LXC for development or testing purposes, then you have probably been in a situation in which you required an architecture system other than your current host. LXC has templates for most CPU architectures like i836, powerpc and armhf.
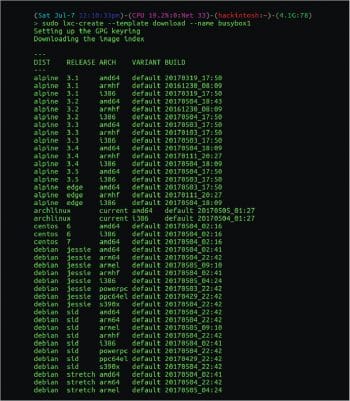
To create a container of a different architecture, you just need to add —arch= to the lxc-create command. Or you can even view the full list of templates and select one from them using the following command:
$sudo lxc-create --template download --name mycontainer
You can stop a container by using lxc-stop, freeze/pause a running container by using lxc-freeze, and then use lxc-unfreeze to unfreeze it. lxc-destroy will delete the container image. To use these tools, all you need to do is pass -n containername with these commands.
lxc-console or lxc-attach gives you access to the shell inside the container, but you may not always want that to happen. Often, you just want to run a single script or command inside the container. For that purpose, LXC provides lxc-execute.
$sudo lxc-execute -n mycontainer – ip addr
This will give you the IP address of interfaces inside the container, rather than your host.
LXC also supports cloning and snapshots of the container. To clone a container, use the following command:
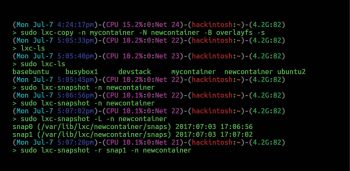
$sudo lxc-copy -n mycontainer -N newcontainer
Note: To clone your container, it should not be in a running state.
We will discuss snapshots in the next section.


Configuring Linux containers
Till now, we have used LXC tools only for general purposes. But when you are using containers in a production or development environment, you need more controls and options to get your work done. To configure a container, you must know how to use the config file. But, first, you need to know the actual location of your containers on your disk. The answer is at the path /var/lib/lxc/your_container_name. Inside this path, you will find the rootfs directory, which is the root of your container (also called the backing store), and a config file. You can change this container’s path while creating the container using lxc-create by passing parameter -P newpath or –lxcpath=PATH.
You can even create a separate partition and use it as the root file system of the container. The default backing store, which is /var/lib/lxc/container_name/rootfs is called dir backing store. Other available options are lvm, loop, brtfs, zfs, aufs, overlayfs and rbd. With the -P option you can only define the path of your container’s rootfs, but the container will still be a dir container.
So, to change the backing store, use -B backing_store_type with lxc-create and lxc-clone (to clone it into another container of a different backing store).
A strong feature that LXC comes with is the container’s snapshot capability. You can create a snapshot using lxc-snapshot.
$sudo lxc-snapshot -n mycontainer
Note: Snapshots are not supported for dir based containers; so before using them, you have to clone them to the container of type aufs or overlayfs.
This will save the snapshot with the name snap0. Now, whenever you do some changes you are not sure about in your container, you can just create a snapshot before the change and restore it later with the following command:
$sudo lxc-snapshot -r snap0 -n mycontainer.
To list all the snapshots of a container, use the following command:
$sudo lxc-snapshot -L -n mycontainer
Every container has a config file at path /var/lib/lxc/your_container/config. You can use this file for almost every possible change you want to do with LXC, including but not limited to networking, setting cgroups limitations, profiling and other common container related configurations. For example, you can mount an external folder inside the container by adding the following line in the config file of your container:
lxc.mount.entry = /mnt/share /root/share none ro,bind 0.0
We will discuss more about the config file in the next article in this series.

How LXC is different from Docker and VMs
LXC (or LXD) has been created to replace the work of VMs as the latter are really heavy to use and can be unmanageable if run in large numbers. The only difference between containers and VMs is that the former have the same kernel layer as that of the host, whereas VMs provide full isolation.
So Linux containers run a whole Linux machine (or simply multiple services) inside the isolated environment provided by the Linux kernel, whereas Dockers are replacements of the traditional way of running applications and run them in isolated environments, i.e., Docker containers are made to run a single application inside their containers. LXC containers are even capable of nested containerisation, which means you can run Docker or any other container inside an LXC container without any issues. In general, it is immaterial what is running inside a container, since all applications will be treated the same way. We will discuss that comparison in the next article in this series.


