Going to popular restaurants can be fun provided one has a reservation. Waiting in a queue for a table can be a real dampener. So let’s create an app that can make reservations on our behalf, taking our entertainment experience to a higher level.
This Android learning journey has become exciting, with readers providing continuous feedback and support by coming up with new challenges and problems all the time. It’s been almost two years now since we started out on our Android journey with pretty basic topics and, over time, we have tackled complex scenarios as well. Going forward in the series, we move on to a more advanced topic.
Going to restaurants has become pretty common nowadays. Every weekend you can see crowds of people having a good time in these places. With large crowds, there is the issue of waiting lists and queues, which can become a real pain for restaurant managers. Restaurants allow advance bookings over the phone, but why not make this service a little more digital and book your table from your mobile app instead? So this is what we will attempt in this session. We will create a restaurant reservation system that will help both customers and the restaurant managers to avoid long queues.
In the previous tutorial, we created a Web database using the open source cloud-enabled Firebase. In this tutorial, we will use this previously acquired knowledge to deliver a fully working digital booking application. Hope you are well versed with the topics covered so far.
If you have missed the last tutorial, I’d like to revise things quickly. Let me first introduce you to Firebase, which is a Google provided cloud database that is open source and freely available for use.
Features of Firebase
Listed below are some of the key features of Firebase.
-
Firebase uses the GUI based data centre so that you can view all the entries and manage them as well.
-
Being on the cloud, it is accessible on-the-go from any device.
-
Smart authentication provides secure access.
-
The real-time database reflects changes as soon as the data is updated.
-
Collaborators can be added so that multiple people can manage the database.
-
No coding is required for fetching and storing data.
Creating a project in Firebase
-
To use Firebase, you must have a working Google account. I hope you have one, as it will be needed to run App Inventor.
-
Type https://console.firebase.google.com/ in the address bar of the browser you are using and hit Enter.
-
If asked for login credentials, give those of your Google account and proceed.
-
Follow the on-screen instructions, which generally involve accepting the terms and conditions.
-
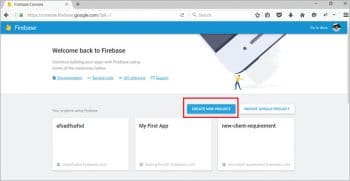
Once everything is done, you will see the screen shown in Figure 1.
-
Click on the ‘Create New Project’ button, as shown in Figure 1.
-
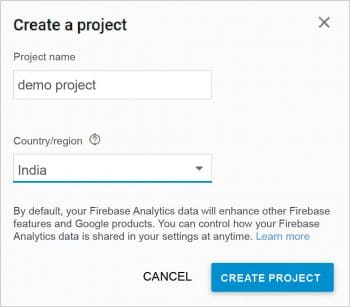
Give the name of the project and country/region, as shown in Figure 2.
-
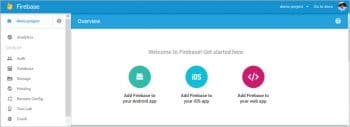
Once your project is created, you will see the dashboard of your application. It will be similar to Figure 3.
-
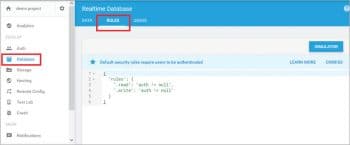
Now select Database from the left-hand palette and then ‘Rules’ from the next page. It will display something like what’s shown in Figure 4.
-
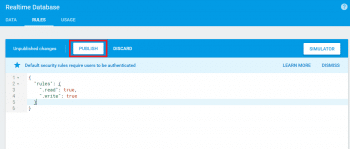
This time, we want to give all users access to the database; hence, we need to change the rules. You can manually do so by typing values as shown in Figure 5. Once done, click on the Publish button.
So you have successfully created an empty space for your project in Firebase, and have given read and write permissions to all the users who have the URL.
If you are new to this Android journey, I would request you to go through a few of the beginner articles to familiarise yourself with App Inventor. Let’s proceed towards the theme of our application, which we will be implementing in this session.
The theme of the application
I hope the initial introduction has made things clear for you. We are making a digital restaurant booking application with the help of which you will be able to secure your table at the said restaurant. This will prevent you from waiting in queues on busy weekends. You are already aware of all the components that I will be using for this application, like buttons, labels, horizontal arrangement, textbox, Firebase DB, etc.
GUI requirements
For every application, there is a graphical user interface or GUI, which helps the user to interact with the on-screen components. How each component responds to user actions is defined in the block editor section. In this application, we will have multiple screens and will define the look and feel for each of them.
Total GUI screens: Four
Screen names:
1. Screen1
2. Login screen
3. New user screen
4. Booking screen
GUI requirements for the application
1. Label: Labels are static text components, which are used to display some headings or markings on the screen.
2. Button: Buttons will let you trigger the event and are essential components.
3. Horizontal arrangement: These are special components, which keep all child components within them horizontally aligned.
4. Notifier: This is used to display some instructions or give controls over your existing components. We will explore its functionality in more detail as we implement it in our game.
5. TinyDB: This is the internal storage within your device, which will be used to keep confidential data such as passwords.
6. Text box: Text boxes are pretty simple objects and are used to take inputs from the user. You can control the type of text box you want by setting various properties, such as only numeric or multiple lines. Table 1 lists the components that we will need for Screen1, which we will drag to the designer from the left hand side palette.
1. Drag and drop the components mentioned in the table to the viewer.
2. Visible components can be seen by you while the non-visible components will be located beneath the viewer under the tag ‘Non-visible’.
3. We have placed a label so as to put the name of the application.
4. All buttons need to be put in the horizontal arrangement to keep them aligned horizontally.
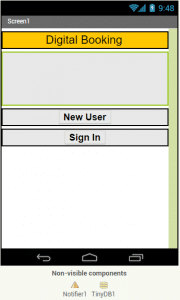
5. If you have dragged and placed everything, the Screen1 layout will look something like what’s shown in Figure 6.
6. Make the necessary property changes for the label and button components so that they fit well on to the screen.
7. Renaming the components helps to identify them in the block editor. In a similar fashion, we will design the remaining three screens as well. Table 2 gives the components that we will require for the new user screen, which we will drag on to the designer from the left hand side palette.
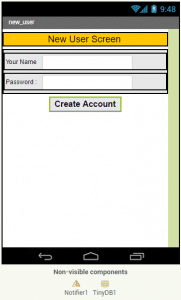
If you have dragged and placed everything, the new user screen layout will look something like what’s shown in Figure 7. Table 3 gives the components that we will require for the sign-in screen, which we will drag on to the designer from the left hand side palette.
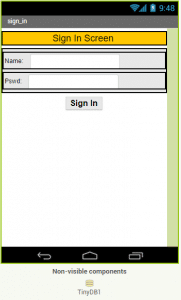
If you have dragged and placed everything, the sign-in screen layout will look something like what’s shown in Figure 8. Table 4 gives the components that we will require for the booking screen, which we will drag on to the designer from the left hand side palette.
If you have dragged and placed everything, the booking screen layout will look something like what’s shown in Figure 9.

Configuring Firebase
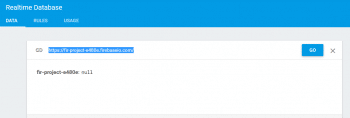
To use Firebase DB in the application, you need to give the URL of the project database and set the properties of the project bucket. The project bucket is equivalent to the folder in your Windows directory system. This means that within a single Firebase project, you can store data of multiple applications under different bucket names.
Now let’s head towards the block editor to define the types of behaviour, and let’s discuss the actual functionality that we expect from our application.
1. On the very first screen, upon clicking the sign-in or new user button, users should be able to navigate to the respective screens.
2. Implementing logic for new users and for signing in.
3. On the booking screen, confirming the details from the user and saving them on the Firebase database.
So let’s move on and add these types of behaviour using the block editor. There is a button available right above the properties pane to switch between the designer and block editor.
Block Editor blocks
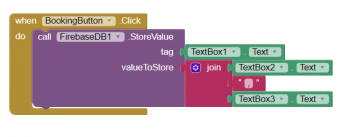
I have already prepared the blocks for you. All you need to do is drag the relevant blocks from the left-side palette and drop them on to the viewer. Arrange the blocks in the same way as shown in Figure 12. I will explain each one — what it does and how it is called. As the logic for the three screens other than the booking screen is pretty simple, I am giving the logic only for the booking screen and am making it brief.

Now you are done with the block editor too. Next, we will download and install the app on your phone to check how it is working. But make sure you complete the blocks for the rest of the applications. I am sure that you will be comfortable making the blocks for the remaining screens. If you face any difficulty, write back to me and I will be delighted to help you out.
Packaging and testing
To test the app, you need to get it on your phone. First, you have to download the application to your computer and then move it to your phone via Bluetooth or USB cable. I’ll tell you how to download it.
1. On the top row, click on the ‘Build’ button. It will show you the option to download the apk to your computer.
2. Downloading will show progress and once successfully done, the application will be placed in the Download folder of your directory or the preferred location you have set for your downloads.
3. Now you need to get this apk file to your mobile phone either via Bluetooth or via USB cable. Once you have placed the apk file in your SD card, you need to install it. Follow the on-screen instructions to do so. You might get some notifications or warning saying, ‘Install from untrusted source’. Allow this from the settings and after successful installation, you will see the icon of your application in the menu of your mobile. Here you will see the default icon, which can be changed, and we will tell you more about this as we move ahead in this course.
I hope your application is working exactly as per the requirements you have set. Now, depending upon the features you want for the app, you can change various things like the image, sound and behaviour.
Debugging the application
We have just created the prototype of the application with very basic functionality, so let’s consider what else the user might be interested in. Carefully think about scenarios that may annoy the user and look at how your app could overcome such pitfalls. Consider the cases below:
1. What if the system is already seeing a queue; can we put an alert message saying that your booking has not been confirmed?
2. Can we add phone contacts and other options to reach out to the restaurant staff from the application?
3. Can we generate a barcode or print a receipt of the booking confirmation?
These are some of the scenarios that might occur and the user will be pretty happy seeing them addressed.
Think over all these scenarios and consider how you can integrate these into the application. Do ask me if you fail to address any of the above cases.
You have successfully built another useful Android app for yourself. Happy inventing!






Hi
I am making a booking app. Everything is ready except if two person try to book same resource then system will confirm to both but the one doing it later will get it and first one will be overwritten. Can you help me to break this deadlock?