App Inventor is a visual block-building language for creating Android apps. Over the past few months, we have been developing simple Android apps through a series of articles, each covering a particular aspect of App Inventor. Read on for the latest addition to this series…
Android devices are beginning to play a larger role in our lives. Whether it is accessing entertainment websites, networking on social media, watching videos over the Internet, chatting with relatives, making reservations/bookings or performing banking transactions, Android has become a crucial need.
Tech enthusiasts like you keep thinking up ways to make Android even smarter by developing useful apps. App Inventor is a great tool for this purpose. So let’s proceed in our quest of mastering App Inventor by creating a more complex and useful Android application.
The theme of the application
Taking attendance is a teacher’s first task. The class attendance register and pen are the only tools to accomplish this task. What if we provide a digital solution to handle this task? Sounds interesting, right? So let’s try to build a smart attendance register for our class so that the teacher need not note these details on a piece of paper and then update them onto computers. Our application will be smart enough to capture attendance and update the records on the database, which will be persistent till we wish to clear it.
In an earlier tutorial on App Inventor, we had explored how to create a Web database using an open source cloud enabled Firebase database. In this tutorial, we will use all the expertise we’ve acquired to deliver a fully working application.
For those who’ve missed the last tutorial, I would like to revise things quickly. In our application we are going to use Firebase, a Google provided cloud database, which is open source and freely available for use.
Features of Firebase
1. Firebase uses a GUI based data centre so that you can visually see all the entries and can manage them.
2. Being on the cloud, it is accessible to any device, on the go.
3. Smart authentication provides secure access.
4. Its real-time database reflects changes as soon as the data is updated.
5. It allows the addition of collaborators so that multiple people can manage the database.
6. No coding is required for fetching and storing data.
Creating a project in the Firebase database
1. To use Firebase, you must have a working Google account. The same will be needed to run App Inventor.
2. Google to the Firebase webpage.
3. If asked for login credentials, give your Google account credentials and proceed.
4. Follow the on-screen instructions which are generally about accepting the terms of usage, etc.
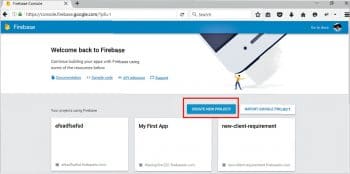
5. Once everything is done, you will see the screen shown in Figure 1.
6. Click on ‘Create New Project’.
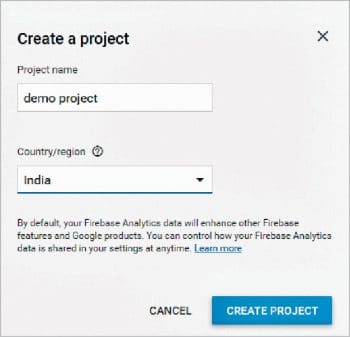
7. Give the name of the project and specify the country/region, as shown in Figure 2.
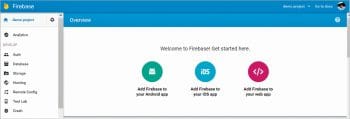
8. Once your project is created, you will see the dashboard of your application. It will be similar to that displayed in Figure 3.
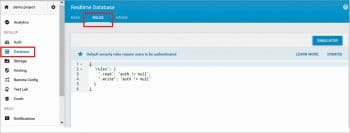
9. Now select Database from the left-hand palette and then ‘Rules’ from the next page, which will display something like what’s shown in Figure 4.
10. This time, we want to give all users access of the database; hence, we need to change the rules. You can manually do this by typing values as shown in Figure 5. Once done, click on the Publish button.
So you have now successfully created an empty space for your project in the Firebase database, and given read and write permissions to all the users who have the URL.
If you are new to this Android journey, do go through a few of the articles in this series, targeted at beginners, to familiarise yourself with App Inventor.

GUI requirements
For every application, we have a graphical user interface or GUI, which helps the user to interact with the on-screen components. How each component responds to user actions is defined in the block editor section. In this application, we will have multiple screens and will define the look and feel for each of them.
There are two GUI screens and their names are:
1. Screen1
2. StudentAddScreen
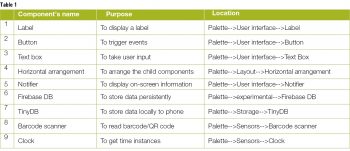
1. Label: Labels are the static text components which are used to display some headings or markings on the screen.
2. Button: A button will let you trigger the event and is a very essential component.
3. Text Box: This is the input field where the user can type. The typed value will be used later in the application through the block editor.
4. Horizontal arrangement: These are special components which keep all child components within them aligned horizontally.
5. Notifier: This is used to display some instructions or give controls over your existing components. You will discover more about its functionality as we implement it in our app.
6. Firebase DB: As you already know, this is the cloud based database utility from Google. We will use it to store the user’s data over the cloud.
7. Tiny DB: This is the database component for a local database on your device. Generally, this is where application related records are saved in the phone.
8. Barcode scanner: This is an advanced component to read and interpret barcode/QR code. It will use the existing barcode application or camera from your device.
9. Clock: The clock component will help in all time instance related actions.
Table 1 gives the components that we will need for this application, which will be dragged onto the designer from the left-hand side palette.
1. Drag and drop the components mentioned in Table 1 to the viewer.
2. Visible components can be seen by you while the non-visible components will be located beneath the viewer under the tag ‘Non-visible’.
3. Labels, along with their respective text boxes, need to be put within the ‘Horizontal arrangement’ so as to keep them aligned horizontally.
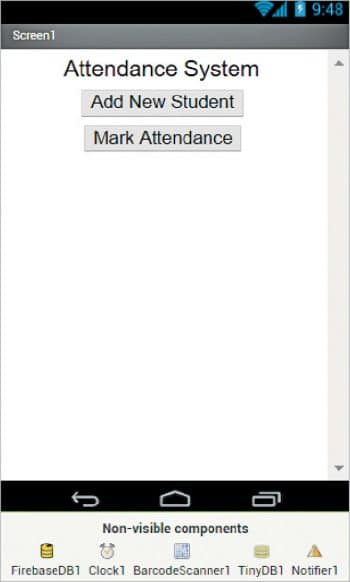
4. If you have dragged and placed everything, the layout will look something like what’s shown in Figure 6.
5. Make the necessary property changes like we did when changing the text property for the label and button components.
6. Renaming the components helps to identify them in the block editor.
7. Your graphical user interface is now ready. Figure 6 shows how the application will look after the installation. Non-visible components will not be visible.
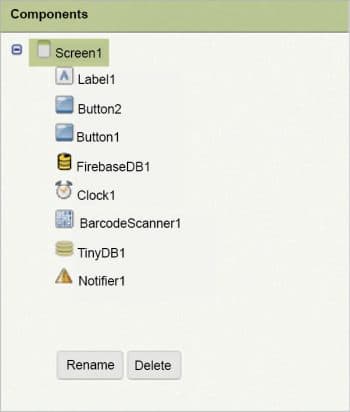
8. Shown in Figure 7 is the hierarchy of the components that we have dragged to the designer.
GUI requirements for StudentAddScreen
In a similar fashion, we will list down the components required on the second screen (Table 2). The purpose of the second screen is to add the students’ names so that their attendance can be verified.
1 Drag and drop the components mentioned in Table 2 to the viewer.
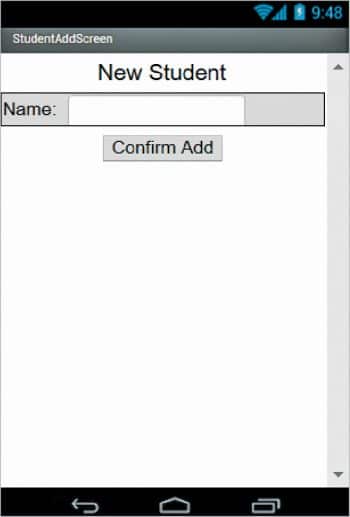
2. If you have dragged and placed everything, the layout will look something like what’s shown in Figure 8
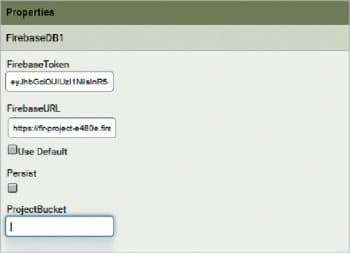
We need to configure the Firebase component to connect to the demo project we created using the steps mentioned above. For that, just assign the URL of your project to the Firebase URL property of the Firebase component in the designer.
Now we will head towards the block editor to define the various types of behaviour; so let’s discuss the actual functionality that we expect from our application.
1. From the very first screen, the user should be able to scan the barcode.
2. The barcode will consist of the student’s name and roll number, separated by a comma.
3. If the student’s name from the barcode doesn’t match with the database, the user needs to add that particular student by going to the second screen.
4. Once the barcode is scanned, the result will be stored into the Firebase DB with the date on which this task was performed.
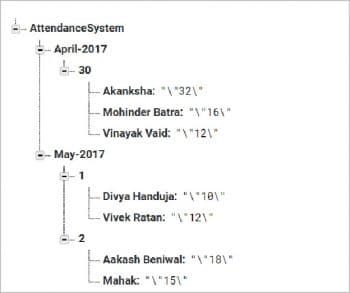
5. The project bucket will be named after the month, so that each month, a new folder will be created and attendance records will be separated for each date.
So let’s move on and add these types of behaviour using the block editor. I hope you remember how to switch from the designer to the block editor. There is a button available right above the Properties pane to do this.
Block editor blocks
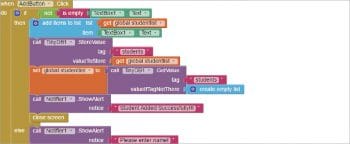
I have already prepared the blocks for you. All you need to do is drag the relevant blocks from the left side palette and drop them on the viewer. Arrange the blocks the same way you see them in the image. I will explain what each block does and how it is called.
A description of the block
- All the lines in the block are easy to understand.
- As soon as the Add button is clicked, it will check whether the text box is empty. If it is, the user will be prompted to provide some value.
- If the value of the text box is not empty, then the name will be added to the student list and the same list will be saved into the phone database so that the next time the application is opened, the list will be the same.
Application code
- It was not possible to snap each and every block of the logic so I am providing the complete code as barcode. Scan QRCode 1 given below to obtain the ‘.aia’ file, which you can upload to your projects in the App Inventor 2 and view the complete code.
- If you want to see how the application looks after installation, scan QRCode 2 to get the application .apk.
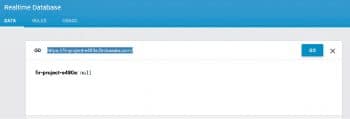
Now you are done with the block editor too. Next, let’s download and install the app on your phone to check how it is working. Figure 12 gives the database view.
To test the app, you need to get it on your phone. First, you have to download the application to your computer and then move it to your phone via Bluetooth or USB cable. I’ll tell you how to download it.
1. On the top row, click on the ‘Build’ button. It will show you the option to download the apk to your computer.
2. The progress of the downloading can be seen and once that’s successful, the application will be placed in the Download folder of your directory or the preferred location you have set for it.
3. Now you need to get this apk file to your mobile phone either via Bluetooth or USB cable.
Once you have placed the apk file on your SD card, you need to install it. Follow the on-screen instructions to install it. You might get some notification or warning saying, ‘Install from untrusted source’. Allow this from the settings and after successful installation you will see the icon of your application in the menu of your mobile. What you see is the default icon, which can be changed and I will tell you how to do this as we move ahead in this course.
I hope your application is working exactly as per your requirements. Now, depending upon your usage requirements, you can customise various things like the image, sound and behaviour, too.
Debugging the application
We have just created the prototype of the application with very basic functionality, but what else might the user be interested in? Now consider various use cases that you might be required to address so as not to annoy the user. Your app should be able to handle the following use cases:
1. Wouldn’t it be good to add an option to delete a student’s name from the list?
2. How about pulling the attendance records within the application and generating a dashboard?
3. Can we make student profiles more attractive by adding profile photos and other related details?
These are some of the scenarios that might occur and users will be pretty happy if your app handles such situations. Think about all the ways your app can integrate features to address these scenarios. Do ask me if you fail to address any of the above cases.
You have successfully built another useful Android app for yourself. Happy inventing!

A note to readers: Dear readers, I would like to know more about your interests and ideas on making Android applications. If you have any specific ideas that you want me to write about, do send me an email. I will surely try to help you convert your idea into a working application




Wow ! such a nice app ,I really like it thanks for sharing.
thanks for sharing but the source code .aia didn’t working can you send it at ibikdashii@gmail.com or update the link
hi please gives us links to download the aia source code and there are no links on this post?
?? anyone
the 2 QR codes have the same info and no code
can u give guide me on do attendance on android using fingerprint to identification..
source code please
Good….please send source code immediately ….
please is there any way to develop an android app that allows student to log in with a given username and password and when the submit button is clicked, it takes them to the screen where there details can be shown such as
name, date of birth, class, courses and grades etc.
please sent me email so that we can share our idea
thanks
could you please share the *.aia file please
could you please share *.aia file please
rd_21@hotmail.com
Could you plz share*.aia file
Plzzz
the 2 QR codes have the same info and no code