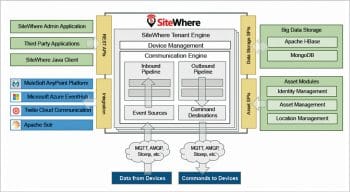
SiteWhere delivers a complete management system to help users avoid per device charges by SaaS operators. It connects devices using MQTT, AMQP, STOMP and other protocols, and devices can be added through self-registration, REST services or in batches. It can also control large numbers of devices using batch command operations.
SiteWhere is an open platform for monitoring and controlling IoT devices and storing device data. It is licensed under CPAL 1.0 and can be deployed as an on-premise solution with complete freedom and scalability, which eliminates the per device or per data pricing by SaaS providers. It can also be deployed in a bare metal cloud environment for public access. It comes with advanced multiple tenant architecture to run various IoT applications in a single server instance. It integrates with proven software and services for the enhanced enterprise needs of connected devices. This article familiarises you with the platform, focusing on device communication using JSON payloads over MQTT and on availing platform services using REST APIs.
Architecture and features
The core platform of the server is based on Spring Boot from v1.7.0 and comes with an embedded Tomcat server in recent versions, but you can still build the Web Application Archive (WAR) file from sources, and deploy it in a custom or vanilla version of the Tomcat server. It comes with multi-tenancy support from v1.2.0, each tenant engine is isolated, having its own data storage and processing channels. It uses MongoDB for the default data store, with SiteWhere as the core database and isolated databases for each of the tenants, with tenant-xxxx naming. Devices can communicate using the JSON format or Google Protocol Buffers (Protobuf) over MQTT transport, and REST APIs are offered to avail platform services.
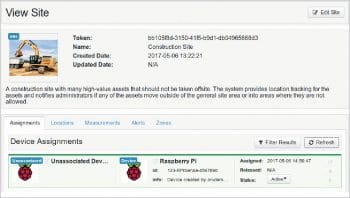
Each tenant device is placed in a collection, known as a site, to cluster the location-aware devices. This enables monitoring of all events at the site level as well as the device level. On bootstrap, a default tenant engine is created with Construction Site, initially. Devices can be kept under device groups as logical units; these can associate with device specifications as per common hardware features, and associate with assets for real world mapping.
Components and integration
SiteWhere makes use of the following popular open source solutions and external services— a few for internal components and some for enriched integration support with inbound and outbound event processing.
- MongoDB as the default data store
- Mosquitto as the MQTT broker (even though HiveMQ is mentioned in the documentation)
- ActiveMQ, RabbitMQ for rich protocol support like AMQP, STOMP, etc.
- Eclipse Californium for CoAP messaging
- InfluxDB for time series data and Grafana for visualisation
- HBase for distributed clustering support for device events
- Hazlecast, an in-memory data grid for external event processing
- Mulesoft Any Point Platform for ESB functionality
- Azure Event Hub and Amazon SQS client libraries for event forwarding
- WSO2 Siddhi for Complex Event Processing (CEP)
- WSO2 Identity Server for asset management
- Apache Spark for streaming analytics
- Apache Solr for indexing and searching device events
- Twilio client for SMS alerts over the cloud
- Mapping devices with Magento products as assets through the community edition
It can also communicate with external cloud services like dweet.io for external messaging and InitialState for advanced data visualisation. It comes with an add-on for OpenHAB persistence support and for controlling back devices via outbound events.
Installation
Installation of SiteWhere is very simple, with few dependencies. Install OpenJDK 1.8, MongoDB and any MQTT broker like HiveMQ or Mosquitto as dependencies. Start MongoDB and MQTT broker. Download the tarball of the latest stable release (v1.9.0 at present), extract it to a suitable location, say /opt, then switch to the extracted directory, i.e., /opt/sitehwhere-server-1.9.0 and execute the script bin/startup.sh. To customise the server port, edit conf/application.properties and uncomment the line server.port=8080.
Building from sources
If you want to build SiteWhere from sources, check out the latest branch, say SiteWhere-1.10.0 or master from github.com/sitewhere/sitewhere.git and run the following commands.
To create a Web application archive (WAR) file, which can be deployed on a Tomcat-like server, type:
gradle clean war |
To generate a standalone archive with an embedded server, similar to the downloaded tarball, use the following command:
gradle clean serverTar |
Collect the generated WAR file or tar file from the build/distributions sub-directory.

Running SiteWhere in a Docker container
You can even run SiteWhere in a Docker container, for which you can check out the source code of any recent version, navigate to sitewhere-docker/standalone/1.8.0, and replace the Ubuntu version 14.04 with 16.04 in Dockerfile for better package support. Run the following command to build the image:
docker build -t sitewhere/standalone:1.8.0 . |
To launch the container for the built image, use the following command:
docker run -p 8080:8080 -p 1883:1883 -p 61623:61623\ --name mysitewhere sitewhere/standalone:1.8.0 |
To customise the port, launch the shell using the following command, switch to /opt/sitewhere/conf and edit application.properties as mentioned above:
docker exec -it mysitewhere /bin/bash |
If SiteWhere doesn’t start manually, launch the server as follows:
docker exec -it mysitewhere /opt/sitewhere/bin/startup.sh
SiteWhere can also be deployed on cloud environments like Amazon EC2 and Microsoft Azure for public access.
Note: There is a problem in downloading images from specified repositories in the Docker hub. I suggest you build your own from available Docker script.
The first steps
You can access the HTML5 based Admin interface on the URL path /sitewhere/admin of the chosen host and port. An interactive REST interface based on Swagger is available on the path /sitewhere. For example, if the server is installed on the same machine and running on port 8080, access the admin interface by using localhost:8080/sitewhere/admin and the REST interface using localhost:8080/sitewhere. The default credential for both the interfaces is admin:password.

Device events
SiteWhere supports the following device events through the MQTT protocol using JSON or Google’s Protobuf format. In this article we’ll use the JSON format and publish the payloads to the MQTT topic SiteWhere/input/json as per the tenant configuration.
Registration: Any device should be registered initially by publishing the following JSON payload:
{“hardwareId”: “123-MyRpiSense-4567890”,“type”: “RegisterDevice”,“request”: {“hardwareId”: “123-RpiSense-4567890”, “specificationToken”: “xxx-xx-xx-xx-xxxxxx”, “siteToken”: “xxxxxxxx-xxxx-xxxx-xxxx-xxxxxxxxxxxx”}}; |
Here hardwareId can be any unique value; siteToken identifies the preferred site, say construction site, and specificationToken identifies Raspberry Pi from the device specifications through the Admin interface.
You can identify the new devices under the Admin UI in the Devices section and Site view section. You can also register a device manually here.
Location update: This helps in geo mapping your device initially or whenever the device is moved for better location awareness in an associated site. To do this, publish the following payload with the suitable parameters:
{“hardwareId”: “123-MyRpiSense-4567890”,“type”:”DeviceLocation”,“request”: {“latitude”: “18.5204”,“longitude”: “73.8567”,“elevation”: “560”,“updateState”: false,“eventDate”: “2017-06-01T12:00:00.390Z”}} |

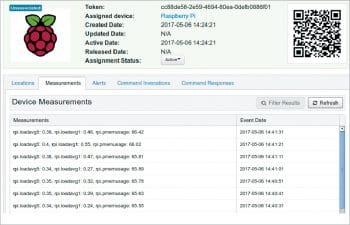
Sending measurements: To send measured values from a device like Raspberry Pi, let’s look at publishing system metrics like the load average of the CPU and memory usage, periodically. In Node.js and NodeRED environments, these can be calculated with the following code, considering avg1 and avg5 as the load average for the last 1 minute and 5 minutes, respectively, and pmem as memory utilisation. You may also add the average of the last 15 minutes as one more property.
const os=require(‘os’);var avg1 = os.loadavg()[0];var avg5 = os.loadavg()[1];var pmem=(100 - (os.freemem()/os.totalmem())*100).toFixed(2); |
Now form the payload in the following format, and publish periodically or on an event basis.
{“hardwareId“: “123-MyRpiSense-4567890”,“type“: “DeviceMeasurements”,“request“: {“measurements“: { “rpi.loadavg1”: avg1,“rpi.loadavg5”: avg5,“rpi.usagemem”: pmem,},“updateState“: true,“eventDate“: now}}; |
If you have a suitable target board and sensors, you can send better payloads, say, weather metrics like temperature, humidity, pressure, etc, or motion sensing metrics like roll, pitch and yaw from an accelerometer’s or gyroscope’s inputs. The SenseHAT add-on board for Raspberry Pi is a good choice for these sensors.
Sending alerts: A device can send alerts when anomalies are detected in measured values by publishing the following payload:
{“hardwareId”: “123-MyRpiSense-4567890”,“type”:”DeviceAlert”,“request”: {“type”: “rpi.cpuoverload”,“level”: “Warning”,“message”: “CPU Loadavg is very high!!”,“updateState”: false,“eventDate”: now,“metadata”: { “loadavg”: avg,“method”: “uptime”}}} |
Delivering commands: SiteWhere can send commands to devices through its outbound processors in Protobuf or JSON formats. Devices can receive them through the MQTT Subscribe operation using the topic name /SiteWhere/system/<hardwareId> for system generated commands on an event basis and /SiteWhere/commands/<hardwareId> for custom commands. You can register a groovy script to trigger custom commands when anomalies are detected in the device measurements. You can also invoke custom commands manually under the Devices section. Commands can also be delivered via the Twilio service or CoAP library. Custom commands need to be added in the Admin UI under Device specifications. We can find the triggered command by parsing the received payload.
Acknowledging commands: The device can acknowledge delivered commands by publishing a suitable payload, by quoting back the original event ID and device response as described in documentation.sitewhere.org/userguide/sending-data.html. You can observe all these events by browsing the target device or associated site in the admin interface. You can also list the events through various REST APIs on the specified path with the GET method and suitable tokens.
REST API
Most of the platform’s functionality is available through various REST APIs, apart from the Admin interface, and any external entity can avail these services. For simple, interactive usage of these APIs, a Swagger UI is added to make suitable requests and check the response in JSON format.
Here are some examples of REST calls with the following common headers for authentication purposes.
Headers: {Authorization: BasicCredentials: admin:password‘X-Sitewhere-Tenant’: ‘sitewhere1234567890’} |
For a listing of all available sites:
GET /sitewhere/api/sites |
For a listing of a particular site:
GET /sitewhere/api/sites/{siteToken} |
For a listing of the associated devices’ locations on a site:
GET /sitewhere/api/sites/{siteToken}/locations |
For a listing of site measurements:
GET /sitewhere/api/sites/{siteToken}/measurements |
For a listing of alerts on a particular site:
GET /sitewhere/api/sites/{siteToken}/alerts |
For a listing of command invocations:
GET /sitewhere/api/sites/{siteToken}/responses |
For a listing of command responses:
GET /sitewhere/api/sites/{siteToken}/responses |
To obtain server runtime information:
GET /sitewhere/api/system/runtime |
To obtain the version of SiteWhere:
GET /sitewhere/api/system/version |
You can explore the Swagger UI or documentation.sitewhere.org/rest/single.html for a complete listing.
NodeRED support
An add-on for NodeRED is available with the name node-red-contrib-sitewhere. It provides a few nodes that generate JSON payloads for device registration, location updates, measurements, alerts as well as acknowledgement events, and can be wired to a regular MQTT publish node. Similarly, a MQTT subscriber node can be wired with a command node for parsing. If you are using Raspberry Pi, you can wire a DHT node or a SenseHAT node with a measurement node for the desired sensor values. Raspberry Pi’s integration tutorial mentioned earlier gives insights into using NodeRED to generate the above payloads and parsing commands. You can find detailed examples written in Node.js and NodeRED flows for the communication through MQTT and REST, in the Sitewhere-examples sub-directory of github.com/rajeshsola/iot-examples.

Java agent
A Java agent is available under github.com/sitewhere/sitewhere-tools, which provides a command line client for custom communication with the platform. You can edit the config /config.properties and run the pre-built JAR file for initial testing. You can also edit the example code for custom communication or integrate this agent with any Java code base easily.
Mobile apps
An Android SDK is available under github.com/sitewhere/sitewhere-android-sdk, which provides SiteWhereActivity and SiteWhereProtobufActivity for base functionality and communication services like MQTT and REST for client implementation. Android apps can be easily built using this SDK. You may refer to the sample application before proceeding, which sends location events and accelerometer readings as measurements.


