Searching text strings from files in a given folder is easily accomplished by using Python in Windows. While Linux has the grep command, Windows does not have an equivalent. The only alternative, then, is to make a command that will search the string. This article introduces see.py, which helps in accomplishing this task.
Have you ever thought of searching a string in the files of a given folder? If you are a Linux lover, you must be thinking about the grep command. But in Windows, there is no grep command. By using Python programming, you can make your own command which will search the string pattern from the given files. The program also offers you the power of regular expressions to search the pattern.
In this article, the author is going to show you an amazing utility, which will help you to find the string from a number of files.
The program, see.py, will search for the string pattern provided by the user, from the files presented in the directory, also given by the user. This is equivalent to the grep command in the Linux OS. Here, we will use Python 2.7.
The program expects the string pattern and directory from the user. Let us examine the code and discuss it.
Import the mandatory modules
import os
import re
import sys
import argparse
In the following code I have declared a class Text_search
class Text_search :
def __init__(self, string2, path1,i=None):
self.path1= path1
self.string1 = string2
self.i=i
if self.i:
string2 = string2.lower()
self.string2= re.compile(string2)
The following method gives the file’s name in which the given string is found:
def txt_search(self):
file_number = 0
files = [f for f in os.listdir(self.path1) if os.path.isfile(self.path1+”/”+f)]
for file in files:
file_t = open(self.path1+”/”+file)
file_text= file_t.read()
if self.i:
file_text=file_text.lower()
file_t.close()
if re.search(self.string2, file_text):
print “The text “+self.string1+” found in “, file

file_number=file_number+1
print “total files are “,file_number
The following method returns the file’s name as well as the line numbers in which the given string is matched.
def txt_search_m(self):
files = [f for f in os.listdir(self.path1) if os.path.isfile(self.path1+"/"+f)]
file_number = 0
for file in files:
file_t = open(self.path1+"/"+file)
line_number=1
flag_file = 0
for line1 in file_t:
if self.i:
line1 = line1.lower()
if re.search(self.string2, line1):
flag_file= 1
print "The text "+self.string1+" found in ", file, " at line number ",line_number
line_number=line_number+1
if flag_file == 1:
file_number=file_number+1
flag_file=0
file_t.close()
print "total files are ",file_number

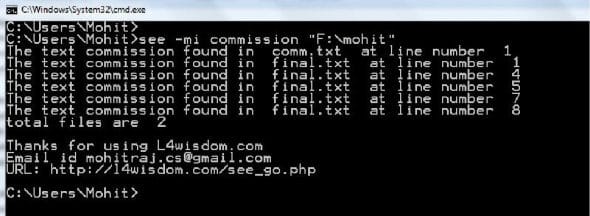
The following method also returns the file’s name as well as the line numbers in which the given string is matched. This method works in recursive mode.
def txt_search_r(self):
file_number = 0
for root, dir, files in os.walk(self.path1, topdown = True):

files = [f for f in files if os.path.isfile(root+”/”+f)]
for file in files:
file= root+”/”+file
file_t = open(file)
line_number=1
flag_file = 0
for line1 in file_t:
if self.i:
line1=line1.lower()

if re.search(self.string2, line1):
flag_file= 1
print “The text “+self.string1+” found in “, file, “ at line number “,line_number
line_number=line_number+1
if flag_file == 1:
file_number=file_number+1
flag_file=0
file_t.close()

print “total files are “,file_number
This is the main function of the program which handles all the options. The program offers you six options. The –m option gives the number of the file and the line. –mi is case-insensitive. You can use the –h option to get help for all options.
def main():
parser = argparse.ArgumentParser(version=’1.0’)
parser.add_argument(‘-m’, nargs = 2, help = ‘To get files as well as line number of files ‘)
parser.add_argument(‘-s’, nargs = 2, help = ‘To get the files contain string ‘)
parser.add_argument(‘-r’, nargs = 2, help = ‘To search in recusrive order ‘)
parser.add_argument(‘-mi’, nargs = 2, help = ‘-m option with case insensitive ‘)
parser.add_argument(‘-si’, nargs = 2, help = ‘-s option with case insensitive ‘)
parser.add_argument(‘-ri’, nargs = 2, help = ‘-r option with case insensitive ‘)

args = parser.parse_args()
If you select option –m, then it will call the txt_search_m() method of class Text_search().
try:
if args.m:
dir = args.m[1]
obj1 = Text_search(args.m[0],dir)
obj1.txt_search_m()
If you select option –s, then it will call the method txt_search().
elif args.s:
if args.s[1]:
dir = args.s[1]
obj1 = Text_search(args.s[0],dir)
obj1.txt_search()
If you select the –r option, then it will call the method txt_search_r().
elif args.r:
if args.r[1]:
dir = args.r[1]
obj1 = Text_search(args.r[0],dir)
obj1.txt_search_r()
If you select the –mi option, then it will call the txt_search_m() method in case-insensitive mode.
elif args.mi:
dir = args.mi[1]
obj1 = Text_search(args.mi[0],dir,i=1)
obj1.txt_search_m()
If you select option –s, then it will call the method txt_search() in case-insensitive mode.
elif args.si:
if args.si[1]:
dir = args.si[1]
obj1 = Text_search(args.si[0],dir,i=1)
obj1.txt_search()
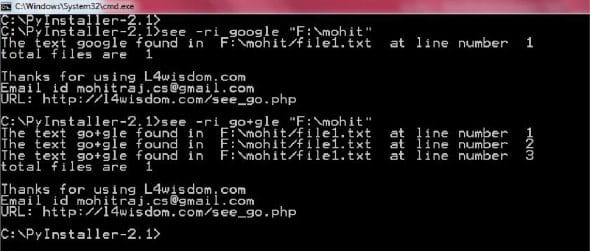
If you select the –r option, then it will call the txt_search_r() method in case-insensitive mode.
elif args.ri:
if args.ri[1]:
dir = args.ri[1]
obj1 = Text_search(args.ri[0],dir,i=1)
obj1.txt_search_r()

print “\nThanks for using L4wisdom.com”
print “Email id mohitraj.cs@gmail.com”
print “URL: http://l4wisdom.com/see_go.php”

except Exception as e:
print e
print “Please use proper format to search a file use following instructions”
print “see file-name”
print “Use <see -h > For help”
main()


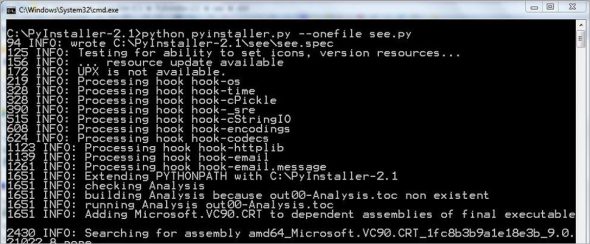
Let’s make exe files using pyinstaller modules as shown in Figure 1.
After conversion, it will make a directory called see\dist. Get the see.exe files from the directory see\dist and put them in the Windows folder. In this way, see.exe is added to the system path.
see.exe works like a DOS command.
Let us use the program see.
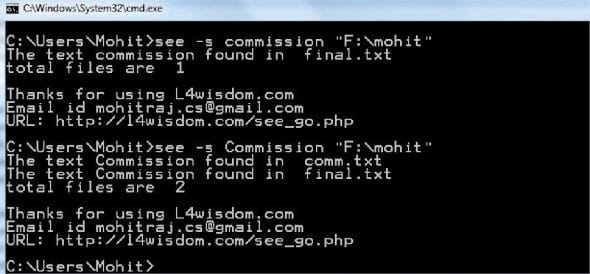
Use the option –s as in Figure 2. You can see that only file names are returned.
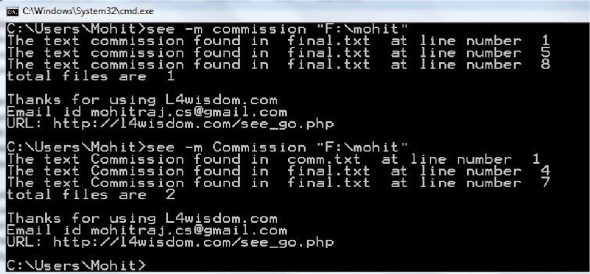
Use the option –m as shown in Figure 3. You can see that file names and lines are returned.
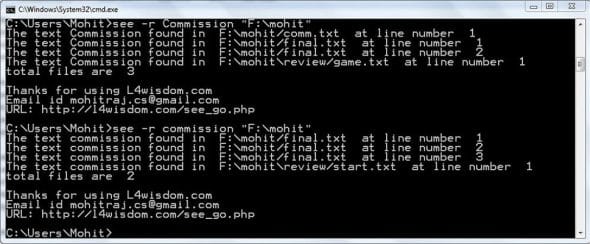
Use the option –r as shown in Figure 4. In this option, –m works in recursive mode.
Use the option –si as shown in Figure 5. You can see that only file names are returned, and text searching is impervious to upper and lower case.
Use the option –mi as shown in Figure 6. Use the option –ri as shown in Figure 7.
In order to get help, use the option –h as shown in Figure 8.
The program offers you the power of regular expressions. Figure 9 shows the file 1.txt, which contains text. Let us use the regular expression, ‘+’ operator.
See Figure 10, which shows the power of regular expressions.


I really appreciate the code. It helped. But would have been really nice if you had provided the code with proper indentation.
Also for instance, “class Text_search :” under figure 2 is not defined as part of your code structure. But the code won’t work without first defining the class.
Hi Mohit,
in the Windows command line you can do the trick by using FINDSTR command, so this statement, I believe , is at least incorrect:
“While Linux has the grep command, Windows does not have an equivalent. The only alternative, then, is to make a command…”