In this article, we will show you how to install and configure Magento 2 with Solr on an Ubuntu 16.04 server using Apache, MySQL and PHP 7. Magento is one of the best e-commerce platforms written in PHP — aimed at larger e-commerce websites. The Apache Solr is a powerful search engine which enables website owners to provide the website visitors with a powerful full-text search engine.
Let’s begin with the installation procedure.
Log in to the server via SSH and make sure your server OS packages are fully up-to-date using the following commands:
apt-get update
apt-get upgrade
Install Apache, MySQL, and all the required PHP packages:
apt-get install apache2 apache2-utils libapache2-mod-php7.0 mysql-server mysql-client mysql-common php7.0 php7.0-cli php7.0-mbstring php7.0-curl php7.0-gd php7.0-xml php7.0-mcrypt php7.0-xsl php-imagick php-pear php7.0-intl php7.0-mysql php7.0-zip
Enable Apache rewrite module on your server if it is not already done so:
a2enmod rewrite
Thereafter, restart the Apache service for the changes to take effect:
service apache2 restart
Beginning the download process
Once the Apache service has been restarted, you need to download the Magento Community (or Enterprise edition) to a directory on your server from Magento’s official website.
At the time of writing this tutorial, the latest version of Magento CE is 2.1.7, so you may download it to the /opt directory on your server, then extract it using the following commands:
mkdir -p /var/www/html/magento
cd /opt/
unzip -d /var/www/html/magento Magento-CE-2.1.7-2017-05-30-01-36-53.zip
All files have to be readable by the web server, so set a proper ownership:
chown www-data:www-data -R /var/www/html/magento
Magento stores data in a database, so create a new MySQL database and user:
mysql -u root -p
mysql> SET GLOBAL sql_mode=”;
mysql> CREATE DATABASE magentodb;
mysql> CREATE USER ‘magentouser’@’localhost’ IDENTIFIED BY ‘y0uR-pa5sW0rd’;
mysql> GRANT ALL PRIVILEGES ON magentodb.* TO ‘magentouser’@’localhost’;
mysql> FLUSH PRIVILEGES;
mysql> quit
Do not forget to replace ‘y0uR-pa5sW0rd’ with a strong password.
Create a new virtual host in Apache on your virtual server. For example, name it ‘your-domain.conf’:
touch /etc/apache2/sites-available/your-domain.conf
ln -s /etc/apache2/sites-available/your-domain.conf /etc/apache2/sites-enabled/your-domain.conf
If it exists, remove the ‘000-default.conf’ file:
rm /etc/apache2/sites-enabled/000-default.conf
Edit the newly created Apache configuration file using the vi editor or similar, i.e.:
vi /etc/apache2/sites-available/your-domain.conf
and add the following lines:
<VirtualHost *:8080>
ServerAdmin admin@your-domain.com
DocumentRoot /var/www/html/magento/
ServerName your-domain.com
ServerAlias www.your-domain.com
<Directory /var/www/html/drupal/>
Options FollowSymLinks
AllowOverride All
Order allow,deny
allow from all
</Directory>
ErrorLog /var/log/apache2/your-domain.com-error_log
CustomLog /var/log/apache2/your-domain.com-access_log common
</VirtualHost>
Locate the main PHP configuration file (php.ini):
# php -i | grep -i php.ini
Configuration File (php.ini) Path => /etc/php/7.0/cli
Loaded Configuration File => /etc/php/7.0/cli/php.ini
Edit the PHP configuration file and add or modify the following settings:
max_execution_time = 1500
max_input_time = 600
memory_limit = -1
upload_max_filesize = 128M
zlib.output_compression = on
Now, restart the Apache service for the changes to take effect:
service apache2 restart
Installing Magento
Open http://your-domain.com in your favorite web browser, and follow the simple on-screen instructions:
- Click on the ‘Agree and Setup Magento link.
- Check if all required PHP modules are installed and file permissions are set properly.
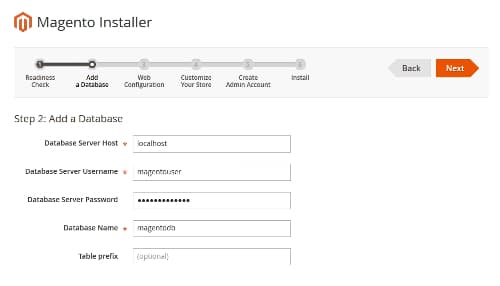
On the next page, enter the database information:
magento2-database-setup.jpg
Then, enter your store and admin URL. It is recommended to use an SSL certificate for your Magento website, so order an SSL certificate, configure your Apache web server accordingly, then select ‘Use HTTPS for Magento Storefront’ and ‘Use HTTPS for Magento Admin’ from the advanced option drop-down selection menu.

On the next page, set the time zone of your web store, default currency, default language and enable/disable Magento modules from the ‘Advanced Modules Configurations’ drop-down selection menu.
Create a new Magento administrator account, and click ‘Install’ to install Magento.
Run the crontab command to create a cronjob:
crontab -u www-data -e
Add the following line:
* * * * * /usr/bin/php /var/www/magento/bin/magento cron:run | grep -v “Ran jobs by schedule” >> /var/www/magento/var/log/magento.cron.log
That is it. Magento 2 has been installed on your Ubuntu server.
Installing Solr
Solr uses the Lucene Java search library for full-text indexing and search, so install Java 8 using the following command:
apt-get install openjdk-8-jdk
To check if Java is installed on the server, enter the following command:
java -version
openjdk version “1.8.0_131″
OpenJDK Runtime Environment (build 1.8.0_131-8u131-b11-0ubuntu1.16.04.2-b11)
OpenJDK 64-Bit Server VM (build 25.131-b11, mixed mode)
Only the Magento Enterprise Edition supports Solr’s search features, so if you are using the Magento Enterprise Edition, download and extract Solr to the /opt directory on the server:
cd /opt/
wget http://archive.apache.org/dist/lucene/solr/4.10.4/solr-4.10.4.tgz
tar -xvf solr-4.10.4.tgz
cd /opt/solr-4.10.4/example/solr
cp -R collection1 magento2
cd magento2
cp -R /var/www/html/magento/vendor/magento/module-solr/conf/* ./conf/
Edit the /opt/solr-4.10.4/example/solr/magento2/core.properties file and change:
name=collection1
to
name=magento2
Create a startup script named /etc/init.d/solr and add the following lines to it:
#!/bin/sh
#Starts, stops, and restarts Apache Solr.
#chkconfig: 35 92 08
#description: Starts and stops Apache Solr
SOLR_DIR=”/opt/solr-4.10.4/”
JAVA_OPTIONS=”-Xmx1024m -DSTOP.PORT=8079 -DSTOP.KEY=jettykey -jar start.jar”
LOG_FILE=”/var/log/solr.log”
JAVA=”/usr/bin/java”
case $1 in
start)
echo -n “Starting Solr”
cd $SOLR_DIR
$JAVA $JAVA_OPTIONS 2> $LOG_FILE &
;;
stop)
echo -n “Stopping Solr”
cd $SOLR_DIR
$JAVA $JAVA_OPTIONS –stops
;;
restart)
$0 stop
sleep 1
$0 start
;;
*)
echo “Usage: $0 {start|stop|restart}” >&2
exit 1
;;
esac
Make the script executable and start Solr using:
chmod 755 /etc/init.d/solr
/etc/init.d/solr start
You should be able to access to Solr admin web interface at http://your-domain.com:8983/solr/ . It is a good idea to password protect Solr admin pages and set up some firewall rules to allow Magento and Solr to communicate.
The Magento Community Edition provides the ability to enhance the default search capabilities by using some third-party Magento extensions. In Magento EE, it is fairly easy to set Solr as the default search engine. Go to Magento EE administration back-end >> STORES >> Configuration >> CATALOG >> Catalog >> Catalog Search >> Search Engine >> select Solr. And that’s it. You have successfully set up Magento with Solr!


