


This article is a tutorial on writing your own bootsector. It is a good exercise in understanding how the bootsector works and trying your hand at writing something that boots. Who knows? You might be able to write your own OS some day!
Many young programmers dream of writing the code for their own operating system. But when they realise they have to write everything from scratch, including the code for the device and file system drivers, they give up the dream.
Of course, one can just write the core components and port all the existing stuff to the new system. But even getting a kernel ready – one that supports only very basic features —would be a long process. Moreover, porting the existing components will not give you that ‘developed-by-me’ feeling.
So here is a solution: start off by writing something that just boots, rather than an entire OS, or even a kernel. Later, the same steps can be followed to develop an advanced bootloader, and eventually a kernel, which essentially lays the foundation for your own OS.
Before starting, let’s first address the following question: why develop a new operating system?
This article doesn’t assume that everybody is going to develop a brand new operating system. We have many OSs already, and our time and resources could be donated to such existing community projects.
However, one reason why you could consider writing your own OS is that it’s a great learning experience. You are at the lowest level of software (just above the firmware), and in contact with bare metal. Any hardware component is ready to obey your orders. And all that matters is your capability to give the correct orders (which is what is called drivers).
Despite being time-consuming, bootsector experiments can give you the confidence that doing an entire Java or PHP course can’t.
Note: The code snippets and explanations given in this article target the Intel x86 architecture. This means you can try them on Intel 8086 to Core i7, any x86 compatible CPU from AMD or other vendor, or on an emulator like QEMU.
Also, modern technologies including GPT, EFI and GNU Multiboot have been avoided in favour of the traditional BIOS-based booting technology. It seems to be the best starting point, and is still supported by all modern machines.
The boot process and the bootsector
The steps involved in the boot process primarily depend on the hardware components, firmware, BIOS, disks and the operating system itself.
Generally speaking, when a system is turned on, the CPU starts and executes the startup code from the ROM chip. After the Power-On-Self-Test (POST), the BIOS locates the boot disk, loads its bootsector (the first sector or 512 bytes) code into the RAM (location 0x7c00), and transfers the controls to it.
The program that has got the controls now is called the first bootstrap loader (or the first stage bootloader). This is the program that we are going to write and test in this article.
With a size constraint of 512 bytes, its only purpose would be to load the next stages in the bootloading process. But this limited space is sufficient for our experiments.
The ‘Hello World’ program
The Assembly code for a simple ‘Hello World’ program that works on the x86 architecture follows. There is no space for a detailed explanation. However, the core idea is to take each letter from a string literal (msg, here), and display it using the BIOS function in order to print a character.
Now just enter the following code using a text editor and save it as hello.asm.
; Set DS (data segment base) as 0x7c0
mov ax, 0x7c0
mov ds, ax

mov cx, MSGLEN
mov si, msg
mov ah, 0xe ; BIOS 10h function code for tty output
putchar:
mov al, [si] ; Character to be displayed
int 0x10 ; BIOS interrupt for video service
inc si
loop putchar

jmp $ ; Jump here (i.e, loop forever)

msg: db 'Hello, world!'

; Let MSGLEN = Length of msg
MSGLEN: EQU ($ - msg)

; We need the boot signature as the last two bytes.
; That's why the remaining space is padded off.
padding: times (510 - ($ - $$)) db 0

BOOT_SIGN: db 0x55, 0xaa
One might ask: why Assembly language? There is no escaping from Assembly, at least, not in the early stages of developing an OS. Assembly is highly hardware-dependent and less productive, but it gives greater control. Also, we have a limited space of 446 bytes for our bootsector code, which is too short for a high-level program.
Getting it assembled using NASM
Although there are many assemblers available (including GNU Assembler), I prefer NASM, the Netwide Assembler, for its simplicity. Let’s use the following command to assemble this code (before that, make sure you have the package nasm installed on your computer):
nasm -o hello.bin -f hello.asm
I am assuming the command shell is in the same directory as the source code. If not, use the command cd to navigate.
hello.asm is the input file, and the option -o specifies the output file, which is hello.bin (an extension has no significance, actually).
The option -f says that the format of the output file should be flat (plain or raw) binary. Usually, assemblers and linkers choose high-level executable formats like ELF and PE, which cannot be executed by the CPU without help from an OS. But we need something that can be directly executed by the CPU. This is why we assemble our program as flat binary.
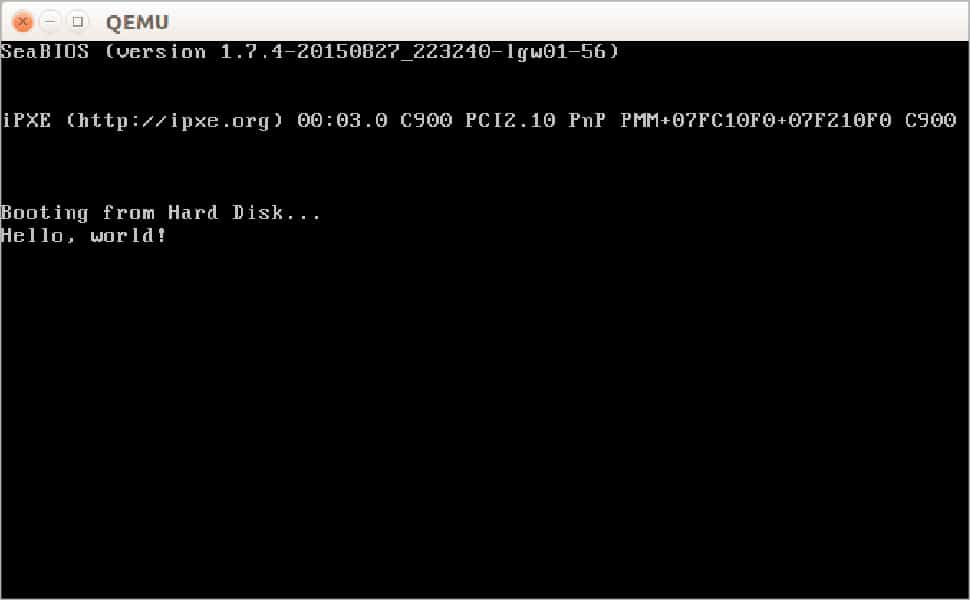
Testing it with QEMU
We can use emulators and virtual machine monitors to test our bootable code without restarting the actual machine and getting out of the current OS. Let’s choose QEMU as the emulator to be used in this article, for its portability. Most GNU/Linux distros provide the package qemu, and you can install it directly.
Now, simply run the following command (again, if the Shell is in a different directory, use cd to navigate first). This command instructs QEMU to start a virtual machine with the disk image hello.bin considered to be the boot disk.
qemu-system-i386 hello.bin
Now it works!
If you’ve got KVM installed, you can use the following command also:
kvm hello.bin
Getting it set on an actual disk
Let’s get our code written onto the bootsector of a USB Flash drive. First, find the drive name of the USB Flash drive. If you have just a single SATA hard disk installed, the next drive you connect (here, the USB Flash drive) would be called /dev/sdb. To verify this, launch the Disk Utility or try the command lsblk after connecting the drive.
Caution:
Incorrect identification of drive names can cause unexpected data loss. Also, take a backup of important files before you start experimenting with a disk.
We are not performing a simple copy-paste. So it is better to unmount the drive (in case it got mounted automatically) by using the following command:
sudo umount /dev/sdb
Now, we can use the following command to copy the bootsector. But wait! Don’t even think about executing it until you complete the next paragraph.
sudo dd if=hello.bin of=/dev/sdb
This command will copy the data in the file hello.bin to the Flash drive, directly (i.e., not as a file). To make it useful again, you’ll have to format it. Alternatively, the following commands copy the necessary parts only, leaving all other bytes intact.
sudo dd bs=446 count=1 conv=notrunc if=hello.in of=/dev/sdb
sudo dd bs=1 count=2 seek=510 skip=510 conv=notrunc if=hello. bin of=/dev/sdb
The first line copies the boot code and the second line copies the boot signature bytes (0x55, 0xaa). bs means the block size is to be considered while copying; count is the number of blocks to copy; seek is the number of blocks to skip at the start of the output; and skip is the number of blocks to skip at the start of the input. conv=notrunc ensures that the output file is not truncated (i.e., all other sectors in the USB Flash drive are preserved).
Now let’s test it on the real BIOS. Connect the USB drive and restart the computer. If USB booting is enabled and given high preference, the system should directly load your boot code. If it doesn’t, restart again and enter the BIOS settings. Ensure the following, save the settings and restart again:
- USB booting is enabled and given preference over other drives like HDD.
- Legacy booting is enabled and is preferred over UEFI.
Now you should see your ‘Hello World’ program running. When you’ve finished enjoying your own bootable program, just press the power button on the tower to shut down, or use Ctrl + Alt + Del to restart.
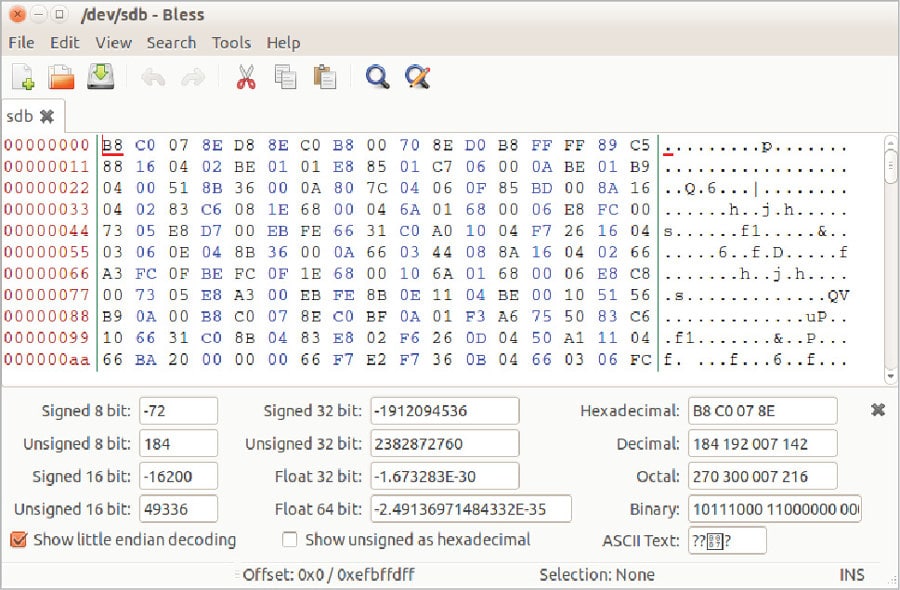
Using a hex editor
A hex editor is a program that lets you view/edit the contents of any computer file as a plain stream of bytes, and it is usually represented in hexadecimal values. While developing bootable programs, we can use a hex editor to review the internal byte patterns in a disk image or pseudo-files like /dev/sdb. In our case, for example, you can use a hex editor to ensure that we haven’t exceeded the limit of 446 bytes for our boot code.
The popular command hexdump might be already available on your GNU/Linux system. However, I recommend installing the package <i>bless</i>, which provides the easy and full-featured Bless hex editor.
After installation, launch Bless from the menu or by using the command bless. If you are not the root user, you might not be able to open system files like /dev/sdb (which represents the hard disk). You’ll need the assistance of commands like su, sudo or gksudo. For example:
sudo bless /dev/sdb
gksudo bless /dev/sdb
Caution:
Never open actual disks (especially your primary hard disk) if you are not sure what you are doing. Editing files like /dev/sda can even break the booting, OS and the partition table. However, trying disk images (e.g., .img and .iso files) is safe if you have their backup copies.
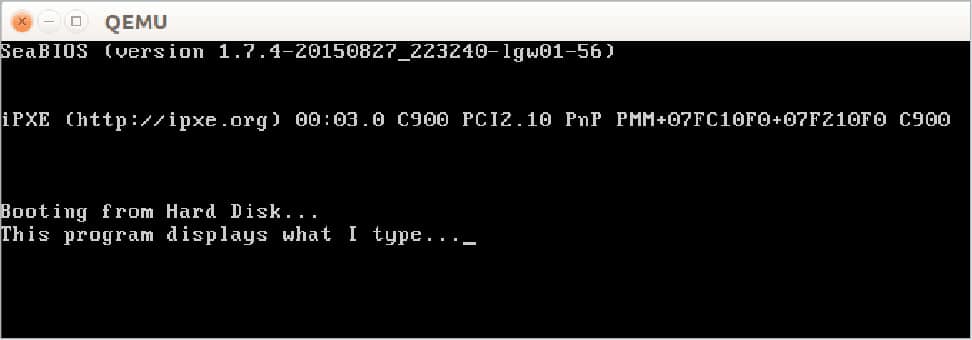
Another example: A simple typewriter
When we run hello.bin (our first example), the keyboard does not respond. Given below is the code for a simple typewriter, which displays whatever you type.
mov ax, 0x7c0
mov ds, ax
read_and_display:
mov ah, 0; BIOS 10h function code for keyboard read
int 0x16; BIOS interrupt for keyboard service
; Waits for a keypress.
; Now we have the ASCII code of the pressed key in AL.

mov ah, 0xe; BIOS 10h function code for tty output
; Anything in AL will be displayed.
int 0x10 ; BIOS interrupt for video service

jmp read_and_display

padding: times (510 - ($ - $$)) db 0
BOOT_SIGN: db 0x55, 0xaa
The way ahead
All examples discussed in this article are based on the Intel x86 Real Mode, which has a limited memory of 1MB, and no protection walls between applications. Modern systems make use of the Protected Mode, which is a must to write a general-purpose OS. However, for backward compatibility and simplicity, modern CPUs still start in the Real Mode. That means the examples we discussed are still useful, avoiding the need for a complete reboot.
You can find many websites that can help you in all these processes, among which is the remarkable wiki.osdev.org. However, as the term bootstrap loading suggests, you are pulling yourself up with your own bootstraps, which means that original experimentation and a lot of patience are required.


