A distributed denial of service (DDoS) attack involves the paralysing of a network by flooding it with data from several individual sources, to the detriment of genuine users. The identification and mitigation of such attacks is an important issue for systems administrators.
With the advent and adoption of technology-loaded devices, a number of challenges are regularly resolved by cyber security professionals. These include breach of privacy, data sniffing and theft, integrity, access control, fake traffic, channel damage, and many others. Cyber security experts are continuously working to enforce and integrate a higher level of security in the devices as well as the network infrastructure so that users can access and use the technology without any vulnerability issues.
In a technology based environment, the hacking community regularly launches numerous attacks. A number of algorithms and mechanisms have been devised to cope with such virtual attacks. Research is still under way in the domain of securing applications, devices, networks and computing infrastructure.
Broadly, there are two types of attacks in any network based environment.
Passive attacks: In any network environment, when there is an attempt at sniffing the data channels to copy secret information, it is considered to be a passive attack. In such cases, the modification of files, directories or credentials is not done. Passive attacks are primarily used to monitor the remote system or server, to spy on private information.
Active attacks: In the case of active attacks, the effect and damage of the assault is instant and, often, the victim machine would not have been prepared for such attacks. These include injection of malicious traffic to damage the remote system, updating or deleting remote files, modifying authentication files and much more.

Distributed denial of service (DDoS) attack
A distributed denial of service (DDoS) attack is a powerful assault, in the taxonomy of active attacks, which is used to restrict access to services from authenticated users. In DDoS attacks, genuine users are not allowed to use a system or service because of excessive traffic.
In very simple terms, fake or malicious traffic is generated in large volumes on a server in order to overload it, thus resulting in the network getting choked or jammed. DDoS attacks are often known as jamming attacks because fake traffic or data packets overload the server delivering a particular service. Due to this attack, other users are not allowed to access the service because of massive congestion in the network.
As an example, let’s suppose there is a limit of 200 concurrent users who can access a website. In a DDoS attack, 200 sources of website access can be generated. After those 200 connections are captured by fake traffic, the genuine users will not be able to access that particular website because of traffic overload or channel congestions.

Types of DDoS attacks
- Application layer based DDoS: Such an attack is used to target and damage the application layer of the network. The effect of this attack is measured in terms of requests per second (RPS). A large number of RPS are generated, which becomes a load for the network.
- Protocol based DDoS: In this type of attack, the resources and related modules of the server are the victims. Bandwidth is not captured in protocol based DDoS.
- Volume based DDoS: Bandwidth is the key target here: it is saturated and flooded with massive traffic in volume based DDoS attacks. If such an attack is successful, the server crashes and major flaws occur.
HULK based DDoS
Whenever there is a DDoS attack on a website, it is known as a HULK (HTTP unbearable load king) attack. In a HULK attack, the unbearable load is created at the HTTP service. A number of virtual connections are created and then fired at the website. If a HULK attack is used, the particular website gets a large number of connections from fake traffic and then the website hangs. That’s why HULK is classified as a DDoS attack. HULK attacks are generally carried out using Python, PHP, Java or Perl scripts, which are easily available on assorted Web based repositories of source code.
As there are massive DDoS attacks on different websites and servers, it is mandatory for network administrators to adopt and implement mechanisms to cope with and mitigate such attacks.
Let’s now discuss two free and open source tools that help to detect and repel such DDoS attacks.

DDoS Deflate
DDoS Deflate, an open source tool, is a powerful shell script to cope with DDoS attacks on servers. DDoS Deflate is dominant enough to push back and block DDoS attacks. At the base level, it makes use of the netstat command to identify and investigate the IP addresses that are creating connections with the server.
The following command is used to identify and list the connections created by all the IP addresses:
<workingdirectory>$ netstat -ntu | awk ‘{print $5}’ | cut -d: -f1 | sort | uniq -c | sort –n |
The features of DDoS Deflate include:
• Auto blocking of IP addresses
• Blacklisting and whitelisting of traffic and their sources
• Easy notification and management for network administrators
• Auto detection of rules associated with Iptables and advanced policy firewalls
• Ease in configuration
• Auto e-mail alerts
• Uses tcpkill to push back the unwanted and fake connections
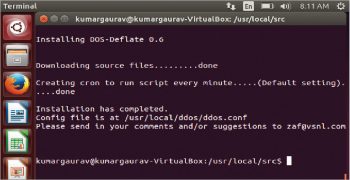
Fire the following commands in a terminal to install DDoS Deflate:
<workingdirectory>$ cd /usr/local/src/<workingdirectory>$ wget http://www.inetbase.com/scripts/ddos/install.sh<workingdirectory>$ chmod 0700 install.sh<workingdirectory>$ ./install.sh |
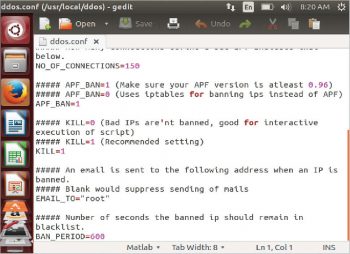
The configuration file of DDoS Deflate can be edited as follows:
<workingdirectory>$ vi /usr/local/ddos/ddos.conf |
or
<workingdirectory>$ gedit /usr/local/ddos/ddos.conf |
Use the following command to start DDoS Deflate:
<workingdirectory>$ /usr/local/ddos/ddos.sh –c |
The following code will uninstall DDOS Deflate:
<workingdirectory>$ wget http://www.inetbase.com/scripts/ddos/uninstall.ddos<workingdirectory>$ chmod 0700 uninstall.ddos<workingdirectory>$ ./uninstall.ddos |
To view the ‘Help’ screen and all other options in DDoS Deflate, type:
<workingdirectory>$ ddos –help |
To view whitelisted IP addresses, type:
<workingdirectory> $ ddos -I | –ignore-list |
Use the following command to view banned or blacklisted IP addresses:
<workingdirectory> $ ddos -b | –bans-list |
To initialise the daemon process for monitoring connections, type:
<workingdirectory> $ ddos -d | –start: |
Type the following command to stop the daemon process:
<workingdirectory>$ ddos -s | –stop |
To view the current status of the daemon and PID running, give the following command:
<workingdirectory>$ ddos -t | –status |
You can view the active connections with the server by typing the following command:
<workingdirectory>$ ddos -v | –view |
The following command bans or blacklists all IP addresses with more than ‘n’ connections:
<workingdirectory>$ ddos -k | –kill: |

Fail2Ban
Fail2Ban is another free and open source tool to identify and ban the sources of malicious DDoS traffic. It scans the log files and identifies suspicious patterns and connections so that blacklisting can be done. Fail2Ban reduces the non-legitimate and incorrect authentication attempts with the use of powerful modules for filtering the various services.
The features of Fail2Ban include:
- Deep parsing and analysis of log files
- Awareness of the time zone associated with the source traffic IP
- Integration of client-server architecture
- Assorted services including sshd, vsftpd and Apache can be processed
- Easy configuration for the administrator
- Compatibility with all the firewalls
- Whitelisting and banning of IP addresses
- Blocking of brute force assaults
- Blocking of IP addresses based on time slots
- Excellent for SSH based environments
- Time-based IP blocking
- Support for Python programming
To install and work with Fail2Ban, type the following command:
<workingdirectory>$ sudo apt-get install fail2ban |
Fail2Ban service maintains a configuration file in the directory /etc/fail2ban. In this directory, the default configuration file is jail.conf.
After installation, the default configuration file is copied to the working configuration file.
<workingdirectory>$ sudo cp /etc/fail2ban/jail.conf /etc/fail2ban/jail.local |
The configuration settings at the end of the config file are as follows:
[http-get-dos] # Rule to be Setenabled = true # Statusport = http,https # 80,443 (Ports)filter = http-get-dos # Filter Nameslogpath = /var/log/www/vhost.d/mysite.com/site-access_log # Path of Logmaxretry = 5 # Retries Max. Limitfindtime = 10 # 5 retries in 10 seconds from 1 IP Ban or Blacklistbantime = 86400 # In Seconds (One Day)action = iptables[name=HTTP, port=http, protocol=tcp] iptables[name=HTTPS, port=https, protocol=tcp]sendmail-whois-withline[name=httpd-get-dos, dest=<E-mail ID>, logpath=/var/log/httpd/site-access_log] # sets iptables variables. |
To view all the jail files that have been enabled, type:
<workingdirectory>$ sudo fail2ban-client status |


