Build automation automates the process of a software build and removes the drudgery of having to do it all manually. Waf is a relatively new build automation tool that is open source and platform-independent. Written in Python, it is maintained by Thomas Nagy.
Build automation tools are used for automatic compilation and installation of computer software. Let us assume you are working on a large software project which is divided into a 100 program files. It is possible to compile all these files manually to generate an executable file. But what if you are frequently making changes to a particular file, and the functions used in it are also used by all the other program files? Then you’d have to recompile all the 100 files again and again. You’d be forced to execute hundreds of commands manually. Such a tedious process to compile the project might make you overlook some minor errors. In such a situation, a build automation tool is quite handy. It helps to build the executable file from hundreds of program files by automating the build process.
An executable file or a binary file contains instructions that cause a computer to perform certain tasks. We are familiar with the .exe executable files in Windows. The a.out file associated with C programs is actually an old executable file format in Linux. And nowadays, the most popular executable file format in Linux is the Executable and Linkable Format (ELF).
Apache Ant, Bazel, BitBake, CMake, Make, Waf, etc, are some popular build automation tools. The most popular build automation tool is Make, which dates back to the 1970s. I used Make for a long time till I decided to explore Waf, a relatively new build automation tool, which I found to be excellent.

Installing Waf
Waf is developed using Python and maintained by Thomas Nagy. The latest version is waf-1.9.6. It is open source software and its source code is released under the new BSD licence. The associated documentation of Waf is under the Creative Commons Licence, and prohibits commercial reuse and modification. Hence, it is overlooked by many of the Linux distributions. For example, Debian Linux does not have Waf included in it by default. But having Waf in your system is very simple because you only need to download the Waf executable file. You can use the following Linux command wget to download the Waf executable file if you have Internet connectivity:
wget https://waf.io/waf-1.9.6
The command wget will download the Waf executable file to your current working directory. You can run this executable file with the command ‘./waf-1.9.6’. But remember to rename the file as waf and copy this file to any one of the directories pointed by the PATH environment variable of Linux to make matters easy. This step is important because the Linux environment will search for executable files only in the directories pointed by the environment variable PATH and, in most cases, the current working directory will not be included. Execute the command ‘echo $PATH’ to see the various directories searched by the Linux Shell for executables. Also remember to change the access permissions by using the command chmod. In this case, the command ‘chmod 755 waf’ or ‘chmod 755 waf-1.9.6’ (depending on whether you have renamed the Waf executable or not) will be sufficient. This command gives read, write and execute permissions to the owner, and gives read and execute permissions for the group and others.
If you do not have Internet connectivity, just download the Waf executable file from the URL https://waf.io and copy it to one of the directories pointed by the environment variable PATH, as mentioned earlier. But do remember that this is not the way we are supposed to use Waf. The developers of Waf want us to copy its executable into the main directory of each and every project we are developing along with a Waf script to build the project. This is the single greatest advantage of Waf over most other build automation tools. If you are using the tool Make for building your project, then the target system should have Make installed in it. But with Waf, you do not have this constraint because all you have to do is to bundle an executable of Waf along with the source files of your project. But while writing this article, I primarily had students in mind—those who are trying to customise their systems with a build automation tool and hence chose the method we are discussing.
Waf can be built from the source files but I prefer the easier method, whereby the executable of Waf is downloaded. As an aside, Waf can also be used in MS Windows and the working of the executable is similar in Windows and Linux.

A sample program to test Waf
In order to demonstrate the working of Waf, a simple C program is used in this article. But do remember that Waf can be used to build projects developed in languages like C++, C#, Java, Fortran, Python, D, etc. The simple C program is divided into three files — main.c, data.c and show.c. The file main.c, shown below, calls two functions data( ) and show( ). But the function definitions are given in two separate files.
void data( );
void show( );
int main( )
{
            data( );
            show( );
return 0;
}
The file data.c given below contains the definition of the function data( ).
#include <stdio.h>
void data( )
{
            printf(“\nLet us learn about Waf\n”);
}
The file show.c given below contains the definition of the function show( ).
#include <stdio.h>
void show( )
{
            printf(“\nWaf is a build automation tool\n”);
}
These three files can be compiled using the C compiler gcc from the GNU Compiler Collection (GCC) to generate an executable called hello by executing the following single command:
gcc main.c data.c show.c –o hello
But the problem with this sort of compilation is that all the three files are recompiled irrespective of whether they are modified or not. So we need the following sequence of commands, which will compile each file individually rather than compiling all the files at a single go, in order to avoid unnecessary recompilation of unmodified files.
gcc –c main.c
gcc –c data.c
gcc –c show.c
gcc main.o data.o fun.o –o hello
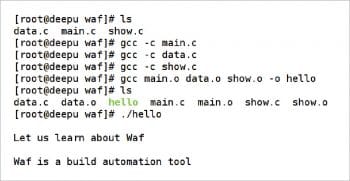
The option –c of gcc tells the compiler to produce object code rather than executable code. But the option –c also makes sure that the linker is not called into action. The first three commands create three object files called main.o, data.o and show.o. The fourth command uses the object files main.o, data.o and show.o to produce an executable file called hello with the option -o. This executable hello is executed with the command ./hello and the output is shown in Figure 2.

A simple Waf script
What if the program contains 10, 100 or 1000 files? Well, we need 11, 101 or 1001 commands, respectively, to generate an executable file. This is alarming and almost as difficult as writing the program itself. But here comes Waf to our rescue. The same effect as one thousand and one command line instructions can be achieved with the help of a single Waf script. The Waf executable will search for a script called wscript containing all the rules to build a particular project in the current working directory of the project from which the Waf executable is called. The code below shows the wscript to compile and build the sample project.
top = ‘.’
out = ‘.’
def options(opt):
opt.load(‘compiler_c’)
def configure(conf):
conf.load(‘compiler_c’)
def build(bld):
bld.program(source=’main.c’, target=’hello’, use=’data show’)
bld.objects(source=’data.c’, target=’data’)
bld.objects(source=’show.c’, target=’show’)
def test(tst):
            print(“\nThis is a waf test function\n\n”)
Always remember to save the Waf script files with the name wscript. In order to build our sample project, open a terminal and set the directory containing the sample C programs and the Waf script wscript as the current working directory. If you have manually created the executable file hello, make sure that you have deleted the executable as well as the object files. The sample project can be built by executing the following commands.
waf configure
waf
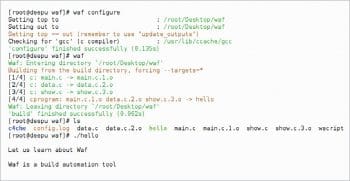
If you haven’t renamed the file waf-1.9.6 as waf, then you need to execute the command waf-1.9.6 on the terminal instead of waf. Figure 2 shows the output of these command executions.
Figure 2 also shows the associated files generated by Waf other than the executable hello. So it is better to store the output data into a separate directory other than the current working directory. For example, the line of code out =’./dest’ instead of the line of code out = ‘.’ will store the executable hello and other associated directories into a directory called dest inside the current working directory. And now, if you run the executable hello in the current working directory or the directory dest with the command ./hello you will get the same output shown in Figure 2.

The Waf script demystified
Now, it is time for us to understand the working of the Waf script file wscript. The line ‘top = ‘.’ defines the top directory of the project. This is almost always the directory containing the top level wscript of your project. Remember that ‘.’ denotes the current working directory in Linux and this is where Waf initially searches for source files, unless you are recursively calling other Waf scripts from one of the parent directories or sub-directories (a topic that we are going to discuss later). The line out = ‘.’ defines the name of the output directory to which the executable file of the project and other dependent files are to be saved. As mentioned earlier, in our case, the executable file will be saved to the current working directory.
If you are familiar with the programming language Python, you will see that the remaining lines of code in the file wscript are nothing but the definition of four Python functions—options, configure, build and test. Even if you don’t know Python, there’s no need to worry because you don’t need Python to use Waf. The most important fact to remember while learning Waf is ‘Waf commands map to Python functions’. In simple terms, for each Waf command there should be a Python function defined in the Waf script wscript. So now we can use the four Waf commands— options, configure, build and test, which are available with the Waf script, and all of them need a Python function to define their actions. Each of these four functions has a parameter defined for them, which can be further used by other functions. In our case, the variables used to denote these parameters are opt, conf, bld and tst, respectively.
The first Python function from our Waf script wscript invokes a command called configure. The configure command is used to check if the requirements for working on a project are met and if it is possible to store the executable file and other associated files in your destination directory. The parameter of the configure command is then stored for use by other commands, such as the build command. The function options defines a command named options which is called once, before any other command is executed in wscript. In our case, the function options with the parameter compiler_c is used to load the C compiler in a platform-independent manner. The term ‘platform-independent’ means that when using Waf, it doesn’t matter whether you have gcc, LLVM or some other compiler to compile the given C program. Instead, Waf will simply identify a compiler capable of compiling C programs on your system or show an error message if it fails to find a suitable C compiler. Other extensions like compiler_cxx, compiler_fc and compiler_d are provided to support the compilation of projects developed using C++, FORTRAN and D, respectively.
The most important function in wscript is called build, which can be executed with the command waf or waf build. In our wscript, the second and third lines of code in the build function create object files for the source files data.c and show.c. The first line of code in the build function generates the final executable file hello by using the file main.c and the object files generated from the files data.c and show.c. So, in order to build our sample project, we only need the three functions—options, configure, and build. You might then wonder what the purpose of the function test is, in the given wscript.
User defined Waf commands
Earlier, we learned the rule ‘Waf commands map to Python functions’. So if you want a user defined Waf command, all you need to do is define a Python function in wscript. Execute the command waf test on the terminal and see the output. I am sure you will be able to guess the output.
Multiple Waf scripts for a project
For the simple project we are discussing, we only need a single wscript. It is possible to have more than one wscript for even a single project. Consider the wscript shown below in the current working directory of our project:
def configure(conf):
            print(“Waf File  Configured!!!”)
def test(tst):
            print(“This is the main wscript”)
            tst.recurse(‘src’)
The wscript shown below is in the directory src inside the current working directory.
def test(tst):
            print(“This is the wscript from the directory src”)
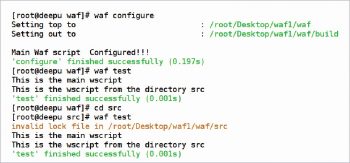
The commands waf configure and waf executed from the current working directory will give you the output shown in Figure 3. The line of code tst.recursive(‘src’) calls the wscript inside the directory src along with the wscript from the main directory of the project. Now execute the command cd src and waf. The output of these commands (shown in Figure 3) might seem a bit surprising because the execution of the wscript inside the current working directory and the wscript inside the directory src are both showing the same output.
Even if you are calling Waf from a directory containing a wscript, the wscript executed is the one that is configured last in one of the parent directories. So if you want only the wscript from the directory src to take charge of affairs, you need to add a configure function in it. This example also tells you something about the default destination of Waf. If you haven’t provided the command out = ‘.’ or say out = ‘./dest’, a default directory called build is generated by Waf to store the executable and other associated files.
A few final words about Waf
So we have learned about the installation and use of Waf with a simple C program. But this example and article just cover the bare minimum essential for a novice to start working with Waf. The features of Waf that I have left out are innumerable. For example, Waf can build executables in parallel which, all together, reduce the code generation time. Another stunning (and disturbing) fact regarding Waf is that it offers a Turing complete language as part of its repertoire. In simple terms, a tool can be called ‘Turing complete’ if and only if it is as powerful as the C programming language—at least theoretically. The command waf distclean will delete all the files generated by the command waf or waf build. This is quite an improvement from the Make utility, with which you need to define the function clean independently, to remove the files automatically built by Make.
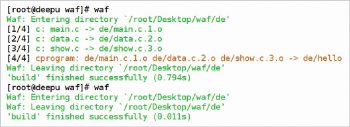
Finally, to understand the single most important benefit of Waf or any other build automation tool in comparison to manual compilation, execute the command waf twice on the terminal. I am sure that the second time, Waf will not do anything at all. All you are going to see is the message shown in Figure 4.
We can conclude that for Waf, ‘if there’s no modification, then there’s no compilation’. In simple terms, Waf will recompile a source file if and only if it is modified. But it is also possible to forcefully recompile all the source files even when no changes are made. This can be achieved by executing the command waf clean on the terminal.


