DevOps is a term that’s emerged from ‘development and operations’. It refers to the collaboration, communication and integration between software developer and IT operations teams, leading to faster production of software and services. This tutorial starts off using the official MySQL image with a minimal Dockerfile, and then moves to Docker Compose to set up a development environment for Rails.
Of late, Docker has clearly emerged as a winner in the DevOps world. It is not a panacea for all problems, though, and has a few issues, the biggest being the learning curve. Docker is fairly new while the technology it uses, i.e., Linux containers, has been around for well over 10 years. Google is a pioneer in the development of Linux containers, while Docker has come up with a more user-friendly approach to using containers.
Let’s consider an example of a Rails application that uses MySQL and Redis. If you are running DevOps for your startup, one of your roles would be to bring on board new developers and help them set up services on their machines. You will probably use some automation tool like Vagrant to get this done. If you are doing it manually via apt-get or Brew, then this is the best time to start using Docker. Dockerising a service simply means adding a `Dockerfile` to your project, just like a Vagrantfile. In this tutorial, we will start with using the official MySQL image with a minimal Dockerfile, and later move to Docker Compose to set up a development environment for Rails. This article assumes readers have a basic knowledge of the Linux command line.
You must have Docker and Docker Compose installed on your machine before starting, for which the official documentation can be followed (Docker: https://docs.docker.com/engine/installation; Docker-compose: https://docs.docker.com/compose/install).
Once you have Docker installed, you can verify it by running docker without any arguments. You can verify your installation as shown below:
<code: shell>$ docker -vDocker version 1.12.3$ docker-compose -vdocker-compose version 1.8.0-rc2, build c72c966 |
Docker requires sudo to run. However, we will not use Docker with sudo, because we wish to avoid repetition and maintain simplicity. You can copy-paste the commands shown below to avoid using sudo. (Logout → Login for group changes to take effect.)
<code: shell>$sudo gpasswd -a ${USER} docker |
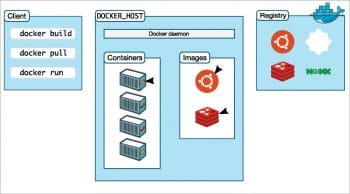
There are three major terminologies to understand when working with Docker.
1. Dockerfile: This is a text document, which contains a set of commands that are required to build an image.
2. Image: This is a compressed archive that is built from executing the commands in your Dockerfile.
3. Container: This is a running instance of an image. You can create any number of containers from an image.
Before we start, let’s set up our environment. We will be doing all the work inside ~/dock.
<shell>$ mkdir -p ~/dock/mysql$ cd ~/dock# demo rails application$ git clone https://gitlab.com/techmaniack/rails-mrd-demo.git ~/dock/rails-rmd-demo |
One of the major benefits of using Docker is that most of the popular open source tools are Dockerised by their maintainers and are available for anybody to use. To know what a Dockerfile is and what it does, we will use a MySQL image as a starting point and build our own image locally.
<code: shell>$ cd ~/dock/mysql$ touch ~/dock/Dockerfile |
Open the Dockerfile in the editor of your choice and copy the following code inside it:
<code Dockerfile>#Use official mysql as a starting pointFROM mysql #Set password for root userENV MYSQL_ROOT_PASSWORD=root |
Now, we are all set to build our first image, which we will name ‘mysql_local’. To build an image from Dockerfile, we have to use ‘docker build’ as shown below:
<code: shell>$ docker build -t mysql_local .Sending build context to Docker daemon 2.048 kBStep 1: FROM mysqllatest: Pulling from library/mysql386a066cd84a: Pull complete 827c8d62b332: Pull complete de135f87677c: Pull complete 05822f26ca6e: Pull complete 63ddbddf6165: Pull complete 15fe0fbc587e: Pull complete 93e74acdb291: Pull complete 11c2df82e984: Pull complete d42a9e6a85c8: Pull complete e7fb2f3afd87: Pull complete 30724006a583: Pull complete Digest: sha256:89cc6ff6a7ac9916c3384e864fb04b8ee9415b572f872a2a4cf5b909dbbca81bStatus: Downloaded newer image for mysql:latest---> d9124e6c552fSuccessfully built d9124e6c552f |
You will see a bunch of ‘Pull complete’ messages, which is fine because we asked Docker to build ‘FROM mysql’ in our Dockerfile. Now the MySQL image is stored on your local machine, which means that when you try to build a new image of ‘FROM mysql’, it won’t pull it from the Internet. The very last line says ‘Successfully built d9124e6c552f’ , where the ID is of the newly created image, i.e., mysql_local. You can list all the images on your machines with ‘docker images’ as shown below:
$ docker imagesREPOSITORY TAG IMAGE ID CREATED SIZEmysql_local latest d61327195850 1 minutes ago 383.4 MB\mysql latest d9124e6c552f 4 days ago 383.4 MB |
As you can see, we now have two images on our machine.
1. mysql: The base image.
2. mysql_local: The image we created with the custom root password.
Let’s go ahead and set up a container, and connect to the MySQL prompt just to verify that things are working.
<code: shell>$ docker run -d -p 3306:3306 mysql_local# Check running containers$ docker psCONTAINER ID IMAGE COMMAND CREATED STATUS PORTS NAMES003d069f511b mysql_local “docker-entrypoint.sh” 2 minutes ago Up 2 minutes 0.0.0.0:3306->3306/tcp hopeful_torvalds$ mysql -h127.0.0.1 -u root -prootType ‘help;’ or ‘\h’ for help. Type ‘\c’ to clear the current input statement.mysql> mysql> exit |
That’s it! You have created an image for MySQL and started a container running MySQL server on port 3306. All we needed were two lines of code in our Dockerfile, which can now be used across operating systems with the same commands to achieve the same output. There are a few more commands that we need to know before we move forward.
Note: If you get an error while running the container, it must be because you already have MySQL running locally. Stop your local MySQL by using `sudo service mysql stop’.
<code: shell># Stopping a container. The ‘id’ is taken from ‘docker ps’$ docker stop 003d069f511b# List all containers (running and stopped)$ docker ps -a# Delete a container$ docker rm <id>#Delete an image$ docker rmi IMAGE#Delete ALL containers. (Use with caution)$ docker rm -f $(docker ps -a -q)#Delete ALL images (Use with caution. It deletes every image on you machine!)$ docker rmi -f $(docker images -q) |
You can play around with this set-up as much as you wish. Try modifying the Dockerfile to build new images with different configurations. Consider achieving this with what you have just learned.
1. Run two MySQL containers on different ports (3306 and 3307).
2. Create an image which allows a blank root password.
3. Create an image with a database named ‘Books’ and a user with the name ‘Librarian’.
Moving on to our Rails application, let’s create a Dockerfile and docker-compose.yml inside the application directory. Just like MySQL, you can also get base images for Ruby, and we will use ‘Ruby:2.3.1’ in our Dockerfile to build the image for the app. The yml file is the template for our environment, and it will be used to spin off dependent services in separate containers, saving us from the overhead of linking them. ‘Compose’ is a tool for defining and running multi-container Docker applications. With Compose, you create and start all the services from your configuration using a single command.
<code: shell>$ cd ~/dock/rails-mrd-demo$ touch Dockerfile docker-compose.yml<code Dockerfile>#Using ruby 2.3.1 as our base imageFROM ruby:2.3.1## Installing dependencies. You can execute any linux command using RUN#RUN apt-get update -qq && apt-get install -y build-essential libpq-dev nodejs##Prepare directory where the application will be copied inside the imageRUN mkdir /myapp##Change working directory (cd /myapp)WORKDIR /myapp## Copy over Gemfile and Gemfile.lock. These files have all the ruby needs defined.ADD Gemfile /myapp/GemfileADD Gemfile.lock /myapp/Gemfile.lock## Execute bundle installRUN bundle install## Copy contents from current directory to /myapp.ADD . /myapp |

The Dockerfile syntax is minimal and simple to understand. In this file, we started from a base Ruby image, installed OS packages, copied files, executed commands like bundle install and finally copied all our code inside the image. As discussed earlier, we have the option of using ‘docker build’, but we will use ‘docker-compose build’ instead. It will read the yml and create three containers for us, which all talk to each other by service names. This means that your web container can communicate with the database with mysql as an endpoint and the same is true for Redis. Here is the docker-compose.yml:
<code docker-compose.yml>version: ‘2’services:mysql:image: mysqlenvironment:- MYSQL_ROOT_PASSWORD=rootredis:image: redisweb:build: .command: bundle exec rails s -p 3000 -b ‘0.0.0.0’volumes:- .:/myappports:- “3000:3000”depends_on:- mysql- redis |
In the web section, you can see ‘build’. which says,‘build a container from the current working directory’; for MySQL and Redis, we need not build an image locally as we are using publicly available images. Build your environment with the ‘docker-compose build’ command:
<code:shell>$ docker-compose builddocker-compose build redis uses an image, skippingmysql uses an image, skippingBuilding webStep 1: FROM ruby:2.3.12.3.1: Pulling from library/ruby386a066cd84a: Already exists75ea84187083: Pull complete...Step 8 : ADD . /app---> 3a51a5637b94Removing intermediate container 2f1b024e5daaSuccessfully built 3a51a5637b94 |
The output makes it clear that it skips building an image for Redis and MySQL, and proceeds with web. As you can see, it starts with Step 1 and ends at Step 8. This is because we have specified eight commands in the Dockerfile. You will need to build whenever there is a change made to Gemfile or Dockerfile. Coming to the final step, let’s run our Dockerised Rails development environment:
<code:shell>$ docker-compose up -dPulling redis (redis:latest)...latest: Pulling from library/redis386a066cd84a: Already exists769149e3a45c: Pull complete1f43b3c0854a: Pull complete70e928127ad8: Pull complete9ad9c0058d76: Pull completebc845722f255: Pull complete105d1e8cd76a: Pull completeDigest: sha256:c2ce5403bddabd407c0c63f67566fcab6facef90877de58f05587cdf244a28a8Status: Downloaded newer image for redis:latestCreating railsredismysqldocker_redis_1Creating railsredismysqldocker_mysql_1Creating railsredismysqldocker_web_1 |
You have your application running and you can verify this by visiting http://localhost:3000 in your browser. You might see a database error and that is because we need to set up a database for our application. Open a new terminal and run the following code:
<code:shell>$ docker-compose run web rake db:create Created database ‘rails-redis-mysql-docker_development’ |
Here are a few commands that you might need while working:
<code:shell># Stop all running containers$ docker-compose stop# Destroy all containers, images, networks. You will have to run rake db:create again if you do this.$ docker-compose down# Check logs$ docker-compose logs web# Validate docker-compose.yml. If there are no errors it will display the contents of yaml.$ docker-compose config |
That’s it for this session. If by now you have doubts like ‘Why not add rake db:create to Dockerfile?’ or ‘Where is my data actually stored?’ then you are thinking along the right lines.


