If you are eager to build a mobile app, there is no better application than App Inventor 2 to start you up. We have been carrying this series for quite a few months now. We have built the simplest apps, and are slowly building more and more complex ones. This article features an app for noughts and crosses (xoxo) to be played by multiple players.
I hope readers are playing around with their ideas and creativity while developing Android apps. I would like to see the application download links if you have uploaded any of your apps on to the Google Play Store. Since we started this journey, we have explored the various ‘intelligent’ components and features of our smartphones.
Now, when we talk about App Inventor specifically, we can proudly say that we have mastered the components available in the palette. Playing around with the designer and block editor is so much fun.
Multi-player games are the trend now because of the fun involved in playing with your friends or competing with strangers across the world. The technology that makes this possible is the real-time integration and communication between all connected devices. We have explored Firebase in two of my previous tutorials, and I hope you are now completely familiar with its capabilities that enable even beginners to build smartphone apps.
In this Android app development journey we have covered all those basic-to-complex applications that are essential for our daily use. Now, let’s develop a simple, yet fun-filled Android game application. Hope you all have played the very popular XOXO (noughts and crosses) game in your childhood.
The theme of the application
The theme is pretty simple and you may have already played the game hundreds of times on paper. But the cool part here is, you don’t need a pen or paper. We will be playing it with the help of our smartphone.
GUI requirement
For every application, there is a graphical user interface or GUI that helps the user to interact with the on-screen components. How each component responds to user actions is defined in the block editor section.
The GUI requirements for Screen1 are listed below.
1. Label: Labels are the static text components that are used to display some headings or text on the screen.
2. Button: Button will let you trigger the event and is a very essential component.
3. Horizontal arrangement: These are special components that keep all child components horizontally aligned.
4. Notifier: This is used to display some instructions or give controls over your existing components. You will see its functionality in more detail as we implement it in our game.
5. Canvas: This is the component for drawing and for animation. You can place various animation objects over the canvas to control them via user actions. We will see more details as we go along.
6. Firebase DB: As you already know, this is the cloud based database utility from Google. We will be using it to store the user’s data, over the cloud.
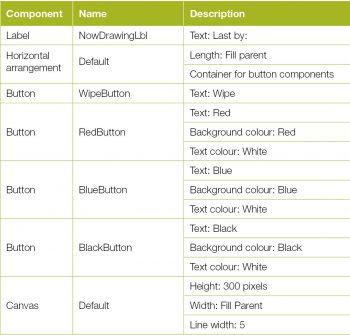
The components that we will require for this application are given in Table 1. We will drag them from the left hand side palette on to the designer.
1. Drag and drop the components mentioned in Table 1 to the viewer.
2. Visible components can be seen by you, while the non-visible components will be located beneath the viewer under the tag ‘Non-visible’.
3. We have placed a label to put the name of the application.
4. All buttons need to be put within the horizontal arrangement to keep them aligned horizontally.
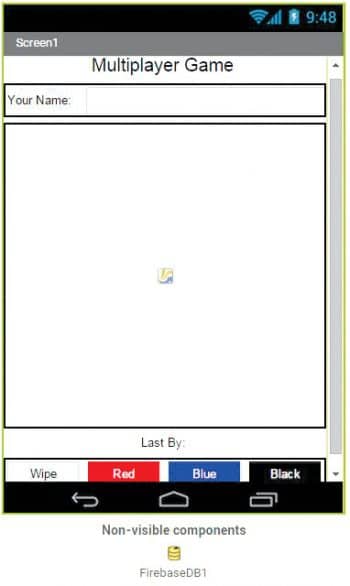
5. If you have dragged and placed everything, the layout will look something like what’s shown in Figure 1.
6. Make the necessary property changes like we did when changing the text property for the label and button components. Table 2 depicts this more clearly.

Renaming the components helps to identify them in the block editor.
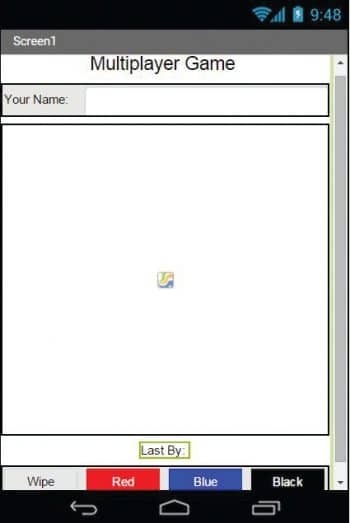
Your graphical user interface is now ready. The application will look exactly like what’s shown in Figure 2, after the installation.
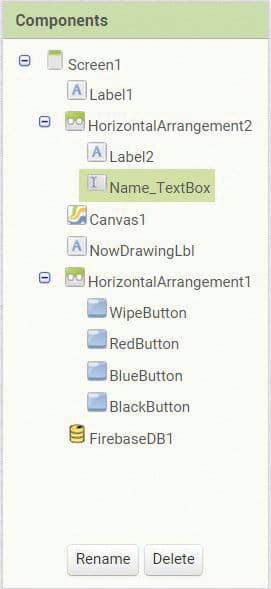
Figure 3 shows the hierarchy of the components that we have dragged to the designer.
If you are confused seeing the designer and the components’ viewer, let me explain things a bit. Here is the hierarchy that we have placed for our application.
1. At the top we have the title of our application. It’s always a good practice to name your application and show it on the screen as well. We have put a label for it and have set its text property to the name of the application.
2. Below that we have a name label and textbox for the users to type in their names. We will store the same name in the Firebase database.
3. Next, we have a canvas which will be our main playing area. We will draw over that area.
4. When two players are involved, it is better to keep track of who has made the last move to avoid confusion. So we have added a label below the canvas, which will show the name of the player who has finished drawing on the canvas, most recently.
5. The horizontal arrangement holds all the action buttons. As we have explained earlier, keeping these buttons within an arrangement will make the horizontal arrangement their parent, and all the components within will be the children.
6. We have named all the buttons with their respective colours. So it is clear by their names what each of them will correspond to.
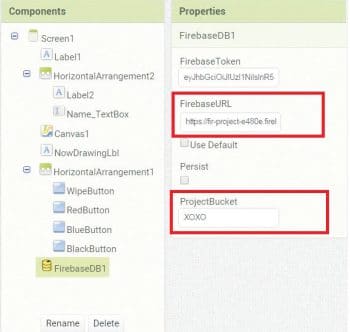
7. Last, we have the Firebase component, which is what will make our application multi-player. I hope you have read the previous two articles of this series which dealt with Firebase’s functionality. If you are already familiar with it, then you probably may have created a project in Firebase and have set the Firebase URL into the properties.
Now, to work on the block editor to define the behaviour, let’s discuss the actual functionality we expect from our application.
1. First, the user will draw a game board of the XOXO game, which is four crossed lines.
2. Each player will take her/his turn and draw (an X or O) on the game board.
3. Each player should draw with a different colour to identify the winner.
4. The name of the player who has made the last move is displayed.
5. Upon winning, the winner is notified.
6. The game board should be cleared using the Wipe button.
So let’s move on and add these behaviours using the block editor. I hope you remember how to switch from designer to block editor. There is a button available right above the Properties pane to switch between the designer and block editor.


Block editor blocks
I have already prepared the blocks for you. All you have to do is drag the relevant blocks from the left side palette and drop them on to the viewer. Arrange the blocks in the same way you see them in Figure 5. I will explain each one — what it does and how it is called.
Initialise three variables as follows:
- KEY_LINE: This will be used for storing data points about the lines, which will be further used to draw coloured lines.
- KEY_USER: This variable will be used to keep track of the last user, so it will be storing each username at every turn.
- KEY_COMMAND: This variable will be used to determine the colour of the pen the user has picked for drawing.
Now, before the user draws anything on the canvas or chooses any colour for the pen, we should check whether he/she has provided a name. If there is a name in the textbox at the top, we will save it to the Firebase cloud database. The procedure (Figure 6) checks for the name and, if present, saves it to the database.
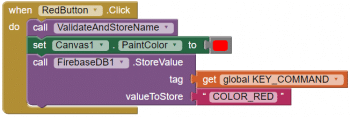
We want each user to draw with a different coloured pen so that it will be easy to identify the moves. So we have included buttons to set the colour of the pen. Now we want to display this colour setting on each device; hence, it should be stored in Firebase. Figure 7 shows the code for one button, and I hope you can make it for the other two as well.
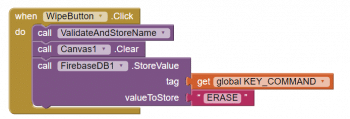
Once the game is finished, whether someone has won it or the game is a draw, the canvas should be cleared and the play board should be drawn again.
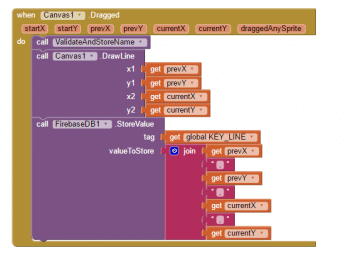
Figure 9 shows the canvas draw event handler. It will be triggered when the user starts dragging on the canvas, and that’s when we will draw the user input on to the canvas.
A FireBaseDB.DataChanged event handler sends two parameters, as follows:
Tag: This is the name of the tag or the key for which data has been updated.
Value: This is the value for the tag.
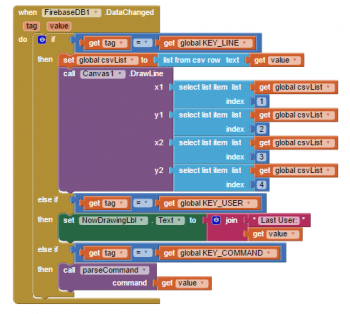
When this event is triggered, we check to see which piece of data has been changed. If you recall, when drawing on the canvas, we stored prevX, prevY, currentX and currentY in CSV format with a key from KEY_LINE.
The block in Figure 10 checks to see if the reported tag (key) is KEY_LINE. If yes, this means another user is drawing on the canvas. We get the CSV value, convert the CSV into a list using list from csv row and store it into our global csvList variable. Next, we simply take each piece of data and use it to draw lines on the canvas.
If the tag (key) is KEY_USER, it means data has been updated in the cloud. We get the associated value and update our lblNowDrawing text to show its related value (the last user’s name).
If the tag (key) is KEY_COMMAND, we call a stored procedure, the parseCommand, to inspect the command. We are using a procedure to reduce the number of blocks in our DataChanged event handler.
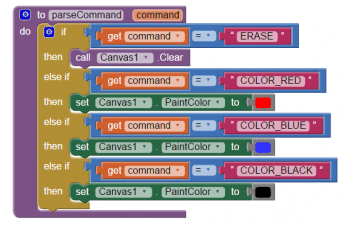
The procedure parseCommandBelow is called from the above blocks. It basically checks to see what command was sent to FirebaseDB. If the command was ERASE, we use Canvas.Clear to clear the canvas. If the command was COLOR_RED, we change the paint colour. We do the same for COLOR_BLUE and COLOR_BLACK
Now you are done with the block editor too. Next, we will download and install the app on your phone to check how it works.
Packaging and testing
To test the app, you need to get it on your phone. First, you have to download the application to your computer and then move it to your phone via Bluetooth or a USB cable. I’ll tell you how to download it.
1. On the top row, click on the ‘Build’ button. It will show you the option to download the apk to your computer.
2. In the course of downloading, you can view how it progresses and once successful, the application will be placed in the Download folder of your directory or the location you have selected for your downloading.
3. Now you need to get this apk file to your mobile phone either via Bluetooth or via a USB cable. Once you have placed the apk file in your SD card, you need to install it. Follow the on-screen instructions to install it. You might get some notification or warning saying Install from un-trusted source. Allow this from the settings and after successful installation, you will see the icon of your application in the menu of your smartphone. Here, you will see the default icon, which can be changed; we will tell you how to do this as we move ahead.
4.
I hope your application is working exactly as per the requirements you have set. Now, depending upon your usability and customisation, you can change various things like the image, sound and behaviour as well.
Debugging the application
We have just created the prototype of the application with very basic functionality. What else could the user be interested in? Let’s look at the various use cases in which your app should be able to perform well. Consider the following use cases:
- Wouldn’t it be nice to add some data validation upon entering the data in lower or upper case?
- Can you extend the app to draw circles on the canvas, as soon as it is touched?
These are some scenarios that might occur and users will be pretty happy seeing them implemented.
Think about all these scenarios and how to integrate them into the application. Do ask me if you fail to address any of the above cases.
You have successfully built another useful Android app for yourself. Happy inventing!


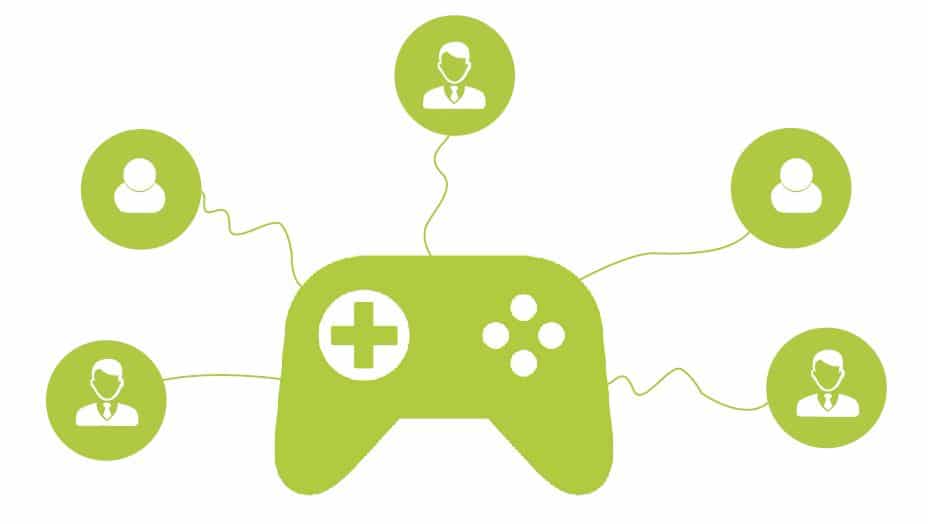


If more than two players were using the app at the same time they would all see each others X’s and O’s
Is there a way to for any two players to remain separate from all others using the app?