


Recurrent neural networks (RNN) can be used to generate handwritten text. This is a fun project that you might like to try out for yourself. This article details the steps to be taken to generate handwritten text from plain text.
Typing has brought a lot of ease to content generation, but sometimes, you may need handwritten text rather than the typed version. Cursive fonts try to address this but fail since the nature of the problem is not addressed; instead, only the symptoms are treated.
Alex Graves has published a paper which demonstrates how to generate sequences with recurrent neural networks (RNN). It can be found at https://arxiv.org/abs/1308.0850. The long and short of it is that we can now generate handwriting using RNNs. In this article, we demonstrate a nifty little program which converts any plain text file into a series of images that have handwriting on them instead of the usual printed text.
This article does not aim to discuss Graves’ paper, but rather, lets you use the research and create your own handwritten text. So, let’s dive in.
This has been tested on Arch Linux and Ubuntu 15. It should work on any platform where Python3.x is installed. The steps are as follows.
First off, we need to install what’s required to run this software. Let’s first install Python3 from https://python.org. If you are on a Linux system, Python is already installed. On Ubuntu, however, you will need the correct version of Python and so need to run the following command:
sudo apt-get install python3
Once that is done, we need to install some of the packages required for our software. To avoid complicating matters, let’s use the virtual environment system for Python. To create a virtual environment, we run the following command:
virtualenv -p python3 env
After this, to activate the virtual environment, use the command given below:
source env/bin/activate
Now that the virtual environment is created and active, we can install libraries in it using the following command:
pip install requests pillow
This installs the two libraries requests and pillow for URL retrieval and image processing, respectively.
With that, our pre-requisites are done. We can now download the software and get going. There are two ways to do so. First, if you have git installed, you can clone the repository at https://github.com/theSage21/handwritten using the following command:
git clone https://github.com/theSage21/handwritten
The other method does not require git, though it does require some sort of unzipping tool like Unzip in Linux systems or Win-zip in Windows. To go this way, use the link to download the Zip file. Once downloaded, you can unzip the file using the following command on Linux systems:
unzip handwritten.zip.
This will create a folder called handwritten, where the program will be.
Now, we navigate to the handwritten folder using the following command:
cd handwritten
We need to create a plain text file of what we need written. So let’s use our favourite editor and open a blank txt file with the following command:
vim example.txt
or
gedit example.txt
or
notepad example.txt
Let’s copy-paste our text into the file, and make sure that no line is longer than 100 characters.
Next, let’s get the individual lines using the following command:
python get_hand.py example.txt 0
Here, the first part invokes Python and instructs it to run the script named get_hand.py. The variables given to the script are the name of the text file used to generate the text and the starting line number. If you do not provide the latter, it is assumed to be 0.
This will create a folder called images in the handwritten folder and put each line’s handwritten text in there. The lines will be PNG images with the line number as names. You need not worry about this as it is an intermediate step in the process. In case some line does not seem good enough, you can always regenerate it by specifying the line number and stopping the script once it’s done.
Now we need to run the other script in the folder called make_page.py using the following command:
python make_page.py 20
What 20 denotes is the number of lines to be used per page. In case it is omitted, the default value is 20. This script will create a folder called pages in the handwritten folder, and the pages of your text will be generated there as PNG images. They will be labelled with numbers denoting the page numbers.
If you would like to use this multiple times, you must make sure that the images and pages folders do not contain anything before running the script. If they do contain something, it will be included in the generation of the handwritten text.
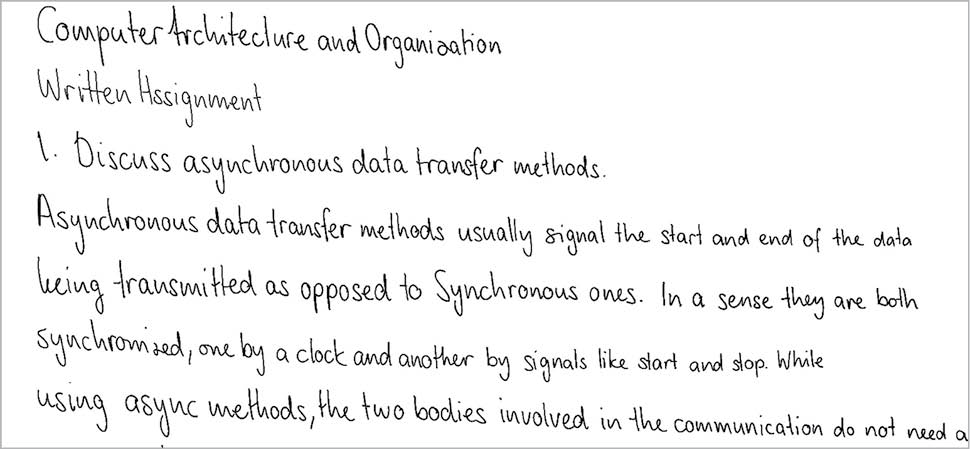
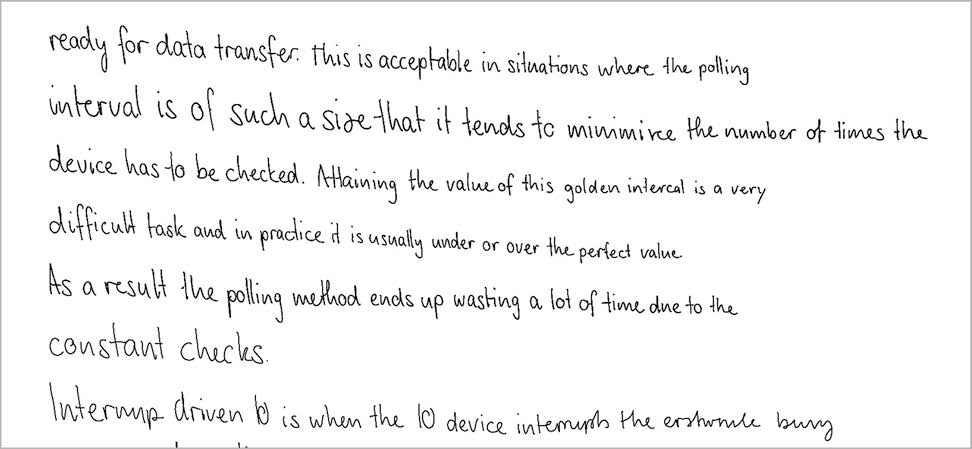
As an example use case, I had submitted one of my assignments using this software. Some of the pages of that assignment are shown in Figures 1 and 2.


