This article is the second in the series on the Selenium IDE, in which we advance further in our exploration of it and, more importantly, its uses in scripting.
The previous article on this topic explored Selenium and its various versions and features. It also provided a comparison table explaining which particular Selenium feature best suits us in different circumstances. So far we know that Selenium is not a single tool but is a complete test suite with multiple utilities. In this article, we will begin with the Selenium IDE and Firebug. The latter is essential for every version of Selenium because it provides a way to control the Web elements like buttons, text boxes, drop downs and radio buttons.

The Selenium IDE
The Selenium IDE is the simplest tool in the Selenium Test Suite. It is a Firefox plug-in, which you can install like all other plug-ins. Though it doesn’t give you many advanced features to tackle complex test cases, it is suitable as a prototyping tool. You will not require any prior programming experience, but awareness of HTML will be helpful. You can export tests from here to Selenium RC and WebDriver.


Downloading and installing the Selenium IDE
So far, I have shared the theory and definitions with you. Now let’s head towards the actual learning process and check out what’s required to master the Selenium IDE.
1. An active Internet connection will be required to download the plug-in from the Internet.
2. We will use Mozilla Firefox as the browser, because the Selenium IDE is available as an installable plug-in for the Firefox browser.
3. Open Mozilla Firefox and directly navigate to the URL http://seleniumhq.org/download/.
4. Under Selenium IDE, you will see the latest version number along with a hyperlink to the download.
5. Firefox will prompt you to enable security notifications, which you need to allow.
6. Once the download is completed, you will see the Install option. Click on the Install button to begin with the installation. Follow the on-screen instructions, if any.
7. Once installation is finished, you will be asked to restart your browser. Click on Restart Now to automatically restart Mozilla Firefox.
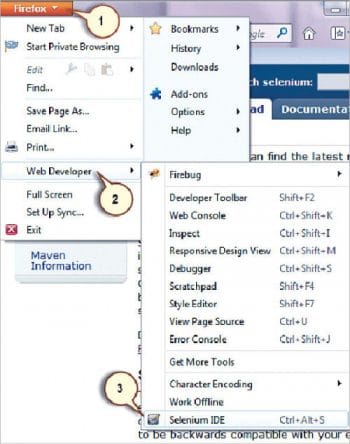
We have now successfully installed the Selenium IDE for Mozilla Firefox and you will see its option under Firefox menu button > Web Developer> Selenium IDE.
Firebug
Firebug is a great utility to inspect the HTML elements and to learn more about the various properties associated with a particular application. In our code, we will be giving the names of the elements we want to work upon. Like Selenium IDE, Firebug is also a useful plug-in available for installation for the Mozilla Firefox browser.
Downloading and installing Firebug
Installing Firebug is as simple as downloading and installing the Selenium IDE.
1. Open Mozilla Firefox and directly navigate to the URL https://getfirebug.com/downloads/.
2. Click on the download hyperlink.
3. On the next screen, click on ‘Add to Firefox’ button.
4. This will begin the download and you will be notified once the download is finished.
5. Once the download is completed, you will see the Install option. Click on the Install button to begin with the installation. Follow the on-screen instructions, if any.
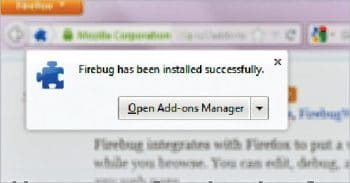
6. Once the installation is finished, you will see a notification saying: ‘Firebug has been installed successfully’.
After installing Firebug, you need not restart Firefox.
Once Firebug is successfully installed, you will see its icon on the top right corner of the screen.
We have now installed the Selenium IDE and Firebug. The greatest utility of Selenium IDE is that it supports Record and Play like the very famous HP UFT/QTP. Let’s hit the Record button and start performing the various operations on the screen, which will be recorded by the Selenium IDE and on playback, it will repeat those steps.
We will continue our journey of mastering Selenium beginning with the very first script in the Selenium IDE, which will be ‘record and play in action’. We will be using the following to make our first script in the Selenium IDE:
1. A working Internet connection.
2. Mozilla Firefox with the Selenium IDE and Firebug already downloaded and installed.
3. Mercury Tours website (http://newtours.demoaut.com/) as the application under test.
Steps for the first script
The steps are listed below:
1. Open Mozilla Firebox.
2. Launch the Selenium IDE by going to Firefox menu button > Web Developer> Selenium IDE.
3. Once the Selenium IDE is launched, set the base URL as http://newtours.demoaut.com/.
4. Press the Record button within the Selenium IDE. This starts the record mode and everything we do further in Mozilla will be added as a command to the Selenium IDE.
5. In the Firebox URL bar, put the address as http://newtours.demoaut.com/ and press Enter.
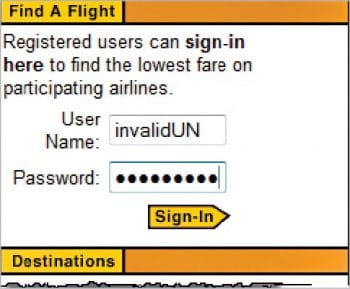
6. It will open up the Mercury Tours website, which will look similar to what’s shown in Figure 5.
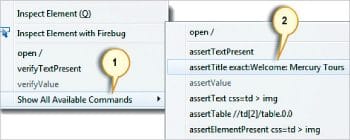
7. Right-click anywhere on the page to select ‘Show Available Commands’.
8. Further, select ‘Assert title exact:’ with which we will verify the title of the Web page. In our case, it should be ‘Welcome: Mercury Tours’ always.
9. In the ‘User Name’ field, type an invalid user name, like ‘invalidUN’.
10. In the ‘Password’ box, type an invalid password, ‘invalidPW’.
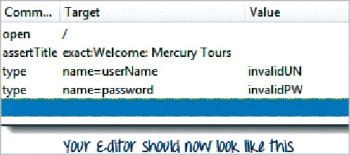
11. You can see the same steps also reflected in the Selenium editor.
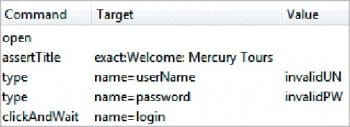
12. Now you need to toggle off the Record button. Your Selenium editor will show an auto generated script as seen in Figure 9.
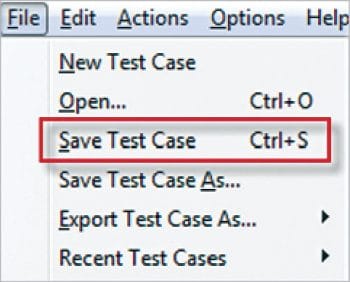
13. In the File menu, select ‘Save Test Case’. Alternatively, you can simply press Ctrl+S. It will save whatever script we have generated as a standalone test case, which we can execute any number of times.
Running the script
To run the script, follow these steps:
1. Go to the Selenium IDE and click on the playback button.
2. This will execute each step in the script flawlessly, and you will see it turn green if it runs successfully.
3. In case there is any discrepancy from the test condition you’ve added, then that particular step will be highlighted in red.
A brief about Selenium commands
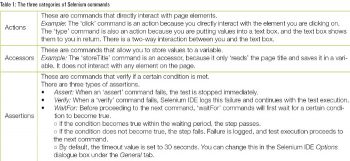
Selenium commands are the statements which tell Selenium what to do at each step and are also referred to as Selenese. These commands are single line statements which might or might not require a parameter. Basically, selenium commands can be divided into three categories (see Table 1):
a. Action: Action commands are those that manipulate the state of the application.
b. Accessor: The Accessor command checks the particular state and saves it into a variable for later use.
c. Assertion: Assertion commands are for verification or validation purposes.
The table above lists a few common Selenium commands.
Once you know the commands, you can manually make the script. This is only an introduction to the Selenium IDE, prior to you moving on to mastering the Selenium Test Suite. Practice it till you perfect it.


