Hosted by the Linux Foundation, the OpenDaylight project was created to promote software defined networking (SDN) and to create a solid foundation for network functions virtualisation. This article takes you through the steps needed to create an application in OpenDaylight.
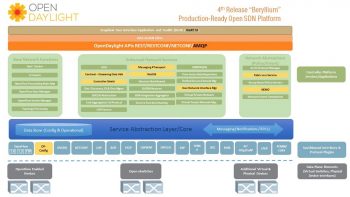
OpenDaylight (ODL) is an open source software-defined networking (SDN) project hosted by the Linux Foundation. It was created in order to advance SDN adoption and build a strong base for network functions virtualisation (NFV). It is a modular platform, with most modules sharing some common services and interfaces. Each module is developed under a multi-vendor sub-project. You can find the list of projects at https://wiki.OpenDaylight.org/view/Project_list.
Technology stack
The technology stack consists of the following four layers.
1. Maven: OpenDaylight uses Maven for its complete build automation, and its archetype has been used for setting up the initial project structure to develop applications.
2. Java: The OpenDaylight framework is built in Java.
3. Apache Karaf: This is a lightweight OSGi container for loading modules/bundles dynamically at runtime.
4. YANG: OpenDaylight uses YANG for data modelling language, RPC and notifications between different modules.
MD-SAL: An overview
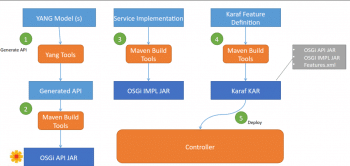
The Model Driven Service Abstraction Layer (MD-SAL) is the core of the OpenDaylight project. It helps in connecting different layers and modules through a well-defined API. The MD-SAL uses YANG as the modelling language for both interface and data definitions, and provides a messaging and data-centric runtime for such services based on YANG modelling. YANG tools are used to compile the YANG template and generate Java classes/interfaces, and automatically build a REST API Doc Explorer.

The flow of the application development process
The prerequisites are:
1. Maven 3.1.1 or later
2. Java 7 or later
3. Eclipse IDE and YANG plugin (optional)
Steps to develop an OpenDaylight controller application
Lets now list the nine steps that will help you build an OpenDaylight controller application for Beryllium release.
Configuring Maven settings.xml
Execute the following commands to set up your maven settings.xml under the ~/.m2 directory:
cp -n ~/.m2/settings.xml{,.orig} ; \wget -q -O - https://raw.githubusercontent.com/OpenDaylight/odlparent/stable/beryllium/ settings.xml > ~/.m2/settings.xml
Make sure MAVEN_OPTS and the JAVA_HOME environment variables are set. If not, configure them as part of ~/.bashrc in Linux, as follows:
export MAVEN_OPTS=-Xmx1048m -XX:MaxPermSize=512m export JAVA_HOME=/usr/lib/jvm/java-1.7.0-openjdk-amd64 export PATH=$JAVA_HOME/bin:$PATH

Setting up the project using Maven Archetype
This is to create a project using the Maven build tool, in which the archetype of OpenDaylight-startup-archetype is used.
mvn archetype:generate -DarchetypeGroupId=org.OpenDaylight.controller -DarchetypeArtifactId=OpenDaylight-startup-archetype -DarchetypeRepository=https://nexus.OpenDaylight.org/content/repositories/public/ -DarchetypeCatalog=https://nexus.OpenDaylight.org/content/repositories/public/archetype-catalog.xml
This will prompt you for the inputs below:
Define value for property groupId: : <com.cloudenablers.networkoptimizer>
Define value for property artifactId: : <networkoptimizer>
[INFO] Using property: version = 1.0.0-SNAPSHOT
Define value for property package: com.cloudenablers.networkoptimizer: :
Define value for property classPrefix: Networkoptimizer: : ${artifactId.substring(0,1).toUpperCase()}${artifactId.substring(1)}
Define value for property copyright: : Copyright (c) 2016 Cloudenablers
Once this is completed, it should have generated the networkoptimizer directory with its sub-folders in the following hierarchy:
+– api
+– artifacts
+– features
+– impl
+– it
+– karaf
+– pom.xml
Building, starting and verifying the application
Execute the following command to build the project:
mvn clean install
Start the OSGi Karaf runtime container, as follows:
karaf/target/assembly/bin/karaf
Verify that the network optimiser module is built and installed as part of Karaf, as follows:
OpenDaylight-user@root>feature:list | grep networkoptimizer
OpenDaylight-user@root>feature:list | grep networkoptimizer
odl-networkoptimizer-api | 1.0.0-SNAPSHOT | x | odl-networkoptimizer-1.0.0-SNAPSHOT | OpenDaylight :: networkoptimizer :: api
odl-networkoptimizer | 1.0.0-SNAPSHOT | x | odl-networkoptimizer-1.0.0-SNAPSHOT | OpenDaylight :: networkoptimizer
odl-networkoptimizer-rest | 1.0.0-SNAPSHOT | x | odl-networkoptimizer-1.0.0-SNAPSHOT | OpenDaylight :: networkoptimizer :: REST
odl-networkoptimizer-ui | 1.0.0-SNAPSHOT | x | odl-networkoptimizer-1.0.0-SNAPSHOT | OpenDaylight :: networkoptimizer :: UI
OpenDaylight-user@root>
Shut down the Karaf container, as follows:
OpenDaylight-user@root>shutdown -f
YANG definition for RPC
As shown below, YANG defines an RPC named service-account with inputs and outputs.
module networkoptimizer {
yang-version 1;
namespace urn:OpenDaylight:params:xml:ns:yang:networkoptimizer;
prefix networkoptimizer;
revision 2015-01-05 {
description Initial revision of networkoptimizer model;
}
rpc service-account{
input {
leaf name {
type string;
}
leaf description {
type string;
}
}
output {
leaf service_name {
type string;
}
}
}
}
On re-building the application with this YANG, it would generate Java Objects and interfaces corresponding to the attributes defined in YANG. Please refer to the following files, which are auto generated under the API sub-directories.
+– NetworkoptimizerService.java
+– ServiceAccountInputBuilder.java
+– ServiceAccountInput.java
+– ServiceAccountOutputBuilder.java
+– ServiceAccountOutput.java
+– $YangModelBindingProvider.java
+– $YangModuleInfoImpl.java
The Eclipse set-up
In Eclipse, import the network optimiser directory generated as the Maven project. This would create different projects in Eclipse for different top folders, in which you can add the api project as dependency to impl.

Implementing RPC
Provide an implementation for the service interface generated by yangtools from the YANG definition of serviceaccount. You can create the file NetworkOptimizerImpl.java, which provides that implementation under impl/src/main/java/com/cloudenablers/networkoptimizer/impl/ and paste the following contents in it:
package com.cloudenablers.networkoptimizer.impl;
import java.util.concurrent.Future;
import org.OpenDaylight.yang.gen.v1.urn.OpenDaylight.params.xml.ns.yang.networkoptimizer.rev150105.NetworkoptimizerService;
import org.OpenDaylight.yang.gen.v1.urn.OpenDaylight.params.xml.ns.yang.networkoptimizer.rev150105.ServiceAccountInput;
import org.OpenDaylight.yang.gen.v1.urn.OpenDaylight.params.xml.ns.yang.networkoptimizer.rev150105.ServiceAccountOutput;
import org.OpenDaylight.yang.gen.v1.urn.OpenDaylight.params.xml.ns.yang.networkoptimizer.rev150105.ServiceAccountOutputBuilder;
import org.OpenDaylight.yangtools.yang.common.RpcResult;
import org.OpenDaylight.yangtools.yang.common.RpcResultBuilder;
public class NetworkoptimizerImpl implements NetworkoptimizerService {
@Override
public Future<RpcResult<ServiceAccountOutput>> serviceAccount(ServiceAccountInput input) {
ServiceAccountOutputBuilder serviceAccBuilder = new ServiceAccountOutputBuilder();
serviceAccBuilder.setServiceName(RPC request successful for Service Name: + input.getName());
return RpcResultBuilder.success(serviceAccBuilder.build()).buildFuture();
}
}
Registering RPC
Add RPC registration in the file NetworkoptimizerProvider.java under impl/src/main/java/com/cloudenablers/networkoptimizer/impl/ with the following content:
package com.cloudenablers.networkoptimizer.impl;
import org.OpenDaylight.controller.sal.binding.api.BindingAwareBroker.ProviderContext;
import org.OpenDaylight.controller.sal.binding.api.BindingAwareBroker.RpcRegistration;
import com.cloudenablers.networkoptimizer.impl.NetworkoptimizerImpl;
import org.OpenDaylight.yang.gen.v1.urn.OpenDaylight.params.xml.ns.yang.networkoptimizer.rev150105.NetworkoptimizerService;
import org.OpenDaylight.controller.sal.binding.api.BindingAwareProvider;
import org.slf4j.Logger;
import org.slf4j.LoggerFactory;
public class NetworkoptimizerProvider implements BindingAwareProvider, AutoCloseable {
private static final Logger LOG = LoggerFactory.getLogger(NetworkoptimizerProvider.class);
private RpcRegistration<NetworkoptimizerService> optimizerService;
@Override
public void onSessionInitiated(ProviderContext session) {
LOG.info(NetworkoptimizerProvider Session Initiated);
optimizerService = session.addRpcImplementation(NetworkoptimizerService.class, new NetworkoptimizerImpl());
}
@Override
public void close() throws Exception {
LOG.info(NetworkoptimizerProvider Closed);
}
}
Rebuilding and starting Karaf
To rebuild and start Karaf, type the following commands:
mvn clean install
karaf/target/assembly/bin/karaf
Verifying the networkoptimizer module RPC
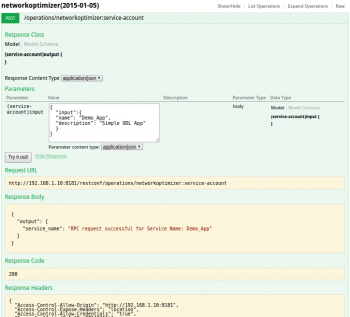
Launch the OpenDaylight API Doc Explorer with http://127.0.0.1:8181/apidoc/explorer/index.html, and select the networkoptimizer module.
Note: Default credential for authentication in Apache Karaf is admin/admin.
POST /operations/networkoptimizer:service-account
Request:
{
input:{
name: Demo_App,
description: Simple ODL App
}
}
Response:
{
output: {
service_name: RPC request successful for Service Name: Demo_App
}
}
If youd like to try out this application, then please refer to the GitHub URL


