We are steadily getting some expertise in creating Android apps with App Inventor 2. If you have been following the series, then this is one more interesting app for you. For those who are just joining us, we recommend that you go through the previous issues of OSFY to gain expertise in creating your own apps.
Heres yet another chapter in this series on mastering Android app development. This time, we will be using the inbuilt Google Maps feature of Android. Google Maps is the most reliable resource for commuters new to any area. Keeping that revolutionary feature in mind, lets look at what to expect from the silent feature and how effective it is in making our lives simpler.
The idea behind the application
The idea behind the application revolves around the very common problem many of us face when we park our car in an unfamiliar area, and find it difficult to locate it later. So lets make an Android application that will save the location of your car once you park it and later, you can trigger the app to show you the route from your current point to the car. So without much ado, lets go ahead and look at what else we will need.
As we move ahead, we will discuss GUI requirements first because if we have these ready, then it is easy to assign or implement the behaviour of the application.
GUI requirements
For every application, there is a graphical user interface or GUI, which helps the user to interact with the on-screen components. How each component responds to user actions is defined in the block editor section.
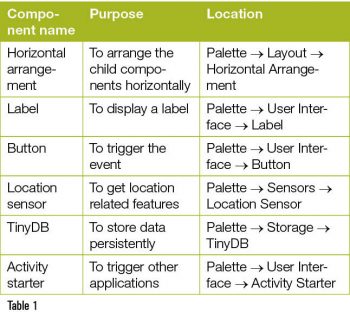
As per our requirements, we will need the following components.
1. Activity starter: This is used to trigger various other processes outside our application. So in this case, since we will be launching the maps application from within our device, we will require it.
2. Label: Labels are the static text components used to display some headings or markings on the screen.
3. Button: This will let you trigger the event and is a very essential component.
4. Horizontal arrangement: This comprises special components, which keep all child components horizontally aligned.
5. TinyDB: We need to save the address in the database so that we can retrieve it later; hence, the TinyDB component will be helpful. It keeps the data persistently, which means it will keep the data even if you close the app and will be available when you start the app again.
6. Location sensor: This can provide you with your current geographical position. Google Maps uses latitude and longitude for navigation and, hence, it is used to fetch the GPS coordinates.
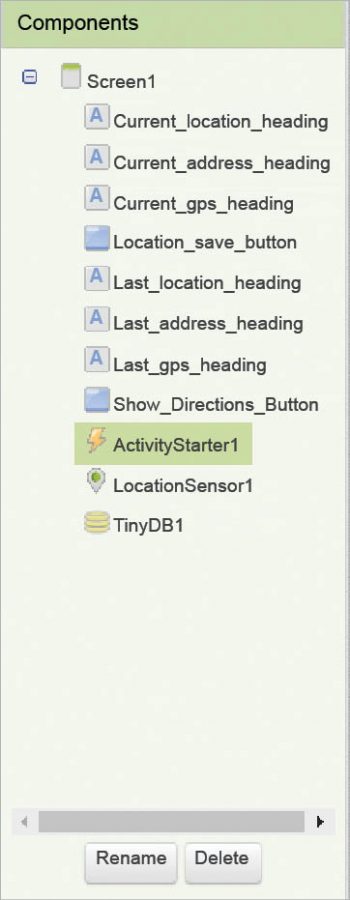
The components that we will need for this application are listed in Table 1. Lets drag them on to the designer from the left-hand side palette.
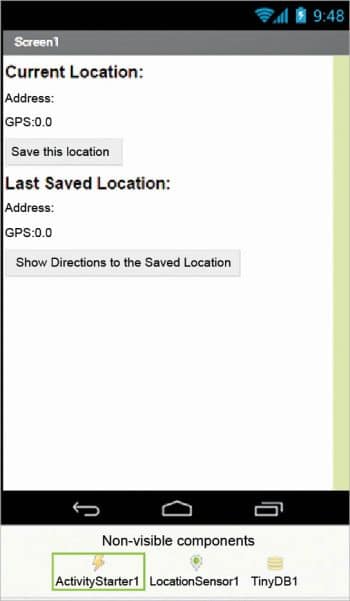
1. Drag and drop the components mentioned in Table 1 to the viewer.
2. While some components will be visible to you, non-visible components will be located beneath the viewer under the non-visible tag.
3. All buttons need to be put within the Horizontal arrangement so as to keep them aligned horizontally.
4. If you have dragged and placed everything, the layout will look something like whats shown in Figure 1.
5. Make the necessary property changes like we did in changing the text property for the label and button components.
6. This way, your graphical user interface is ready. Figure 1 shows how the application will look after the installation.
This time, you will see the activity starter for the first time, so you might also be curious to know what it does and how this is accomplished. The activity starter is used to trigger an already installed application in order to communicate with other applications. It will require certain application-specific inputs. To open Google Maps, we have to set the following properties of the activity starter in the designer itself.
Now we will head towards the block editor to define the behaviours. So lets discuss the actual functionality that we are expecting from our application.
1. We want the application to be able to get our current location.
2. On pressing the Location_Save_Button, the app should save our location in terms of latitude and longitude, to the tiny database of the device.
3. If any previous location was saved, on pressing the Location_Save_Button, it should overwrite previous records.
4. On pressing the Show_Directions_Button, it should be able to take us to the Google Maps application where it will show us the route between the two points.
So lets move on and add these two behaviours using the block editor. I hope you remember how to switch from designer to block editor. There is a button available right above the Properties pane to do so.
Block editor blocks
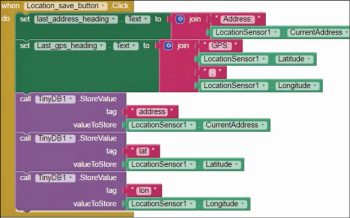
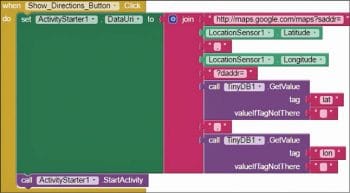
I have already prepared the blocks for you. All you need to do is drag the relevant blocks from the left-side palette and drop them on the viewer. Arrange the blocks in exactly the same way shown in the above block editor images. I will explain what each does and how it is called.
1. The blocks in Figures 3, 4 and 5 are easy to understand. I will explain each of them here.
2. The very first block is meant for the location sensor and to keep track of any location changes.
3. As soon as it senses any change in the location, it will display the same against the labels we have put for the address, latitude and longitude.
4. When we click the Save location button, as expected, it should store all available entries in the database.
5. We should save addresses, latitudes and longitudes with their respective tag names for better retrieval when needed.
6. This will update the labels for the last saved location as well.
7. On clicking the Show directions button, our activity starter should trigger Google Maps, and the route between the two GPS points will be shown.
8. We will accomplish that by setting the data URI of the starter activity.
9. Finally, starting the activity will start Google Maps, from out of our application.
Now you are done with the block editor too. Next, we will move to download and install the app on your phone to check how it works.

Packaging and testing
To test the app, you need to get it on your phone. First, you have to download it to your computer and then move it to your phone via Bluetooth or USB cable. Ill tell you how to download it.
1. On the top row, click on the Build button. It will show you the option to download the apk to your computer.
2. While downloading, you will be shown the progress and, after its done, the application will be placed in the download folder of your directory or the location you have set for it.
3. Now, you need to get this apk file to your mobile phone either via Bluetooth or USB cable. Once you have placed the apk file on your SD card, you need to install it. Follow the on-screen instructions to install it. You might get some notification or warning saying: Install from untrusted source. Allow this from the settings, and after successful installation you will see the icon of your application in the menu of your mobile. Here, you will see the default icon, which can be changed and we will tell you how to do this as we move ahead in this course.
I hope your application is working exactly as per your requirements. Now, depending upon your usability and customisation, you can change various things like the image, sound and behaviour.
Debugging the application
We have just created the prototype of an app with very basic functionality, but what else might a user be interested in? Lets look at various cases which require serious attention so as not to annoy the user.
1. Can we code it to store more than one location, so that it doesnt overwrite the previous one?
2. Can we share our location with others also, so that they too get to know about our whereabouts?
These are some of the scenarios that might occur, and users will be pretty happy if your app could address these needs too. So think about how you can integrate these into the app. Do ask me if you fail to accomplish any of the above cases.


