The standard release of Drupal is called the Drupal Core. It contains the basic features of content management systems (CMS). It is a simple website, where you can add content and change themes according to your wish.
There are many developers who are actively working in the community. The issues are solved within a very short period of time and the community tries to make Drupal bug-free. Drupal 8 is the latest version, and it recently achieved zero critical issues. This is really a great achievement and becoming a part of this organisation is something special.
Drupal promises lots of opportunities to students. There are frequent Drupal conferences happening around the globe, where you can conduct sessions as a speaker. Drupal is also an active Google Summer of Code organisation. Being a part of this community will definitely benefit you a lot. You can work with a lot of experienced developers and explore many new interesting things. There are many mentors who are ready to help you at any point in time.


Installing Drupal
Ensure that you have installed Git on your system. We will be cloning the Git repository of Drupal.
Also, make sure that you have the LAMP (Linux, Apache, MySQL, PHP) stack installed in your system. LAMP supports Drupal with lots of interesting features, which you can explore. If you have PhpMyadmin installed too, it will be really helpful, especially when working with the database.
Now, move on to installing Drupal. Since we are focusing on the developer approach, lets clone a developer version of Drupal 8. Lets start with the 8.0.X version.
Once you have installed the LAMP stack, I hope you get the /var/www/html location. Inside that, create any folder, as follows:
$mkdir Drupal8$cd Drupal8So, to start cloning enter$git clone --branch 8.0.x http://git.Drupal.org/project/ |
This will give you Drupal 8 cloned in your system. Once the cloning is done, we need to start the installation process. Open your browser and go to the location of Drupal. It will most probably be localhost/Drupal8/Drupal.
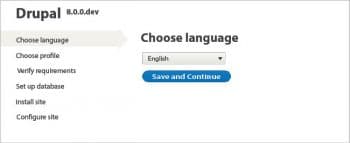
I hope you got something like whats shown in Figure 1.
You are asked to choose the language. Do so, then click on Save and Continue.
Now, click on Standard. This will have all the required basic features of Drupal. You will then be led to the Drupal Requirements page. Ensure that you meet all the conditions. If you get a red mark across any of the requirements, fix it before going forward.
A clean URL is an issue that has challenged me quite often. But, what is a clean URL? If you ignore this issue and go ahead with the installation, Drupal will get installed in your system. But, when you start using it, you will understand there is a bit of a problem. Because, when you click on any link in the home page, you will get a Page not found message. However, when I added index.php soon after Drupal in the URL, i.e., localhost/Drupal8/Drupal/index.php/something, I could reach the required link. But, as you all know, it is tedious to add index.php every time. So the small fix that I found for this issue is as follows:
$sudo a2enmod rewrite |
Open your Apache file
$sudo gedit /etc/apache2/apache2.conf |
Usually, the localhost will be in /var/www/html, so add the following lines at the bottom of the Apache file
<Directory /var/www/html/*>AllowOverride All</Directory>AccessFileName .htaccess |
Now, restart the Apache server
$sudo service apache2 restart |
Now, refresh the Requirements page and the issue will be fixed.
Once all the basic requirements are satisfied, you need to take some other small steps. You need to create a directory called sites/default/files as follows:
$mkdir sites/default/fileshttps://www.Drupal.org/project/project_theme |
Now, make the directory writeable by using the following command:
$chmod a+w sites/default/files |
Next, create a new file sites/default/settings.php and copy the contents from sites/default/default.settings.php to the new file, as follows:
$cp sites/default/default.settings.php sites/default/settings.php |
Now, make the file created writeable by using the code shown below:
$cp sites/default/default.settings.php sites/default/settings.php |
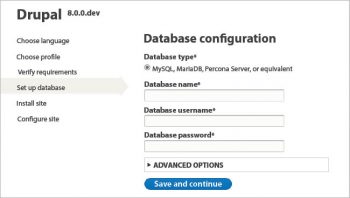
Once you are done with all the requirements, you will be guided to the database configuration page.
Go to your phpmyadmin. Open a new tab and go to localhost/phpmyadmin.
Log in with your user credentials. Click on Database and under Create database, enter any database name and click on Create. You will see the new database created in the database list.
Now go back to the installation page. Enter the database you have created. Also add your database user name and password. Once you are done, click on Save and Continue.
Once the database details you have entered are verified, the Drupal installation begins. I hope you are able to see something like whats shown in Figure 3.
It may take a couple of minutes to complete. When the installation ends, start configuring your sites. Add a stylish site name, give a site email address and fill all the fields as per the instructions on the page.
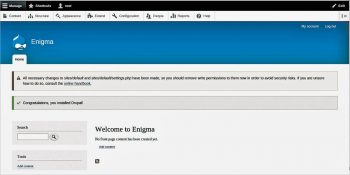
You have now built a Drupal site and should see something like whats shown in Figure 4.
You can go through the various links and start exploring and experiencing Drupal. I am sure you have enjoyed this installation, which hasnt taken long.
If you go to Appearance, you can change the theme. You can either select themes from the given options or install one from https://www.Drupal.org/project/project_theme. Copy the address of the tar file that you would like to install. Select Install new theme in Appearance. Paste the link and click on Install for the new theme to get installed.


Find and fix bugs
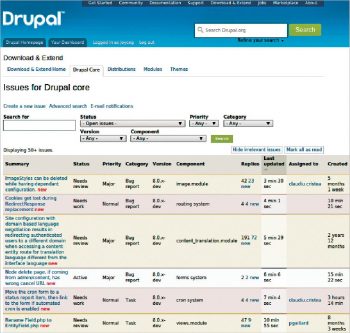
You can start contributing to open source projects by fixing some bugs in the Drupal core. Create an account in https://www.Drupal.org. There is an issue queue in Drupal, where you can see all the bugs reported. Visit https://www.Drupal.org/project/issues/Drupal. You should see something like whats shown in Figure 5.
This list consists of all the issues or bugs of Drupal. It gives a brief summary of all the issues.
You can add filters and choose issues as per your requirement. If you want to start working on any bug, its better to change the status fields value in the filter to Active. This will show up all the bugs you can start with. Open issues will contain the list of all issues those under review, those that have been fixed and also those that are yet to be worked upon.
Since we have installed a particular version of Drupal (8.0.x), change the version to 8.0.x-dev. You can select the priority as per your wish. Now, search for issues. If you find one that you can solve, open the issue. Read the report about it given in the issue link. The comments may be really useful. Go through them and once you think you can work on it, click on Update this issue. On the Assigned option, choose your user name (I hope you are logged in to your account) and click on Save. This ensures that you are working on this issue.
Now, make the required changes in the code and test it locally.
Submitting a patch
Once you are done with the required changes, we need to upload it to the issue queue. Drupal generally accepts Git diffs, i.e., you need to upload only the patch.
So, get the Git diff. Go to your Drupal Git repo in your system and do a Git diff. There is a format for the file in which the diff should be stored. It is of the form:
bugId-short_description_of_the_comment-new_comment_number.patch |
Give a very short description of the comment. New Comment Number is the comment to which the patch is supposed to get attached, which can be seen on the issue page.
So, the Git diff will be of the form:
git diff 8.0.x > bugId-short_description_of_the_comment-new_comment_number.patch |
Once you have stored the patch file, we need to upload it to get it reviewed. Go to the issue link and then to the bottom of the page. You will see the Add a new file option. Upload the patch and click on Save. Now, click on Update this issue and change the status to Needs review. The patch you have uploaded is now ready to get reviewed. The patch also undergoes some basic tests, which will check the coding standards and a few other basic aspects. If your patch passes the tests, you will get a green coloured box with the patch inside it, just like whats shown in Figure 6.
The patch will then get reviewed by the developer community and if there are any more modifications needed, you will be informed. If you have uploaded the right patch, the issue will be closed. The review process may take a bit of time, as there are many issues which are under review daily.


Get connected with developers
Always ensure that you are in good contact with community developers. Interact with them as much as possible. IRC channels are available for those behind the development of Drupal to communicate with developers. You can contact them at #Drupal, #Drupal-contribute and #drupa-support at Freenode. You can talk with mentors here. You can interact with the issue reporters to get a clear understanding of the problem. There are also mailing lists you can subscribe to, to ensure that you dont miss any updates from the Drupal community. You can get these mailing lists at https://www.Drupal.org/mailing-lists. Ensure that you are aware about the various Drupal conferences happening, and try to attend some of them. Drupal is also offering grants for students.
Google Summer of Code is another opportunity for students to get involved with Drupal projects. You can work on some awesome projects and also get connected to many mentors.


C:xampphtdocsdrupal>git clone –branch 8.0.x http://git.Drupal.org/project/
Cloning into ‘project’…
fatal: repository ‘http://git.Drupal.org/project/’ not found