Chrome is a free Web browser developed by Google. It is considered one of the best for Windows, Linux and OS X, as well as for smartphones running Android or iOS. Read on to learn how to build an extension for it within minutes.
Apart from an easy-to-use interface, Google Chrome offers users a range of key features. These include:
- Bookmarks and settings synchronisation: This allows users to synchronise bookmarks, history and other such important settings through their Google account.
- Web standards support: Chrome supports the latest standards such as HTML5, CSS3, etc.
- Security: The browser warns users when they attempt to visit a site flagged as potentially harmful (malware or phishing sites).
- Plugins: Chrome supports third party plugins such as NPAPI, ActiveX, etc.
- Privacy: Chrome’s private browsing feature prevents the browser from permanently storing any history or cookies from the websites visited.
- User interface: This browser has tabs and Omni Box (a URL box, which combines functions of both the address bar and the Google search box).
- Themes: Users can install these to alter the appearance of their Chrome browser.
- Automatic Web page translation: When Chrome detects a language which is not the user’s preferred choice as set during installation, it automatically asks the user whether or not to translate it.
- Extensions: Chrome allows users to use third-party features via extensions.
What are Google Chrome extensions?
Google Chrome extensions are browser extensions, which enhance, augment or add some extra features to the Chrome browser. These extensions are basically written using common Web technologies like HTML, JavaScript and CSS. The extensions are hosted on the Chrome Web Store. This is an extension gallery, through which users can download and install the extension.
Let us now create an extension for Chrome.

Creating an extension
We are now going to develop a simple and useful extension. Let us call it the ‘WikiSearch’ extension, which will allow users to search any highlighted word on wikipedia.org. Users will highlight the word they wish to know more about, in the browser, and then right-click the highlighted word, before selecting the ‘WikiSearch’ option from the context menu. After doing this, users will be redirected to the relevant Wikipedia page.
We are going to use basic Web technologies:
- HTML for the entry point of our extension
- JavaScript for the logic

Setting up the development environment
Let us set up a file structure for our extension, and create a new folder on the computer. In our case, C:\wikisearch is the extension’s folder. Now, inside that new folder, create a folder called images.
In the root directory of our extension folder, create an empty text file, called manifest.json and create an empty HTML file called background.html. Also create an empty JavaScript file that you can call logic.js.
You should end up with the following directory structure:
- images\
- background.html
- manifest.json
- logic.js
Description
Images is the directory containing icons or images which we will be using in our extension.
background.html is the entry point of our extension. The logic for the extension will be loaded from here.
manifest.json is a metadata file in the JSON format that contains basic properties like the extension’s name, description, version number, etc. logic.js is a JavaScript file containing the logic for the extension.
Adding icons or images for our extension
Here, we are going to add an icon just to make our option in the context menu more appealing. Go to http://www.flaticon.com/search/magnifier and download any one icon, preferably in the .png format of size 16×16, and copy it to the images folder located in our extension’s folder. Also rename that image to ‘search.png’.
Creating the manifest file
Open the manifest.json file and copy the following JSON code:
{
"manifest_version": 2,
"name": "Wiki Search",
"description": "Searches for the selected text on Wikipedia.org",
"version": "1.0",
"minimum_chrome_version": 20,
"permissions": ["contextMenus", "tabs"],
"icons": {
"16": "images/search.png"
},
"background": {
"page": "background.html"
}
}
This code has been written in JSON format. It consists of general information about the extension such as its name, description, version, minimum version of the Chrome browser it supports, icons/images used in the extension and so on.
Parameter description
- ‘manifest_version’: Specifies the version of the manifest; the value must be 2.
- ‘name: Specifies the name of the extension.
- ‘description’: Specifies a short description of the extension.
- ‘version: Specifies the version of the extension.
- ‘minimum_chrome_version’: Specifies the minimum version of the Chrome browser required to run the extension.
- ‘permissions’: Specifies which Chrome APIs are to be used. We are using ‘contextMenus’ and ‘tabs’.
- ‘icons’: Specifies the location of the icons/images we are going to use in our extension.
- ‘background’: Specifies that the page `background.html` should load as soon as the user starts the Chrome browser. Basically, this will be the entry point for our extension.
Adding JavaScript
Open the logic.js file located in our extension directory, and add the following JavaScript code:
searchWikipedia = function(word){
var query = word.selectionText;
chrome.tabs.create({url: 'https://en.wikipedia.org/wiki/' + query});
};

chrome.contextMenus.create({
title: 'Wiki Search',
contexts:['selection'],
onclick: searchWikipedia
});
The ‘searchWikipedia’ function gets the value of the element ‘word.selectionText’, and stores it in the variable named query. Now, using DOM, we just append the extracted value with the URL of the Wikipedia search engine to load the page with query search results.
The next task is to create the UI for our extension, since we are providing the option in the context menu. We will be using the contextMenus.create() function to create customised context menu. This function has some key:value parameters such as the title, contexts, and the single most important event which specifies what must be done when certain browser based events occur (i.e., in our case, the searchWikipedia() function will be called).

Creating an entry point
Open the background.html file and add the following HTML code:
<!DOCTYPE html> <html> <body> <script src=logic.js></script> </body> </html>
This is the HTML code to load our extension’s logic. So you are done; now let us load the extension.
Loading the extension
Generally, extensions for Chrome are packaged up as .crx files. Also, there is a quick alternative and user-friendly way of loading extensions.
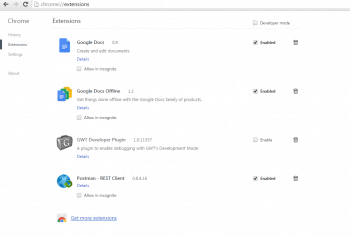
1. Open up the Chrome menu by clicking the icon that’s to the right of the address bar and select Extensions under the Tools menu or just enter ‘chrome://extensions’ in the address bar before hitting Enter, as shown in Figure 1.
2. Check the Developer mode checkbox in the top right-hand corner if it hasn’t been checked.
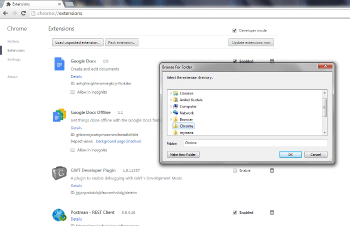
3. Now, click on Load unpacked extension, which will open up the file-selection dialogue box, as shown in Figure 2.
4. Navigate to the directory where your extension files are, and select it.
Another easy way is to simply drag and drop the extension folder onto chrome://extensions in your browser to load it. The extension will install/load right away. If you make some errors while creating the extension, it will not load and will display an error message at the top of the page. You have to rectify the error and then try again.

Running the extension
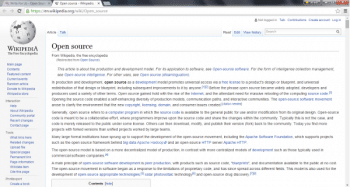
After installing/loading the extension, you can test it by highlighting some text and then selecting the Wiki Search option from the right-clicked context menu. As an example, we tested the extension by highlighting the word ‘open source’ on https://www.opensourceforu.com/ and then selected the Wiki Search option from the right-clicked context menu, as shown in Figure 3. This opened Wikipedia search results for ‘open source’ in a new tab in the Chrome browser, as shown in Figure 4.


This is awesome, easy to follow tutorial.
“FireShot extension lets you screenshot a section, the visible part or the entire page. So that’s better than the first suggestion from this post
“
thanks for your awesome post. I am going to use extensions 6,7 which make me able to save and share any content to Facebook. My question: what difference does it make to directly share to Facebook, or using these extensions, in terms of the added Facebook ranking? I’ve heard that Facebook ranks are increased only if one directly shares posts (or any other engagement) to Facebook, and not by third party tools…