Computer vision is a domain that’s under active research, with applications spreading across a spectrum of fields such as robotics, human computer interaction (HCI), etc. Computer vision involves tasks such as image reception, processing, reasoning, video stream handling, etc. These tasks involve a lot of mathematical processing, which is not easy to implement. To handle this problem and make the life of the developer simpler, frameworks like SimpleCV become handy.
SimpleCV
SimpleCV is an open source framework for performing computer vision tasks. And like its name suggests, it has made computer vision simple. The complexities associated with OpenCV have been taken care of in SimpleCV by providing direct-to-use functions for performing repeatedly used computer vision tasks. SimpleCV is written in Python and can be installed in all major operating systems such as Linux, Windows and Mac. It is available with the BSD licence.
SimpleCV allows developers to handle both images and videos. The source image/video is acquired directly using various input sources as listed below:
- Web cams
- Kinects
- FireWire and IP cameras
- Mobile phone cameras
SimpleCV facilitates not only making changes to the images but also allows them to be understood.

Installation
SimpleCV can be installed on all major operating systems. As it makes the computer vision code simple by providing a wrapper over existing libraries, it has many dependencies. Hence, during installation, all those dependencies need to be taken care of for making SimpleCV ready to run. The process of installation varies in different operating systems. The dependencies for SimpleCV are shown in Figure 1.
If you prefer to install SimpleCV in Ubuntu, use the following commands:
sudo apt-get install ipython python-opencv python-scipy python-numpy python-pygame python-setuptools python-pipsudo pip install https://github.com/ingenuitas/SimpleCV/zipball/master |
Once the installation has been successfully completed, run simplecv from the console.
For Windows operating systems, there are two different ways of installing SimpleCV. One method is to download the Windows Superpack from http://www.simplecv.org/download/ . This super pack includes all the dependencies required for SimpleCV installation.
However, if your system already has some of the dependencies and you want to keep them as they are, then individual components can be downloaded separately, as shown below:
1. Download and install Python 2.7 using http://www.python.org/ftp/python/2.7.3/python-2.7.3.msi
2. The Python set-up tools for Windows can be downloaded from http://pypi.python.org/packages/2.7/s/setuptools/setuptools-0.6c11.win32-py2.7.exe
3. Installation of the SciPy super pack can be carried out using http://sourceforge.net/projects/scipy/files/scipy/0.9.0rc5/scipy-0.9.0rc5-win32-superpack-python2.7.exe/download
4. Installation of the NumPy super pack can be done by using http://sourceforge.net/projects/numpy/files/NumPy/1.6.2/numpy-1.6.2-win32-superpack-python2.7.exe/download
5. Installation of Pygame for Windows can be done using http://pygame.org/ftp/pygame-1.9.1.win32-py2.7.msi
6. Installation and configuration of OpenCV can be done by using http://sourceforge.net/projects/opencvlibrary/files/opencv-win/2.3.1/OpenCV-2.3.1-win-superpack.exe/download
After the downloading has been completed, execute the .exe file and extract to the folder C:\OpenCV2.3\. It can be extracted to any other folder too, but the environment paths are to be set accordingly.
After the installation is over, set the ‘PATH’ variables accordingly, as shown below:
SETX PATH C:/Python27/;C:/Python27/Scripts/;C:/OpenCV2.3/opencv/build/x86/vc10/bin/;%PATH%SETX PYTHONPATH C:/OpenCV2.3/opencv/build/python/2.7/;%PYTHONPATH% |
To update the ‘path’ variables, it is required that you close the current command prompt and reopen it. Then execute the following commands:
easy_installpyreadlineeasy_install PILeasy_installcythoneasy_install pippip install ipythonpip install https://github.com/ingenuitas/SimpleCV/zipball/1.3 |
After the successful installation by executing the above commands, type simplcv from the command prompt at the installation folder, to open the simplecv shell. Otherwise, you may click on the SimpleCV icon on the desktop.

SimpleCV shell
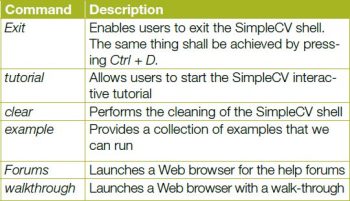
The SimpleCV shell allows us to execute the commands and get the results in an interactive manner. Some of the shell interaction commands are as listed in Table 1.
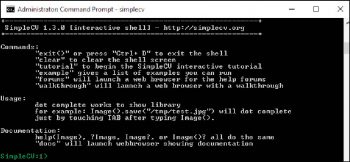
The SimpleCV console is shown in Figure 2.
SimpleCV incorporates a detailed and elegant help system. The help on any of the components/libraries can be retrieved by using the Help command. An example of a command and its output is listed below:
SimpleCV:1> help(Image) |
The successful response for the above command would be:
Help on class Image in module SimpleCV.ImageClass:class Image| **SUMMARY**| The Image class is the heart of SimpleCV and allows you to convert to and| from a number of source types with ease. It also has intelligent buffer| management, so that modified copies of the Image required for algorithms| such as edge detection, etc can be cached and reused when appropriate.|| Images are converted into 8-bit, 3-channel images in RGB colorspace. It will| automatically handle conversion from other representations into this| standard format. If dimensions are passed, an empty image is created.|| **EXAMPLE**|| >>>i = Image(/path/to/image.png)| >>>i = Camera().getImage()|| You can also just load the SimpleCV logo using:|| >>>img = Image(simplecv)| >>>img = Image(logo)|| Or you can load an image from a URL:|| much more here ... |
A detailed tutorial on interactive shells is provided at http://tutorial.simplecv.org/en/latest/examples/shell.html


SimpleCV HelloWorld
As stated in the beginning of this article, the core idea of SimpleCV is to make machine vision simple. A HelloWorld example is shown below:
from SimpleCV import Camera# Initialize the cameracam = Camera()# Loop to continuously get imageswhile True:# Get Image from cameraimg = cam.getImage()# Make image black and whiteimg = img.binarize()# Draw the text Hello World on imageimg.drawText(Hello World OSFY !!!)# Show the imageimg.show() |
As can be observed from the code sample, SimpleCV provides direct functions for performing the vision tasks. The first step is to get the image source from a camera, which can be done using the cam.getImage(). To convert into black and white, the direct function img.binarize() should be used. Similarly, drawing the text also can be carried out using the simple method img.drawText(). The output image can be displayed using img.show().
SimpleCV provides mechanisms to capture the live camera feed using simple methods as shown below:
from SimpleCV import Cameracam = Camera()cam.live() |
An example of machine learning
Apart from performing the simple image manipulation tasks as shown in the HelloWorld example, it allows us to perform comparatively advanced tasks such as image classification. The classification is based on the machine learning. A sample code for performing classification is available at the official code repository of SimpleCV (https://github.com/sightmachine/SimpleCV/blob/develop/SimpleCV/examples/machine-learning/machine-learning_nuts-vs-bolts.py). This example classifies the given image into ‘Nuts’ and ‘Bolts’ using the Scikit-learn library. Image features such as “area,” “height,” and “width” are extracted from the images for classification purposes.
SimpleCV Blob handling
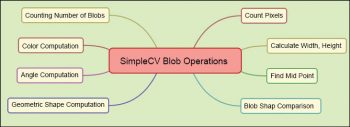
Blobs are regions of similar pixels. Blobs are used to detect items of interest in the image. Once the blobs are identified, many operations shall be performed as shown in Figure 3.
A simple code for blob handling is as shown below:
from SimpleCV import Imagecoins = Image('coins.png')binCoins = coins.binarize()blobs = binCoins.findBlobs()blobs.show(width=8) |
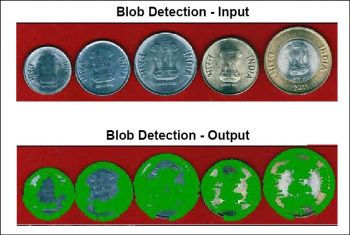
After binarizing the image, the blobs are identified by directly applying the function ‘.findBlobs()’. The example program loads an image with coins in it. The findBlobs is used to identify the pixels representing the coins leaving the background pixels. The screenshot of the input and output images for the blob detection are as shown in Figure 4.

Motion Detection Example
Motion detection is an important task in many machine vision applications. SimpleCV allows the developer to perform the motion detection task using less than ten lines of code as shown below:
from SimpleCV import *cam = Camera()threshold = 5.0 # setting an adjustable threshold for motion detectionwhile True:previous = cam.getImage() #get the current imagetime.sleep(0.5) #pause for half a second. The 0.5 can be adjustedcurrent = cam.getImage() #get another imagediff = current - previous # compute the image differencematrix = diff.getNumpy()mean = matrix.mean()diff.show()if mean >= threshold:print "Some Movements Detected" |
As it can be observed from the aforementioned code, the motion detection is carried out by subtracting the current image from the snapshot taken half a second ago. The SimpleCV facilitates direct subtraction of these image shots as shown in the code.
A detailed capability demo of SimpleCV is available at https://youtu.be/UZSm7Q2bZoc. In Summary, SimpleCV really makes the Vision computing easy by providing a wide collection of methods. As it is Python based, the seamless integration shall be performed with other useful Python Libraries.


Oct. 19, 2016
SimpleCV.org seems to be inactive.
I am not getting any responses from there.
Does anyone know how to get around the error message:
The ‘IPython.config’ package has been deprecated. You should import from traitlets.config instead.
I am running in Windows 10 and downloaded the SimpleCV package from SimpleCV.org.
I appreciate the long posting by K S Kuppusamy, but I still am unable to run/use SimpleCV.
I uninstalled everything related to python and simplecv, etc. and started from scratch as indicated in the posting. I chose to “download the Windows Superpack from http://www.simplecv.org/download/ . This super pack includes all the dependencies required for SimpleCV installation.” And installed from the downloaded file SimpleCV-1.3.msi
Then I skipped all the steps involved in installing the ” individual components can be downloaded separately, as shown below:”
It is unclear to me whether I should follow these instructions
” Then execute the following commands:
easy_installpyreadline
easy_install PIL
easy_installcython
easy_install pip
pip install ipython
pip install https://github.com/ingenuitas/SimpleCV/zipball/1.3”
I did not do these and I do not see a SimpleCV icon on my desktop. I do see icons for IDLE (Python GUI) and Python (command line) and they work.
BUT I do not understand how to run SimpleCV using either the IDLE or command window.
I don’t understand this statement: “type simplcv from the command prompt at the installation folder, to open the simplecv shell”. What is the “installation folder”?
How do I get a command prompt at the installation folder?
When I type simplecv.exe in the command window, I am told that the ipython package has been deprecated and to use triatlets.config instead.
I have no idea of how to get the simplecv shell by importing from traitlets.config.
HELP
Thanks,
Bob
same issue as bob