Whenever a computer is switched on, the boot loader is the first software program to run on it. The boot loader is responsible for the loading of the kernel software, which in turn loads the operating system. GNU GRUB is a multi-boot boot loader and is one of the most used. Most of the popular operating systems have GNU GRUB because of its user-friendly design and support for multiple boots.
History of GRUB
It all started in 1995, when Erich Boleyn was trying to boot the GNU Hurd with the GNU Mach (earlier known as the University of Utahs Mach 4 microkernel). The aim of developing GRUB was mainly to offer support for compatibility on different machines and operating systems. The idea of modifying the FreeBSD boot loader was dropped when Boleyn realised that it was easier to develop a boot loader rather than modify the current one. GRUB had a lot of features added by Boleyn, which makes it stand out from all the existing boot loaders.
Later, in 1999, GRUB was adopted as an official GNU package by Gordon Matzigkeit and Yoshinori K. Okuji. The latest sources were made available through Anonymous CVS for the development of GRUB.
In later years, GRUB was further developed and more features were added. But it soon became obvious that the design of GRUB was incompatible with the new features that were planned for it.
Around 2002, Okuji started rewriting GRUB to make it cleaner, safer and more powerful than the previous version, which was known as Preliminary Universal Programming Architecture (PUPA for GNU GRUB). PUPA was eventually renamed GRUB 2, and the original GRUB was named GRUB Legacy. The last stable release for GRUB Legacy came out in 2005.
GRUB 2 was widely accepted by the computer science community. Most of the Linux distributions started using GRUB 2 and by the end of 2009, multiple major distributions were installing it by default.
The booting process
Ever thought about what really happens when you switch on a computer and how the operating system is loaded? Booting can be defined as a series of processes that help to start a computer and put it into a state of readiness for any operation by the user. Booting is said to be complete when the normal, operative, runtime environment is attained. Booting of a computer can be explained in several phases.
The BIOS phase: BIOS (Basic Input Output System) is a firmware interface. The BIOS software is stored on a ROM chip on the motherboard and is the first software run by a PC when powered on. It carries out the process called POST (Power on Self-Test) which checks, identifies and initialises the hardware to find that every device has the right amount of power, and performs a memory test to see whether the memory is corrupted. The BIOS cannot load the kernel directly because it is unable to access enough of the large hard disk space to load the kernel code. Instead, BIOS detects and executes the boot loader software located in the boot device, which is capable of loading the kernel, thus giving control to the PC.
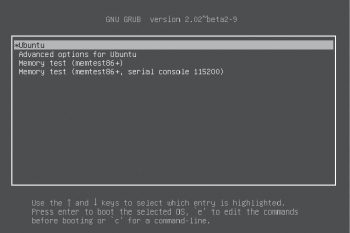
The boot loader phase: The completion of self-tests initialises the master boot record or MBR, located on the first sector of the bootable disk, which is very small. GRUB is responsible for the execution of the kernel and the initrd images in the file system. The MBR executes the GRUB boot loader, which allows us to choose between the multiple kernel images installed on the machine. GRUB then loads the user-selected kernel and passes control on to it. The GRUB entry and default entry time can be changed by editing the grub.cfg file or using any third party application.
The kernel phase: Once the control is passed to the kernel, it acts as an intermediate layer or mediator between the software and hardware of a computer. The kernel, being one of the most fundamental components of the operating system, handles all system processes such as I/O request management, task scheduling, memory management and overall system control. The first process that is executed by the kernel is the init process.
Operating system: The init processs first job is to check the systems properties, the file system and hardware to make sure these are running fine. Init executes each run-level one after the other and the corresponding scripts. Based on the run-level, scripts are executed to start or stop various processes to make sure the system is functional. Once the init process completes all the tasks, the control is given back to the kernel.
Installing GRUB in Ubuntu
Although GRUB is automatically incorporated into a normal Linux installation, there are times when we need to install it in various storage devices as per the users convenience during multiple booting. If users want to install Linux in a specific partition, they are supposed to specify the drive on which to embed the boot loader information.
Entire drive: While installing Ubuntu using the Erase disk and install Ubuntu option, the user chooses where Ubuntu and GRUB will be installed, automatically.
Something else: In this method, users are given the extra option to install the boot loader into any device that they choose. This is needed when there is an OS already installed in the system or is going to be installed. The disk where BIOS is set up to boot or the partition where Linux is installed is generally selected in this case.
Making a GRUB bootable CD-ROM: When booting becomes difficult due to some compatibility issues, a GRUB bootable CD-ROM can be created. So there is no need to create a floppy or hard disk image file. Booting from a CD-ROM involves using a special image file, cdboot.img, which is included in the core.img file. Also, grub.cfg, the main configuration file, should be incorporated with the other image files.
You can use the grub-mkrescue program to create an ISO image file, as follows:
# grub-mkrescue -o grub.iso-o To set the output file |
You can create a directory that is to be included in the ISO image file, as follows:
# mkdir bootable |
A directory for GRUB in the top directory bootable can be created as follows:
# mkdir p bootable/boot/grub-p By default grub looks in /boot/grub directory file, to change this p command is used |
To include the GRUB configuration file grub.cfg inside the GRUB directory, create the bootable image, as follows:
# grub-mkrescue o bootable.iso bootable |
This creates a bootable image named bootable.iso, which can be burned into a CD-ROM or creates a bootable USB device using the image.
Customising GRUB with Grub-customizer
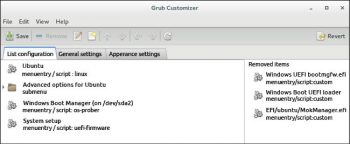
After installing GRUB, some users may not like the default GRUB, and may want to edit it. There are several ways to do so. One of the methods is to manually edit it, which is a bit risky since any mistake would possibly result in an unbootable system. Or, you could install Grub-customizer which is open source software that enables you to edit GRUB in an easy manner and reduces the risks inherent with manually editing the configuration file. Grub-customizer was developed by Daniel Richter, and it provides a graphical user interface to configure the GRUB2/BURG settings and menu entries. It is published under the terms of GNU GPL v3.
Grub-customizer essentially does the following:
- Edits the menu entries (renames, reorders, adds or removes)
- Edits the contents of the menu entries or creates new ones
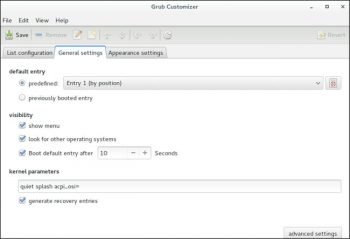
- Changes menu visibility and timeout
- Changes the default boot entry
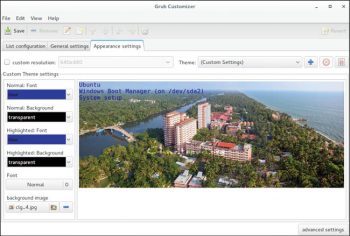
- Changes the GRUB resolution or background image
- Disables recovery entries
- Provides support for GRUB2/BURG
- Changes the kernel parameters, etc
To install Grub-customizer in Ubuntu and Mint, launch a terminal and type the following commands:
sudo add-apt-repository ppa:danielrichter2007/grub-customizersudo apt-get updatesudo apt-get install grub-customizer |
Working with Boot-repair
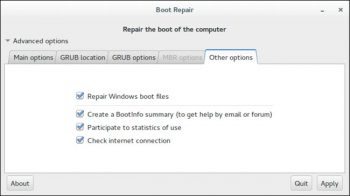
Ever been stuck with an unbootable GRUB? Or been unable to access your multiple operating systems from the GRUB menu? Thats when Boot-repair comes in handy. It is free software that is licensed under GNU GPL, and provides a graphical interface to repair frequent boot problems. Boot-repair allows the repair or recovery of your boot loader, gains access to the unbootable operating system and fixes issues when you install Windows after installing Linux. Boot-repair can be used either from a live CD or a Boot-repair disk, which automatically runs it at start-up. You can also install Boot-repair in your system if you have a bootable Linux.
Installing Boot-repair
There are two ways of installing Boot-repair.
By using the Boot-repair disk: The Boot-repair ISO image can be downloaded and burnt to a CD, or you can make it bootable on a live-USB using any of the USB bootable software available.
Installing in Ubuntu: Open a terminal and type the following commands:
sudo add-apt-repository ppa:yannubuntu/boot-repairsudo apt-get updatesudo apt-get install -y boot-repair && boot-repair |
Using Boot-repair
Boot-repair offers the following options.
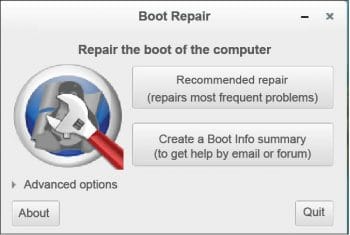
Recommended repair: Launch Boot-repair either from the Applications menu or from the terminal. The Recommended repair option allows you to solve the frequently occurring boot up issues. It reinstalls and repairs your default GRUB.
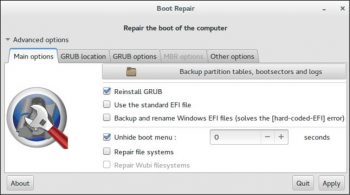
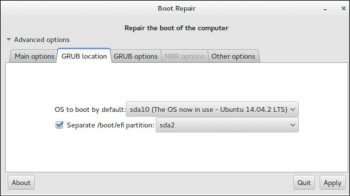
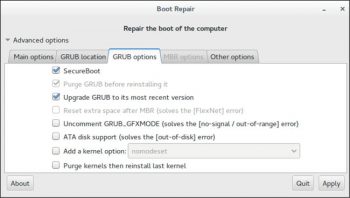
Advanced options: This option lets you delve more into GRUB and allows you to customise it the way you like.
Advanced options include:
- Re-installing GRUB and restoring MBR
- Backing up partition tables and boot sectors
- Repairing file system and Windows boot files
- Changing the GRUB location
- Purging GRUB
- Creating a boot information summary
Table 1 above gives a comparison of the different
boot loaders.
References
[1] http://en.wikipedia.org/wiki/GNU_GRUB
[2] http://en.wikipedia.org/wiki/Comparison_of_boot_loaders
[3] https://wiki.archlinux.org/index.php/Boot_loaders
[4] https://www.gnu.org/software/grub/manual/grub.html


