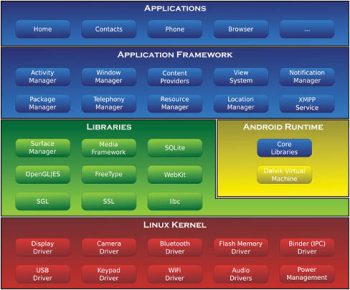
The Android architecture, which most developers must be familiar with, consists of a Libraries layer, which in turn consists of SQLite, an open source database management system that is used to create databases and tables on the Android device (Figure 1).
SQLite supports various datatypes such as int, varchar, blob, real, double, float, text, Boolean, date, datetime, etc.
Let us look at how to store values in the embedded database and retrieve them through an Android app. In order to use the database, import the SQLite package as follows:
import android.database.sqlite;
Your class should extend the SQLiteOpenHelper class in order to use the methods to insert and retrieve values into and from the database. When extending this class, override the constructor and pass the required values.
public class MyDatabaseHelper extends SQLiteOpenHelper {
public MyDatabaseHelper (Context context, String dbName, SQLiteDatabase.CursorFactory cursorFactory, int version) {
super(context, dbName, null, 1);
}
}
This method takes as its parameters the context that is used to open or create the database, the name of the database file, the cursor factory which indicates the cursor behaviour, and the version number of the database. The version starts from 1.

Instantiate the helper class from your activity
To instantiate, type:
MyDatabaseHelper helper = new MyDatabaseHelper(getApplicationContext(), osfy.db, null, 1);
The null value of CursorFactory indicates default behavior.
Use the execSQL method in the helper class to execute SQL queries.
public void onCreate(SQLiteDatabase db) {
db.execSQL(CREATE TABLE Article (id INT, title VARCHAR(50), author (50)));
}
The same method can be used to insert values.
public void insertValues() {
SQLiteDatabase db = this.getWritableDatabase();
db.execSQL(INSERT INTO Article VALUES(1, Title of the article, Name of the author));
}
If you are retrieving values from EditText views in the app, use the getText method and replace the parameters with the values entered by the user.
In order to retrieve values from the database, use the rawQuery method, as follows:
public void getData() {
SQLiteDatabase db = this.getReadableDatabase();
Cursor result = db.rawQuery(select * from Article, null);
result.moveToFirst();
while(res.isAfterLast == false) {
Log.d(Title: + res.getString(res.getColumnIndex(title)));
res.moveToNext();
}
}
Here, the second parameter in rawQuery is used to enter selection Arguments. For instance:
db.rawQuery(SELECT * from Article WHERE title = ?, new String[]{SQLite});
You can display the values retrieved using the cursor in a TextView in the activity. Similarly, you can update or delete values from the database using the execSQL method.
References
[1] http://en.wikipedia.org/wiki/Android_(operating_system)
[2] http://developer.android.com/reference/android/database/sqlite/SQLiteOpenHelper.html


