In the previous articles in the DevOps series, we discussed the procedure to set up a client-server sandbox environment as well as the Chef client and server installation. In this article, we are going to talk about Chef’s architecture and the basics and internals of a cookbook. A clear understanding of the Chef architecture and its internals will help view Chef in a holistic way.

Chef’s architecture
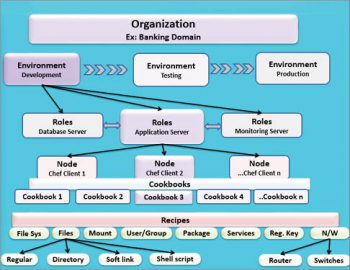
Figure 1 gives an overview of the Chef architecture. An organisation is independent of the components of Chef. It can be applied to your business unit or specific domain or project account. The DevOps process involves maintaining a database, source control management, software development, as well as testing the developed software and deployment in the production environment. Continuous integration (CI) plays a vital role here to invoke the execution of new checked-in code to the next stage. For example, if any code is checked-in by the developer, the CI triggers the build process, then tests the code and, finally, enables the deployment. If the code fails at any stage, it will alert the concerned stage and respective team requesting it to look into the matter. So an organisation can have different environments for development, testing and production. Further, a development environment can have different roles like maintaining software code and the relevant data in a database server, executing the application in the application server and monitoring the application by a dedicated monitoring server. Each role may associate one or more client nodes and every node can have one or more cookbooks. Nodes denote servers in the infrastructure, while the servers may be physical systems or virtual machines or hardware, which will represent compute instances. A cookbook consists of recipes, which in turn give the run list to enable the given nodes to reach a desired state after the deployment process. It may be creating a Web server, an ftp server, a mail server, a specific registry key, creating files or directories, manipulating file systems, setting up network components, installation of software packages, automating frequently executed tasks and managing services, etc.
So, to use Chef to configure your infrastructure, you should have a fair knowledge of cookbooks. This article will describe the writing of recipes in a cookbook. A recipe is about managing different resources and a resource is a fundamental building block of Chef. Let us name the cookbook ‘cookbook_101’. It contains code examples for different core resources, which are built into the Chef-clients. A resource can be of different types like a file, directory, command, network, script, package, service, etc, and these resources are grouped together into recipes, which will decide what configuration we want to set up for the target nodes. You should have domain expertise to understand your projects requirements, and should know definitely what state your system should be in to solve your business problems. Please note that to understand the given code examples in this article, the reader should have a fair knowledge of UNIX commands and script writing.


Bootstrap the Chef-client node
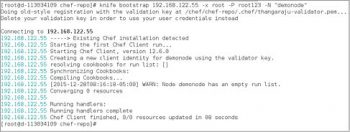
First, we need to set up Chef in the target node by using the Bootstrap command as shown in Figure 2. Knife is the command to execute the Bootstrap command in the client system 192.168.122.55 with user as the root, the password root123 and name of the node set as’demonode’. If the Bootstrap command is executed successfully, you will see the output shown in Figure 2. From the figure, we can see that the run list is empty and no resources have been updated in the client system.
Now let’s assume a systems administrator wants to perform the following tasks: configure n nodes to create a file, write some content into a file, create a directory to a given path, create a symbolic link for a file to find the total number of directories to a given path and store the value into a file, execute a given shell script or group of commands, copy a file content into some file, take backups of certain files, stop or start some service, set up a static IP address for a network device, create a new user and create a cron job to automate certain tasks into the nodes. Let us see how to configure the above resources in the form of a recipe in the cookbook_101.



Cookbook_101: Example code
In Figure 3.1, a file is a resource, which will create a ‘regular_file’in /home/raju directory, the owner of which is Raju, and write some content into the file. The code given in this figure is part of cookbook_101 to help create a file with certain properties. The block of code between do and end typically executes as a single command.
The example code given in Figure 3.2 depicts how to create a directory, ‘dir_file’, with the directory resource, which has the properties of the owner, group and mode of the directory. The action is to create a directory if it has not already been created. The action may be deleted or ‘nothing’. The ‘nothing’ attribute in an ‘action’ specifies don’t do anything unless some other resources invoke some action. If action is not included in the block of code, then Chef will execute the default action based on the resource type, which may create a file or directory, install a package or start the service.
The example code block given in Figure 3.3 will create a symbolic link file. Link is the resource type; by default, it will create a symbolic link. If you want to create a hard link file, you need to explicitly specify link_type as hard. The source file is list.txt and we want to create a symlink file as symlnk_list.txt. If the link_type is symbolic, then including link_type is optional. Typically, if properties like user, mode, action, etc, are not mentioned in the resource block, they will be assigned their default value.
If you want to execute a command to find the total number of directories in a given path, the code example in Figure 3.4 can be used. ‘Execute’ is the resource type, and the command line specifies the command, which is to be executed. The command ls Rl lists all the files, including sub-directories in the lab_demo. grep ^d filters only directories and wc l will give the total number of directories, while the output will be stored in the totdir file.
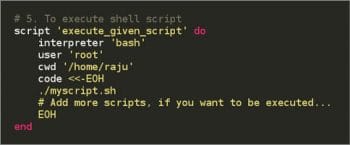
In a given scenario, we may need to execute certain existing shell scripts in all the nodes. The code example given in Figure 3.5 will help us to do it. Script is the resource type, execute_given_script is the resource name, and we need to specify which shell interpreter should be used to execute the script since the syntax of a shell script is different in between shells. The available shells in a system are listed in the /etc/shells file. Apart from shell script, you can also execute Perl, Python or Ruby scripts. In our example, we use the Bash shell as the interpreter, the user is the root, current working directory (cwd) is /home/raju and the code <<-EOH is the starting block of a source code file, which ends with EOH. We can specify the scripts to be executed inside the block of source code.
The code example given in Figure 3.6 explains how to copy the content of a file test.txt into a new file testcp.txt. The resource type is file, and IO.read will read the contents from test.txt. The action is to create the testcp file.
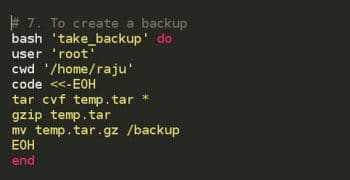
Taking backups of important files is an important task for a systems administrator. The code given in Figure 3.7 shows how to do it through a cookbook. Bash is the resource to do certain tasks like installing packages or executing blocks of commands. Here, take_backup is the name of the resource block. We group all the files into temp.tar using the tar command in the /home/raju directory, and then compress it with the gzip command. The created backup file temp.tar.gz is moved into /backup.
To set up a Web server or ftp server, we first need to install the necessary packages and start the service. The code in Figure 3.8 shows how to stop the iprdump service.
We can set the static IP address of a network device eth0 in a different way. The code given in Figure 3.9 explains how to set up the IP address with ifconfig resource on eth0 in a cookbook.
One of the main tasks for a sys admin is user management creating users, updating users, deleting user accounts and settings, locking or unlocking user passwords, etc. The code block in Figure 3.10 explains how the user resource type is used to create a user name newuser and the user’s home directory /home/newuser; /bin/bash is the login shell.
If you want to automate particular tasks, you can use the cron job to do this periodically within a desired time frame. Once we add run lists to nodes from Chef-server, we have to execute Chef-client commands to all the nodes to execute the run lists. If you have a large number of nodes, then frequently updating the cookbook will make it a tedious task to execute Chef-client in all the nodes after every cookbook update. To automate this, write a cron job as shown in Figure 3.11. Cron is the resource type, and Chef-client is the name of the resource block. In general, using cron, we schedule routine background tasks at a given time interval on an ongoing basis. The time interval is specified in minutes, hours, day of the week and the month in which the command is to be executed. Here we expect, on an average, to upload the cookbook into nodes every 30 minutes; so we set ‘minute’ to 30 and execute the command as the root user. The output of the Chef-client command execution is stored in the Chef_client_log file. Every execution of Chef-client will append the log file with its output due to >> being used in the command.
Create a cookbook file as cookbook_101 using the $knife cookbook create cookbook_101 command, go to /Chef-repo/cookbooks/cookbook_101/recipe/ directory, copy the given code examples (Figures 3.1 to 3.11) into the default.rb file and then save it.


To add the run list, specified in cookbook_101, execute the following command in the server: # knife node run_list add demonode ‘recipe[cookbook_101]’
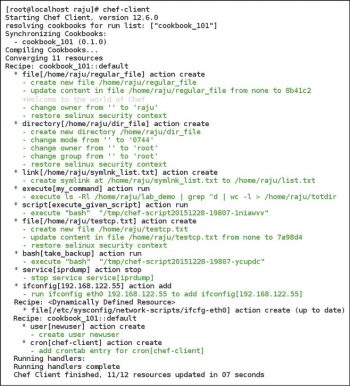
Once the run list specified in the cookbook_101 is added into the demonode successfully, we need to execute the Chef-client command in the Chef-client system to execute this list. The Chef-client downloads the required system configuration in the form of a run list from the Chef-server and configures the node as mandated in cookbook_101.
The screenshot of the Chef-client command execution output is shown in Figure 4. From the figure, we can interpret that 11 resources are specified as recipes in the cookbook_101. All these resources are configured in the demonode and set the desired state.
In the next article, we will dive deeper inside the cookbook and write advanced level recipes. For example, Linux flavours maintain different package names and services to set up a server. It is not advisable to write a specific cookbook for every Linux flavour (RHEL, CentOS, Fedora, Ubuntu etc,); instead we can write a cookbook in such a way that it will work for any Linux distribution.


