
The theme of the application
Playing games on smartphones has become one of the favourite pastimes in our daily lives something we engage in while travelling or during idle hours. Over the years, gaming on smartphones has been hyped so much that every age group, from little kids to elders of the family, is playing games, and with the collaboration offered by social media, the gaming fever has spread very rapidly. In this article, we will explore how games are made, what is the logic behind them, and look at all the things that make a character move as per your instructions, all over the screen of your smartphone. Let’s create a simple animation using the App Inventor, which will allow you to control a ball on the screen with various controls.
In the last application we created, you got to know about the various options and features available on the designer or block editor in the App Inventor browser application. We will use the same tools here, along with a few other components.


GUI requirements
For every application, there is a graphical user interface or GUI, which helps the user to interact with the onscreen components. How each component responds to user actions is defined in the block editor section.
As per our requirements, we will need the following components.
1. Canvas: The Canvas component works as the base of the animation, and it provides the platform over which the object will move as per instructions.
2. Label: Labels are the static text components, which are used to display some headings or markings on the screen.
3. Buttons: These trigger events and are very essential components.
4. Ball: This is an inbuilt component in the App Inventor palette, which will display a ball on the screen. Using its properties, you can set the colour, diameter and various other parameters for the ball.
5. Clock: This component is responsible for all the time based events; so we will have a clock event also. The Clock component will repeat a particular action after a fixed duration of time.
6. Horizontal arrangements: These are special components which keep all child components horizontally aligned within them.
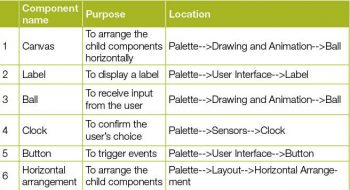
Table 1 gives the components that we will require for this application. We will drag them on to the designer from the palette on the left.
1. Drag and drop the components mentioned in the table to the viewer.
2. Visible components can be seen while the non-visible components will be located beneath the viewer under the tag ‘Non-visible’.
3. We have placed a label on which to place the name of the application.
4. All buttons need to be put within the ‘Horizontal arrangement’
to keep them aligned horizontally.
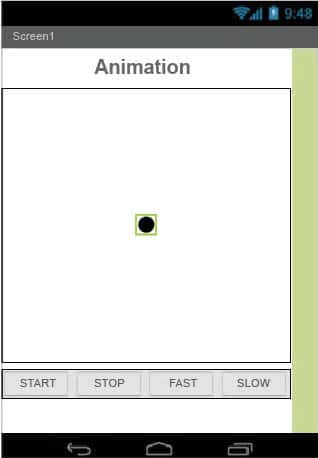
5. If you have dragged and placed everything, the layout will look something like what’s shown in Figure 1.
6. Make the necessary property changes, like we did when changing the text property for the label and button components.
7. Renaming the components helps to identify them in the block editor.
8. Your graphical user interface is now ready. Figure 1 shows exactly how the application will look after the installation.
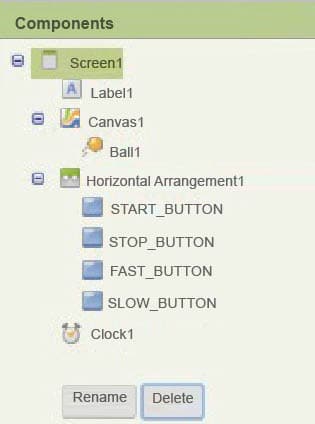
9. Figure 2 gives the hierarchy of the components that we have dragged to the designer.
Now we will head towards the block editor to define the behaviour. Let’s discuss the actual functionality that we are expecting from our application.
1. We need to code it so that on pressing the Start button, the ball starts moving.
2. When the Stop button is pressed, it should stop at its current location.
3. On pressing the Fast button, its speed should increase.
4. On pressing the Slow button, its speed should decrease.
So let’s move on and add these functions using the block editor. I hope you remember how to switch from the designer to the block editor. There is a button available right above the Properties pane to switch between them.
Block editor blocks
I have already prepared the blocks for you (Figures 3 to 7). All you need to do is to drag the relevant blocks from the left side palette and drop them on the viewer. Arrange the blocks the same way you see them in the image. I will explain what each does and how it is called.
1. The blocks in the figures are easy to understand. The very first block tells us that when the Start button is pressed, it should enable only the clock in the application.
2. When the timer is enabled, it will increase the x coordinate of the ball, which will move it towards the right, keeping the y coordinate as it is. Here,’plus 1′ means that on every cycle of the clock component, it will increase the horizontal position of the ball by one count.
3. When the Fast button is pressed, it will increase the speed component of the ball, causing it to move faster.
4. When the Slow button is pressed, it will decrease the speed component of the ball, causing it to move slower.
5. When the ball has reached the edge, it should start this all over again. Hence, for this we need to set the x coordinate as 0.
With this, the block editor is done with. Next, we will move to downloading and installing the app on your phone to check how it is working.


Packaging and testing
To test the app, you need to get it on your phone. First, you have to download the application to your computer and then move it to your phone via Bluetooth or USB cable. I’ll tell you how to download it.
1. On the top row, click on the Build button. It will show you the option to download the apk to your computer.
2. Downloading will show the progress and after a successful download, the application will be placed in the download folder of your directory or the preferred location you have set for your app.
3. Now you need to get this apk file to your mobile phone either via Bluetooth or USB cable. Once you have placed the apk file in your SD card, you need to install it. Follow the on-screen instructions to install it. You might get some notifications or warnings saying Install from untrusted source. Allow this from the settings and after successful installation, you will see the icon of your application in the menu of your mobile. Here you will see the default icon, which can be changed. I will tell you more about this, as we move ahead in this course.
Your application should now work exactly as per your requirements. Depending upon your usability and customisation, you can change various things like images, sound and behaviour too.
Debugging the application
We have just created the prototype of the application with very basic functionality. What else might users be interested in? Now come various use cases, which require serious analysis so as not to annoy the user. Consider the following:
1. What are the other factors that will affect the movement of the ball?
2. Rather than buttons, can we make the ball move from the sensor commands (orientation sensor)?
3. How can we change the direction the ball moves in? In the example mentioned earlier, the ball moves towards the right; how can we make it move in the up-down axis?
These are some of the possible scenarios that users will be pretty happy seeing implemented in your app. So think over how these can be integrated into the application. Do ask me if you fail to accomplish any of the above cases.
Congratulations! You have successfully built another useful Android app for yourself. Happy inventing!


