Reconfiguring a live network – for example, while implementing access control lists (ACLs) in an enterprise network – can be a challenging task. Troubleshooting such networks could also be really difficult if strict change management policies are in place, and specially if downtime and disruption are to be avoided under any circumstances.
Is there a way out of this? Yes! Many professionals use GNS3 to simulate complex networks. It is also used by students to prepare for lab tests conducted by various certification providers.
History
In 2005, Christophe Fillot wrote Dynamips – a Cisco router simulator. It had a text based interface and could simulate only one router on one PC, at a time. Version 0.2.5 of Dynamips, released in 2006, introduced hypervisor mode and enabled multiple router simulations on one PC. It also provided a simple virtual switch.
GNS3 was introduced in September 2007 with a GUI, drag-and-drop facilities for adding network components, and easy storage of created objects and topology.
gns3.com describes GNS3 as The software that empowers network professionals.
Dependencies
GNS3 depends on several libraries and components. Successfully installing these dependencies is a prerequisite. The important dependencies are listed below.
- Dynamips: Base of GNS3, a Cisco router simulator.
- Dynagen: A text based front-end to Dynamips, which uses the hypervisor mode to communicate with Dynamips. It uses a simple configuration file for specifying virtual router configurations, and enables interconnecting of routers and WAN technologies such as ATM, frame relays and switches. Further, it provides management CLI for device functions such as start, stop, suspend, reload, console connection, etc.
- Python: Dynagen is written in Python.
- VPCS: This is a virtual PC simulator, which can simulate up to nine PCs. It is possible to use the ping and traceroute commands from or towards these virtual PCs. Remember that VPCS is just a program running on Linux or Windows supporting a few network commands. But, it becomes difficult to configure a network without VPCS. Earlier, VPCS was not available, and users were required to configure an additional router in place of a host (PC) for testing.
- QEMU: A generic and open source machine emulator and virtualiser. As a machine emulator, it enables programs made for one system to be run on different machines (e.g., programs developed for ARM can be run on a PC). As a virtualiser, it achieves near native performances by executing the guest code directly on the host CPU.
- cpulimit: This attempts to limit the real CPU usage of a process. It is helpful to limit CPU usage of devices created in GNS3.
- VirtualBox: A virtualiser for x86 hardware, targeted at server, desktop and embedded usea cross-platform virtualisation application.
- IOUYAP: This provides network support for IOU (IOS for UNIX).
Supported images
GNS3 (Dynamips) uses actual device IOS images to run the actual IOS rather than simulating device commands. An example of a device simulator is Cisco Packet Tracer. Only selected versions of IOS, and selected modules, cards, processing engines, port adapters, etc, are supported. A list of images supported by GNS3 is given below. Please remember that only selected devices from the mentioned device series are supported.
Detailed list of supported hardware
A detailed list of supported hardware is available at https://community.gns3.com/docs/DOC-1708.
An interesting guideline mentioned in this link is to use older images supporting your configuration requirement, for better speed.

System requirements
To run real IOS image(s) in virtual environment, CPU and RAM resources from your computer are required. Virtualisation also requires additional RAM and CPU capacity.
Considering these requirements, your computer system should have CPU and RAM resources sufficient for the desired IOS image and network topology.
If you wish to configure complex topologies, the best choice will be a 64-bit Linux OS, with a minimum of 4GB RAM, or 64-bit Windows with a minimum of 8GB RAM. This is because, as you must be aware, all 32-bit operating systems have a total addressable space barrier, which limits the maximum RAM limit to 3GB.
Downloading GNS3
Register with gns3.com and proceed to the download section. You may also use the GitHub link https://github.com/GNS3/gns3-gui/releases, where you can select the desired version and go ahead. The approximate download size for GNS3 1.3.7 is 65MB for Windows and 40MB for Linux.
Installation instructions
Windows: Download installables and double click.
Ubuntu 14.04: Using the command line, you need to install Python, Dynamips, GNS3 Server, GNS3 GUI, IOU dependencies, IOUYAP, VPCS, Virtual Box, QEMU and cpulimit. You may also consider installing Wireshark to capture packets for diagnostics and troubleshooting.
Step-by-step instructions for installation of GNS3 on Ubuntu 14.04 are available at https://community.gns3.com/thread/5471. Complete the installation. GNS3 runs in non-administrative mode, so use the command gns3.
Practical uses
GNS3 is a great help for students aspiring for various Cisco certifications. Preparation for most of the laboratory tests for CCNA, CCNP and even CCIE is possible using GNS3.
GNS3 is also a handy tool for professionals. Consider an enterprise with a data centre (DC), disaster recovery (DR) site, primary and redundant links, routers connecting branches to the DC and DR, etc. An incorrect change made to any of the networking devices may lead to incorrect configuration or network outage. Here, GNS3 can be used to configure the virtual network mirroring the actual set-up. This virtual set-up can be used as a test environment to make the desired changes, and then these tested changes can be applied to the live (production) network.
Did you guess an interesting dependency of GNS3, not mentioned above?
Where can Cisco IOS and IOU images be obtained? Are they provided on the GNS3 website? Can anybody provide them?
Let me make it very clear GNS3 users will have to arrange IOS images on their own. IOS and IOU images are the property of Cisco, and so user licences are available from the company. You have been warned!
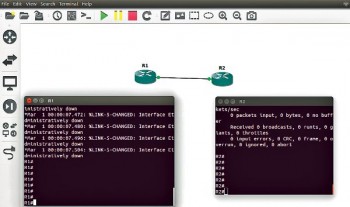
Your first lab: GNS3 1.3.7 installed on Ubuntu 14.04
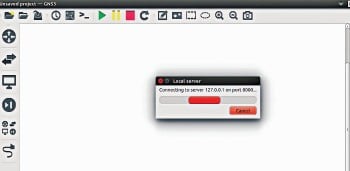
Start GNS3 from the command line as follows:
$ gns3
During startup, GNS3 will check and inform you if any new updates are available.
You must follow these steps to add your first two routers:
1. Enter the name of the new project. The default project folder is /home/username/GNS3/projects/, which can be changed from Edit – Preferences. Give your project a meaningful name.
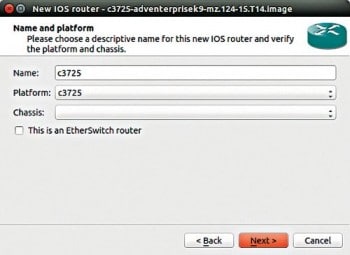
2. Add router images to GNS3.
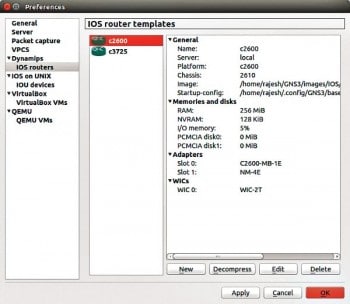
Go to Edit – Preferences – Dynampis – IOS Routers – Browse – select the desired image file, and then expand the file as prompted.
For this lab, Cisco 3725 and 2600 IOS images are used.
3. Populate the 3725 router with supported cards. The default card is GT96100-FE, a two-port 10/100 Fast Ethernet.
In addition, the following models are supported.
a. Network adapters (any two of the following):
NM-1FE-TX: One fast Ethernet (10/100)
NM-4t: 4-port asynchronous (serial) module
NM16-ESW: 16-port 10/100 EtherSwitch modules for Cisco ISR series
b. WIC modules (any three of the following):
WIC-1T
WIC-2T
4. Set the idle PC value. When a router is just started, CPU utilisation of the computer system may rise to 100 per cent and the system may become very slow. To avoid this, the idlepc setting is necessary. Select Idle-PC value’ displays the default value. Use the Idle-PC finder button to check whether it is suitable. Often, the default idle PC value is suitable.
5. Save the configurations by clicking OK and proceed further.
6. Follow Steps 2 through to 5 to add a 2600 series router image.
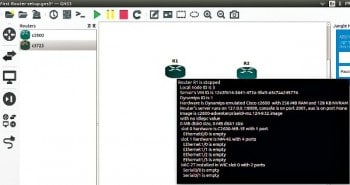
7. Configure the topology. Drag and drop as many routers you wish to use in the topology, and use the Add a Link button to connect them by cable. This test lab has the 2600 Router R1 Ethernet0/0 to 3725 router R2 FastEthernet0/0.
Note that when you move the cursor on the router, its status and configuration is displayed in the adjacent black window.
8. Use topology devices.
Click on the Start / Resume all devices (the green > button on top) to start all devices.
Click on the >_ button to trigger console connection to all devices.
Click on the red square button to stop routers.
Do not forget to save your project by using the File-save project menu. Go ahead and configure these routers for your test labs.
Changing the configuration of these router images including network/WIC modules, RAM and Flash is possible from the Edit menu. You can even change the base MAC ID of the router under the Advanced button.
Keep a watch on this column for updates in exciting world of GNS3.











NS3 or GNS3 which will be better for content centric network based IoT simulation?