Linux plays a dominant role in server management, worldwide, due to its powerful kernel, based on which a wide range of operating system flavours are availableRed Hat, OpenSUSE, CentOS and Ubuntu are a few of the popular ones. The high level of reliability, safety, security and flexibility provided by Linux has also made it popular among desktop users and mobile phone users (Android is built on Linux).
In an earlier article that I wrote for the December 2014 issue of OSFY, I argued that the security of Linux based OSs is in the hands of systems administrators. The topics of users and group management were discussed in detail. Further to adding and managing users, permission management is a necessary skill. Well controlled permissions and privileges implemented by a good administrator make a Linux box more secure; otherwise, it can remain vulnerable to numerous attacks and digital theft. So awareness of various security features provided by Linux and their implementation is necessary. In this article, I have focussed on permissions, their management and their effects, so that readers can secure their Linux machines better.
Permissions
Permissions mean conferring the authority to access data to an unauthorised person, by default. In the digital world, primarily four kinds of permissions affect our interaction with computing machines: read, write, execute and No permission.
Read (r) allows a user to view the contents of a file, write (w) allows a user to modify or delete the contents, execute (x) allows a user to run a file such that the computer provides the relevant output after running the code provided, and No permission (-) restricts user access for a specified operation.
Permissions can be implemented on both files and directories. In the case of files, read allows the viewing of the contents, write allows the modification or deletion of the contents and execute allows the running of commands written within the file – this is in the case of shell scripts and other scripts. In case of directories, read allows the listing of the contents, write allows the creation or deletion of files and directories within a directory, and execute allows the opening of a directory. Without execute permissions, a directory cannot be read.
To view the permissions of particular contents, execute the following command in any directory:
ls -l
You will get the result shown in Figure 1.
A thorough exploration of users and groups was done in my earlier article. In the snapshot shown Figure 1, the first column of the output contains various permissions as explained below:
<em> r w x </em> <em> r - x </em> <em> r - x</em> User owner Group owner Other users
How permissions are calculated
The decimal value of read is 4, of write is 2, of execute is 1, and of No permission is 0.
So, if we say that a file has read and execute permissions, it means the permission is 4+0+1=5.
A r w x r x r – – permission can be read as (4+2+1)(4+0+1)(4+0+0)=754, where 7 is implemented for the user owner, 5 for the group owner and 4 for all the other users.
We can also understand this by using binary-to-decimal conversion:
Permissions: r w x
Binary bits: 1 0 1
Conversion: 1*22 + 0*21 + 1* 20 4+0+1= 5
A file with permissions 777 will give all the rights to everyone using your computer.
Note: If you want your file to be readable and executable by the owner user, only readable by group members and offer no access to any other users, you should set permissions as 540.
Managing owner user, group owner and other user permissions
Now, the question is how do we change the permissions for implementing security? The answer is the chmod command.
Lets suppose we create a file named f_shobhit using the command touch f_shobhit. The default permissions attained by this file will be r w r w r – -. To change the permissions of the file f_shobhit using the numeric mode, execute the following command:
chmod 540 f_shobhit
Now, the permissions will become r x r – – – – –
Permissions are always assigned from left to right and if no permission is specified, 0 is taken as default.
chmod 5 f_shobhit
In the above example, the permissions value will be taken as 005, where 5 is assigned to other users and the resulting permissions will become: – – – – – – r – x.
chmod 45 f_shobhit
In the above example, the value will be taken as 045 and resulting permissions will be: – – – r – – r – x.
Permissions can also be managed using the symbolic mode as shown below:
chmod u+rwx,g+x,o-x f_shobhit
The result of the above command will be: r w x r – x r – -. The + symbol adds a permission to a specific octet while the symbol takes away permissions. u represents the owner user octet, g represents the group owner octet, o represents the other users octet, and a collectively represents all octets.
chmod a=r f_shobhit
The above command will assign Read only permission to all the octets at once.
Effects of permissions on files
By default, the user name is the user owner and owner group of a files contents. In the above examples, the user shobhit was logged in and created th
cat f_shobhit
e file f_shobhit, so automatically shobhit becomes the user owner and owner group. To discuss the effects of permissions, file f_shobhit is moved to a directory /home/Common such that permissions 777 are implemented on the Common directory. This is done so that all the members of the group and other users can have access to the file.
Let us clear all the permissions from the file (leaving the right side of the permission assignment expression blank will do the trick). Then the step-by-step effects of permissions will be elaborated by assigning one permission at a time.
chmod a= f_shobhit
1. Now, execute the following command:
cat f_shobhit
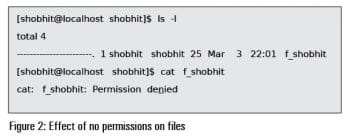
The user owner will not be able to use cat, vim and other commands on a file. Instead, the user will get a Permission Denied error (see Figure 2). Although vim is meant for editing a file, due to no-read permissions, the contents will not be read by vim and so cant be modified. Similarly, neither members of group shobhit nor other users will be able to read the file.
2. Now, add read permission to
chmod g+r f_shobhit
user owner:
chmod u+r f_shobhit
The cat f_shobhit command will now work perfectly for the user owner, but members of the group shobhit and other users still cant read the file.
3. Next, add another user test as a member of the group shobhit:
useradd -G shobhit test
Add read permission to the owner group for the file:
chmod g+r f_shobhit
Log in with the user test and read the file:
su test cat f_shobhit
The contents of the file will be displayed.
4. Add another user test1 who is neither the user owner nor a member of the group shobhit:
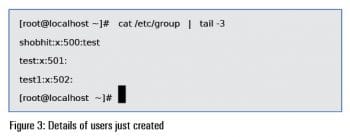
useradd test 1
(See Figure 3.)
Add read permission to other users also:
chmod o+r f_shobhit
Log in with user test1 and try to read the filethe contents of the file will be displayed.
Similarly, write and execute permissions will work for user owner, owner group member users and other users.
Note 1: To implement execute permissions, read permissions must be provided because file contents are read and then sent for execution.
Note 2: It doesnt make sense to give write permissions on a file without the read permissions, in general, since this will simply overwrite an existing file.
Note 3: It is strongly recommended not to give write permissions to other users, including every unauthorised person who can use the system and, with lose permissions management, can harm your files. It is better to appoint all the authorised persons as group members and then give them write privileges. Advanced permissions may be implemented using ACLs and SELinux, which are out of the scope of this article.
Effects of permissions on directories
Let us create a directory named d_shobhit under the /home/Common path and clear all permissions from that directory:
mkdir d_shobhit
chmod a= d_shobhit
Now, executing the following statements from any user will show the Permission Denied error.
cd d_shobhit
ls d_shobhit
touch d_shobhit/file1
1. Giving read permission to all users will allow the listing of the directorys contents but the other two operations still wont work:
chmod a+r d_shobhit
ls -ld d_shobhit
2. Adding execute permission will allow opening of the directory and viewing its contents, but new files still cant be created:
chmod a+x d_shobhit
cd d_shobhit
3. Adding write permission will allow the creation of new contents:
chmod a+w d_shobhit
touch d_shobhit/file1
4. Now, removing read permission will allow the creation of a file and opening of the directory, but listing directory contents using the ls command will not be permitted:
chmod a-r d_shobhit
touch d_shobhit/file2
cd d_shobhit
5. Keeping read and write permissions, but removing execute permissions will not allow the opening of the directory or the creation of contents inside it. Listing of contents will be incomplete, and a warning will be issued to this effect. This is because a directory should be opened before performing these operations, and directory opening is controlled by the execute permission.
6. Keeping read and execute permissions will allow the listing of the directorys contents and the opening of the directory, but creation of new contents will not be allowed.
Adding and managing users without user management commands
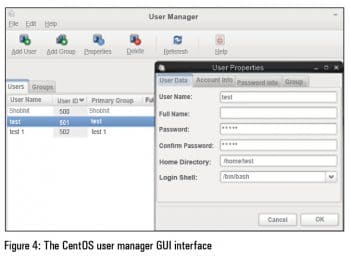
Method 1: The GUI interface can be used to manage users in CentOS. In your Linux box:
1. Click on System, which appears on the top bar of your desktop.
2. Click on Administration.
3. Click on Users and Groups.
4. The User Manager Interface will be displayed.
5. Here, you can use the Add User option to create new users with specific configurations.
6. To modify the configurations of existing users, click on the name of a user and click Properties. Here you can update the basic user settings, account settings, password aging and group membership management (see Figure 4).
7. To delete a user, simply select a user from the list and click the Delete button.
8. Similarly, groups can be managed from the Groups tab.
Note: User Manager can also be started from the terminal using the following command:
system-config-users
Method 2: Make all the configurations and entries manually. Then add a new user named test2, whose primary group will be test1 and home directory will be stored in /mnt/test2home (there will be no group with the name test2).
1. As root user, edit /etc/passwd and make the following entry:
test2 : x : 503 : 502 : : /mnt/test2home : /bin/bash
2. Create the home directory:
mkdir /mnt/test2home
3. Edit /etc/group and make test2 a member of the group test1, by modifying the entry of the group test1 as follows:
test1 : x : 502 : test2
4. Now, generate a SHA-512 hashed password for the test2 user. This password will be stored in the /etc/shadow file:
\/sbin/grub-crypt - - sha-512
5. Copy the generated hashed password.
6. Now, open the /etc/shadow file and make the following entry:
test2 : <copy-hashed-password-here> : 16498 : 0 : 99999 : 7 : : :
The values may be modified as required for password aging.
7. Now, give the new users permission on their home directory as follows:
chmod 700 /mnt/test2home
8. Make test2 as the user owner and test1 as the group owner of this home directory:
chown test2:test1 /mnt/test2home
9. Now, copy the bash shell configuration files from /etc/skel to /mnt/test2home:
cp /etc/skel/.bashrc /mnt/test2home
cp /etc/skel/.bash_profile /mnt/test2home
10. Log in as test2 using the switch user command:
su - test2
11. Also, log out from root through the GUI and try to log in with test2 from the GUI login window. The new user should work fine.
Well implemented permissions can secure your Linux machine to a great extent. Security implementation skills act as the basic building blocks of systems administration and must be worked on continuously.

