Virtualisation in computer science terms means creating virtual and isolated instances of computer resources like storage, memory, processors and memory. Virtualisation exists at various levels such as at the hardware level, operating system level and application level.
Introducing VirtualBox
In very basic terms, VirtualBox is a cross-platform virtualisation manager application, which enables the user to experience various operating systems simultaneously on Intel and AMD based platforms.
Where to get it
VirtualBox is free and open source software available for free download. One just needs to start typing the word VirtualBox on a search engine and there will be thousands of links to download from, for free. Two of these are: http://www.filehippo.com/download_virtualbox/ and https://www.virtualbox.org/wiki/Downloads
Installing VirtualBox on Windows
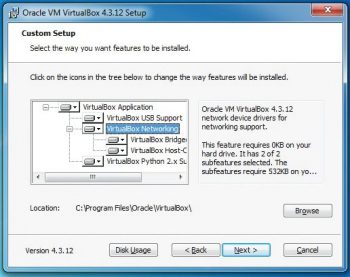
You can install VirtualBox the same way you install any other software. Once the installer is downloaded, just double-click VirtualBox-version-win.exe and start the installation. The installer will start and it will provide some details with regard to installation location, type of install, and the features it will install in the next few screens. A new user can safely keep going Next->Next and Next.
Towards the end of the installation, the installer will ask for permissions to install various device drivers; choose Install and finish the installation.
Additional drivers required during installation
When you install VirtualBox, you will require a few additional drivers for your virtual machines (VMs) to work and access all the hardware attached to the host.
In Windows, as soon as you start the installation on the second screen (Figure 1), you will see a list of features that the installer will install along with the set-up. Towards the end of the installation, these are the additional packages for which set-up will ask your permission.
Lets take a brief look at what these special drivers are for.
VboxUSB: This module will enable USB support inside virtual machines, and the user will be able to attach the hosts USB devices to virtual machines.
VboxNetwork: This package will install two required network drivers vboxnetfit and vboxnetapp. Both these modules are responsible for enabling networking support to the VM.
VBox Python: This module will enable Python support to VMs.
Steps for creating your first VM using VirtualBox
Now that we have VirtualBox installed on our system, lets try and create a VM using it. Since VirtualBox is a platform-independent application, the user interface remains the same across all platforms Windows, Linux or iOS.
The steps to create and configure a VM using VirtualBox follow. Start the VirtualBox application from the Start menu. You will see a welcome screen with the menu option New.
Click on New to start a new VM creation process.
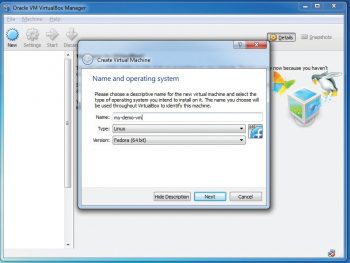
1. In the next screen (Figure 2), the user will be asked to give a name, select the VM type (Windows, Linux, iOS, etc) and inform what flavour of the selected type is to be installed. For example, I have chosen Linux as my VM type and Fedora-64 bit as my flavour. I also named my VM as my-demo-vm.
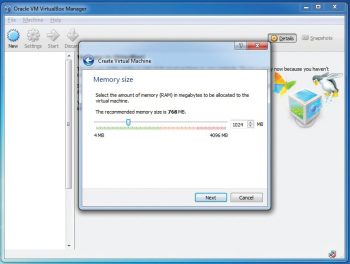
2. Once done with the above selection, click Next. The next screen (Figure 3) will ask you to select how much memory you want to dedicate to your VM. The dialogue box will show a range from a minimum permitted memory range to the maximum physical memory you have on the system. I have chosen 1024MB (1GB) for my demo VM.
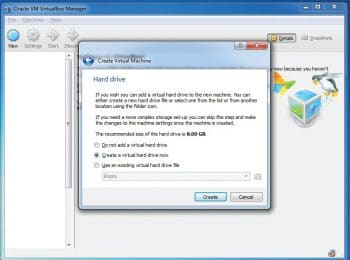
3. Click Next and the next dialogue box (Figure 4) will ask how much of disk space you want to allocate to the VM. The dialogue box will give you a few options with regard to disk selection:
a. Do not add a virtual hard drive: This is in case you do not want to have any local storage to your VM. Then where should we install this? Lets leave this option for now.
b. Create a virtual hard drive now: This is the default selected option and most common too.
c. Use an existing virtual hard drive: This option is useful when youve already created a VM disk earlier and you want to re-use it.
For our example, lets go with option b, the default, and click on Create.
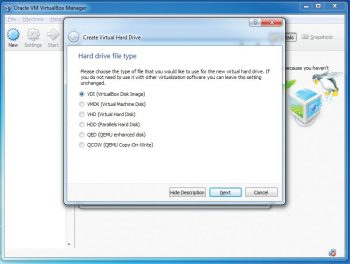
4. The next dialogue box (Figure 5) will show a list of the types of disk drive images that the user can create. Each adds a specific feature but for a normal user, we can go with the default option again and click Next.
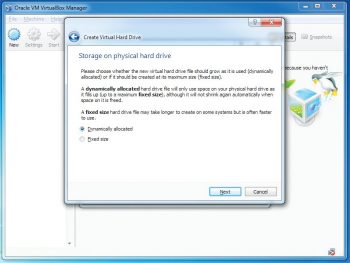
5. The next dialogue box (Figure 6) is very important with regard to hard disk drive configuration. Here, the user will have two options to choose from for hard disk space. Lets look at each of them:
d. Dynamically allocated: This option will create a disk of the minimum required size and then will keep increasing it as needed, up to the maximum disk size limit allocated; but once increased, the reverse doesnt happen.
e. Fixed size: This option will create the virtual disk drive of the maximum size and the same disk space will be isolated from the hosts use.
A dynamically allocated disk allows maximum use of the hosts disk space and prevents wastage of unused disk space within the VM but, on the other hand, since disk space is being allocated dynamically, the I/O operations on the VM take a hit. The decision on which of the two options to choose lies entirely with the user and the purpose the VM is being created for.
For our example, I will go with the default option, Dynamically allocated.
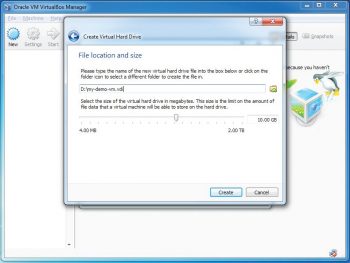
6. The next dialogue box (Figure 7) will allow you to select the virtual hard disk size, its name and also the file system location where the disk image is to be created. All choices available in the dialogue box will have their default values, but I would personally advise users to alter at least the location for disk image creation. Lets look at all the options.
f. Virtual hard disk driver location: By default, this location is /user/Home/Virtual/ but I would personally suggest that you keep to a different drive so that you can maintain a better and separate track of the virtual disk drives you have created. Also, if anything nasty happens to the VM, it will not have any effect on your C or User directory.
g. Size of the virtual disk drive: Users can select the desired size for the virtual disk drive.
Once everything is configured as per desired values, you can click Create to actually create the disk drive image and the VM itself.
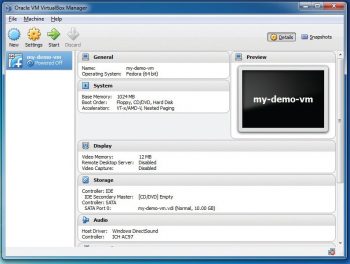
7. Our VM is now created and the VirtualBox home page will list it (Figure 8) along with the details of its basic properties.
8. Its now time to start using our VM. But wait! We havent installed any operating system on it.
9. In the VM context, installing an OS is considered to be an operation on the VM rather than a part of the VM creation process.
Configuring a VM
In this section, we will look at how we can adjust the various properties of our VM, add or remove hardware resources, and install an operating system. We will also look at how to start using a VM as an independent OS.
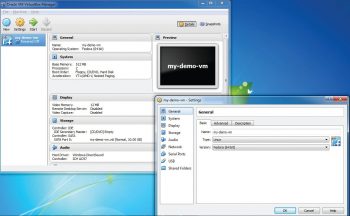
1. Configuring VM properties: If you think that you would like to change some properties or resources allocated to the VM that were missed out during VM creation, go to the VirtualBox main page and select the Settings option (Figure 9) to access all VM properties and change them, as desired. A point to note here is that you will not be able to change each and every value, but those restrictions are self-explanatory.
2. Installing an OS on the VM: Its now time to install the operating system on the VM. Lets look at the process in the following steps.
a. First and foremost, we need an installation source (DVD/network boot location). For this demo I am using the DVD method and leaving the network boot for readers to try out.
b. To associate a DVD with the VM, go to the VirtualBox main page and click on Settings.
c. On the next window, from among all the options on the left hand side, click on Storage.
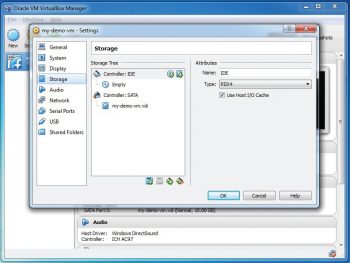
d. On the right hand side (see Figure 10), you will see a storage tree detailing storage controllers and devices attached to the VM.
e. On the same window, the first in the tree is the Controller IDE, for which the device list is empty; this means there is no DVD attached to the VM yet.
f. Select Controller IDE and click on the first plus icon, which should say Add CD/DVD Device when you scroll the mouse over it.
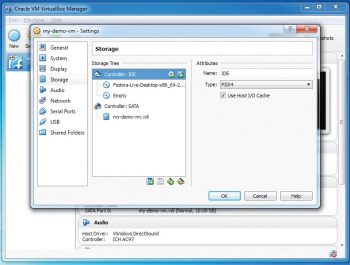
g. The next window will show a box, which asks if you want to add a DVD disk. Click on Choose disk, browse to the DVD image location and select the image as desired. The selected DVD image should show up on the storage tab under Controller IDE (Figure 11).
h. Finally, go to the System tab in the Settings menu and arrange the boot order accordingly.
i. Now, in the Settings window, click OK to save all the changes. Once all the changes are saved, you will be brought back to the VirtualBox main page.
3. And yes, we are done
Now just click the Start button in the VirtualBox main page and start the VM.
4. From here on, the VM will boot into the selected boot device, and you can continue installing the OS and then boot into it.
Advanced features of VirtualBox
Now that we have looked at the basics of VirtualBox, lets look at a few advanced features. Most of these features are useful for professional users and those who manage multiple VMs across many hosts. Since its not possible to introduce all the features that VirtualBox offers, I will try to list a few.
1. Manageability: VBoxManage is a command line interface to VirtualBox, and it allows you to do much more than what can be done from a GUI. More details of how to use it can be found at https://www.virtualbox.org/manual/ch08.html.
2. VM groups: The VirtualBox manager enables you to configure a group of VMs in order to manage and configure them collectively. More details are available at https://www.virtualbox.org/manual/ch01.html#gui-vmgroups
3. Create snapshots: If you are familiar with virtualisation technology, you will know what a snapshot means. VirtualBox enables you to create snapshots of the VMs and restore them back to the previous state. More details are available at https://www.virtualbox.org/manual/ch01.html#snapshots
4. Creating a clone: VirtualBox enables you to create the exact copy of an installed VM. This property is called cloning of a VM. More details are available at https://www.virtualbox.org/manual/ch01.html#clone
VirtualBox is one of the best VM managers available even when compared with proprietary solutions. It offers a lot more than what desktop users may require and allows users to experience a smooth multi-OS environment.


