So far, we have learnt how to set up Chef Server and configure it by running the Chef-server-ctl reconfigure command. We have also learnt how to verify the server configuration by running the test command. Now, the server is almost ready to be used, though theres still some work to be done to get it started and communicating with agents. For this, we need to create an administrator user and organisation. The purpose of creating an administrator user is to control the Chef environment (server and agent), and of creating an organisation is to set up a profile for the Chef environment.
The syntax for a command to create an admin user is as follows:
#Chef-server-ctl user-create<username><first name><last name><email><password>--filename<full path of pem file> ---here pem is the private key file created in the specified folder.
For example:
# Chef-server-ctl user-create magesh magesh kasthuri magesh.kasthuri@wipro.com password --filename /root/.Chef/magesh.pem
Then, we can run org-create to create the profile for the Chef environment or organisation. The syntax for the command is as follows:
# Chef-server-ctl org-create<Org name><Org description>association-user<Admin user associated with this org> For example: # Chef-server-ctl org-create magsandbox Mag-Sanbox Setup association-user magesh
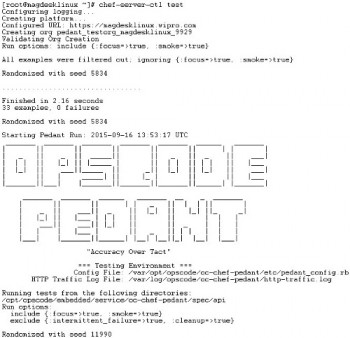
After creating the organisation, we can run the test command again to verify if the user is associated properly and the server can start with the organisation profile.
The Chef management console is a Web based tool which provides a graphical user interface (GUI) to manage environments, user roles, cookbooks, etc. After verifying the Chef Server set-up, we need to install the management console by executing the following commands:
# Chef-server-ctl install opscode-manage
# Chef-server-ctl reconfigure
The command to configure and bring up the management console is:
# opscode-manage-ctl reconfigure
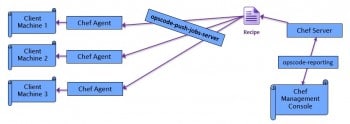
There are two more steps to complete the server installation and one of them is to install the push job service. This is called the opscode-push-jobs-server and it helps to push jobs or actions to the Chef agent machines. Once this is pushed, the agent will pick them up and run the job or action in the respective machines. This is shown in Figure 2. In this screenshot, you will notice a service called opscode-reporting, which serves reporting data to the management console to enable the user to visualise the operations from the server and agents.
Installing opscode-reporting is the last step in setting up Chef Server and can be done by using the following command:
# Chef-server-ctl install opscode-reporting
After installation, run the reconfigure command to configure and bring up the service. This will push the reporting data to the management service and enable its display in the Web UI. This is done by the following commands:
# Chef-server-ctl reconfigure
# opscode-reporting-ctl reconfigure
For each service, we need to run Chef-server-ctl reconfigure as well as the respective service reconfigure. This is to enable reconfiguration in both Chef Server and the respective service.
Preparing the client machine
As we are preparing the Chef set-up in a sandbox environment, we also need to prepare the client environments for the sandbox. While we are not setting up live environments with multiple nodes as agents with multiple machines, we need to set up virtual environments for client installation.
The sandbox environment is a single machine; the client VM can be another VMware image set up in the host machine (windows) or virtual machines on the guest VM (Linux). We have used an RHEL v7 based machine as the host to install the client VM.
Typically, a VM manager is part of the host system. If we didnt select the virtualisation packages while installing the server, we need to install virt-manager manually. To install the package, we can either use the RHELv7 ISO image, or set up the Yum repository by mounting the ISO file or by downloading it from the Red Hat website directly. This installation can be done by running the following command:
#yum install virt-manager
Client VM
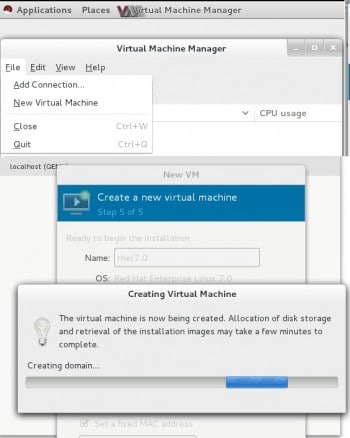
Now, we can run virt-manager (as a sudo user) to install the client VM. Please follow the same steps we did to install the guest OS to prepare this client VM. Also note that we are taking the same guest OS resourceChef Server and related services are running in the guest OS and, hence, use less resources for the client VM to enable enough resources to be available for the guest OS. The installation runs as shown in Figure 3.
Once the installation is over, edit /etc/libvirt/qemu.conf and uncomment the user and group lines. This will enable the root user and root group permissions for virt-manager. If we do not do this, we may face permission issues while accessing the Linux image file when we try to run the client VM. Now start the virtual manager service using the following command:
# service libvirtd restart
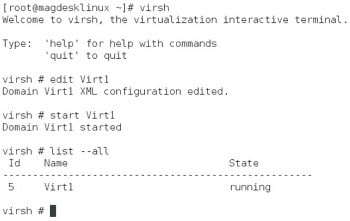
Next, run the virsh command to verify if the client VM has started successfully. This can be done as depicted in Figure 4.
We can also run the client VM from the virt-manager GUI. It is interactive and will guide you through the installation with the given ISO image. After selecting the ISO image, the installation procedure is the same as the installation of the host system as described in our previous article in this series.
Installing the Chef client
The Chef client needs to be installed in the client VM which we created using virt-manager. This process of preparing the Chef client is called bootstrapping. We can install Chef client by downloading it from https://downloads.Chef.io/Chef-client/redhat/.
Then, we need to install a tool called Ohai, which is used to synchronise various attributes to the nodes (client) at the start-up of the Chef client. Ohai collects data attributes from platform details, network usage, memory statistics, CPU usage, kernel health-check, host information including FQDN (fully qualified domain names) and statistical information. The private key created in Chef Server should be copied to all Chef clients so that two-way authentication (a handshake) happens between server (public key) and client (private key) when there is any communication between Chef Server and the client.
To download the certificate key from the server to all connected Chef clients, we need to run the knife command as follows:
#knife ssl fetch
This will download the certificate key from the server to the client in the folder /.Chef/trusted_certs. To verify if key authentication between client and server has been successful, we can run the knife command in the Chef client node as follows:
#knife ssl check
Connecting to host magdesklinux.wipro.com:443 Successfully verified certificates from magdesklinux.wipro.com
Preparing knife
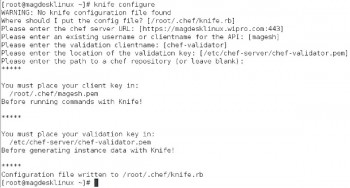
We have prepared Chef Server (on a Linux guest OS) and the Chef client (on a Linux client), so the next step is to prepare the communication channel between server and client. This is done with the configuration of knife, which is the command in the Chef environment to upload cookbooks, create clients, clone configuration between clients, upload and edit roles, and much more. Knife can be prepared by running the command as depicted in Figure 5.
As described in Figure 5, you should place the private key (pem file) in the /etc/Chef-server folder. Once this configuration is done, we can verify that the handshake of keys is happening and the client is configured properly by executing the following command:
#knife client list
Now, when we bring up the Chef client, the following basic steps (also shown in Figure 6) happen in the background during client start-up. Please note that these are major steps in the client start-up, though there are many smaller steps involved in between these steps. This stage is explained in Figure 6.
run_ohai: This is the first step when we start the Chef client, where it loads the configuration data as listed earlier. This is collected for each node of the Chef environment and starts the Chef client.
Authenticate/Register: This step is most important to bring up the Chef client into the secured environment of the Chef set-up. If the authentication is successful through the two-way handshake (public/private key authentication), the client node is registered to the Chef Server so that it is entered into the Chef environment and is available in the reporting UI of the Chef management console.
Load and run node: Here, the configuration is loaded, and the client is authenticated and registered to the Chef Server environment. The next step is to load the node and start the node machine.
Synchronizecookbooks: This synchronises the cookbooks from the Chef Server. The cookbooks are stored in the storage of the Chef Server and loaded into the client machines through the Knife tool (pushed to all client nodes).
After this, the set-up is finalised. This saves the node state and finalises the client set-up. If any of these steps fail, the Chef client moves to start-up run_failed state and stops abnormally. We need to look into the log file to analyse the reason for the failure and fix it.
Now, run runs list to get the list of RUN_ID of the Chef client which is successfully running. This is done by executing the following command:
# knife runs list
From the output of the above command, you can get the RUN_ID of the client and run the show command to get client details. For example:
# knife runs show c40csacd2-6778-122d-45589-3e1c4e55f741
Execution of the above command will display the running information of the client like node name, ID, status, run resources, checksum, permissions, user and other relevant details. With this step, the client is successfully installed, configured and able to communicate with the registered server.

Preparing the reporting facility
Now the client is completely ready, and we need to enable its reporting facility so that reporting data is collected in the server and displayed in the management console. This can be done by editing the client.rb file and setting the option enable_reporting true. At the same time, run the reporting service in Chef Server (Guest OS) as follows:
#opscode-reporting-ctl start
To get some sample reporting scripts written in Ruby, you can download them from the Git repository https://github.com/Chef-cookbooks/Chef-reporting.
Use the git fetch command to download these Ruby scripts and add Chef-reporting::default to client.rb to enable the publishing of reporting data. Theres no problem in introducing Ruby scripts suddenly.
So far, we have looked at how to set up a client VM to install the Chef client, and how to install a Chef client and Chef reporting service. Also, we have learnt the purpose of the knife tool, as well as how to install and configure it. In our next article, we will discuss Ruby scripts and their implications in Chef Cookbook preparation. Also, we will cook up some recipes for Chef configuration, and learn how to do a typical deployment of the application and how Knife is used in the Chef environment.
In subsequent articles in this series, we want to showcase a typical real-time banking/financial infrastructure to show how Chef helps in automating the deployment process with just a single button click, as well as how it helps in resilience and automating scaling of infrastructure to meet customer demands.


